OUR ADVERTISERS

Sunday, March 14, 2010

CHEAP BICYCLE TOOLS


Most bike repairs can be done with regular tools that you can find at the hardware store. Some however are very specialized and specific to certain tasks. For example the chain breaker tool or the pedal crank puller are pretty specific items that any starting mechanic should get.

Tools are not cheap and one source that might get you a bargain are the omni present flea markets and garage sales. Used tools, of any kind, are sometimes of better quality than the newer items and the price is often very decent.

The examples in the picture above are mostly meant for carrying in a saddle bag but I would be confident in using that 50's era tool that is at the bottom of the pic. That tool has everything I need to take apart an old style three piece bottom bracket and cotter pin cranks. The others I grabbed because I collect old bike stuff and I found that the tire spoon part could be practical. I got the whole lot for $6. Yes $2 a piece! Buying all the tools separately to take apart that bottom bracket new would cost over $60 easy.

Keep an eye open for old and used tools at flea markets and garage sales. Look up online for images of bike tools so you know what you are looking for. Chances are the person selling it doesn't know what they have and the price should be more than decent. That is one of the best way to get your hands on cheap bicycle tools.

Good hunting.

Until next time, ride safe and Godspeed.

Gerry :)

Monday, March 08, 2010

CCM Marauder restoration

Snow is melting away and the sun was present all weekend with temperatures above zero. All that is needed to go for a ride. I went in the shed and the only bike not tied up in a knot with all the others was my CCM Marauder.


The ride was nice but the bike is truly falling apart at the seams. Even if it doesn't show up in my pictures, a recent clean up of my shop afforded me some space to start a new project. I have found most of the missing parts for this bike and I was planning to rebuild it, so now is a good time as any to begin the restoration process.

I originally bought the bike for $10 but with the different parts that I got for it, the spend-o-meter now sits at $90. I plan to salvage what I can and use what I already have to avoid any more expenses.

If you want details on how I took this thing apart, just follow one of my older blog here: bikeoverhaul.blogspot.com The information there covers the tear down of the exact same type of bike.

What I do want to share with you are a few tips that can make things easier, especially for when the time comes to rebuild the thing.

Tip number one is to set aside a box that you can dedicate to your build for the loose items big or small. Sounds too obvious, but it can save you a lot of cursing in a near or distant future when you are looking for that elusive, impossible to replace, little thingy part that you absolutely need.

Tip number two is to leave whatever you take apart in some relative state of sub assembly until you are ready to work on that specific part. Example: All the bearings and cones left on the fork or brake calipers with all the attached nuts and bolts.


Tip number three is take a picture! You're about to take something apart for the first time in your entire life? Take a picture of it with all the parts exposed in a few angles and Bingo! You got yourself documentation to save your life when that little gizmo goes "Pop" somewhere in your shop. Most everybody has a camera these days, you just have to discipline yourself to use it.

All these tips will help you even if you are just doing a simple repair job, not just a full restoration. When you come back to your bike after a long work week or a couple of months down the road, all the parts and information will be there, ready to continue from where you left off.

I'll keep you posted on the build.

Until next time, ride safe and Godspeed.

Gerry :)

Tuesday, January 12, 2010

LINK TO FREE BIKE BOOK FIXED


It was reported by a reader that one of the links to my free bike maintenance book was defective. For some reason unknown to me, the file sharing site I was using deleted the file. I've uploaded the file again and also made the copy on dropbox.com publicly available. So with these two and the one on issuu.com that makes 3 copies available at all times.The odds that all 3 vanish in one fell swoop are pretty slim.

You can view or download the book from this post: http://www.howtofixbikes.ca/2009/02/free-bicycle-maintenance-book-its-here.html

Feel free to keep me posted on dead links or missing stuff anytime, it's truly appreciated.

Until next time, ride safe and Godspeed.

Thank you Crystal :)

Gerry

Sunday, January 10, 2010

Easy and cheap brake upgrade


Side pull caliper brakes are just about the worst, performance wise, that you can have on a bike. Apart from expensive quality calipers found on good road bikes, they are found on many mass produced bikes since they are inexpensive to manufacture. Stopping with these brakes will eventually happen but it could be a lot better. If you have steel rims, it's even worst in wet conditions.


Short of having brake bosses welded to your frame for V-type calipers or a disc brake set-up, your options are limited. It could be cheaper to replace the entire bike. But if you want to keep your current bike, you have another option. You can purchase inexpensive brake pads for V-type brake calipers for around $10 and install them on your existing calipers. The extra surface on the pads will give you more grip and help you stop a bit faster, simple physics. If you decide to spend more money on better pads, then do so. The better pads do work better, I highly recommend Koolstop for having used them often with great results. If you have steel rims, I urge you to replace them with alloy ones to get better braking power in wet condition, unless you live in the desert then kindly disregard my last comment.

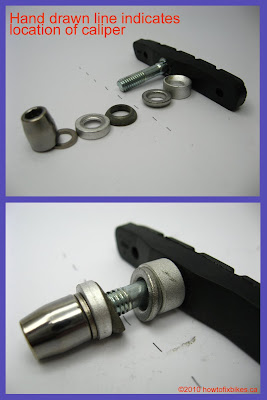
I've also provided a close up shot of the pad with the myriad of washers in the proper order. Odds are at least one of you will take everything apart without noting the proper order. It's ok, we've all done it at least once! To find out how to adjust the brakes, please consult my previous article on the subject here: http://www.howtofixbikes.ca/2006/07/by-popular-demand-adjusting-brakes-yes.html


Until next time, ride safe and Godspeed

Gerry :)

Thursday, December 24, 2009

Merry Christmas and Happy New Year


Happy Holidays wherever you are on this planet. I wish you all a safe and prosperous New Year and I'm looking forward to keep on hearing from you throughout the coming year.

Gerry :)