
Here's a video I did on how to use a chaintool to take apart or reassemble your bicycle chain. For more info on the chaintool or chain, check out the original post linked below the video. Have fun and ride safe.
If for some reason the video below doesn't work, you can watch direct from YouTube by clicking this link.
Original bicycle chain repair how-to article
Gerry
Thursday, August 31, 2006
Sunday, August 27, 2006
HOW TO BUILD A CHEAP BUT GOOD BICYCLE TRAILER
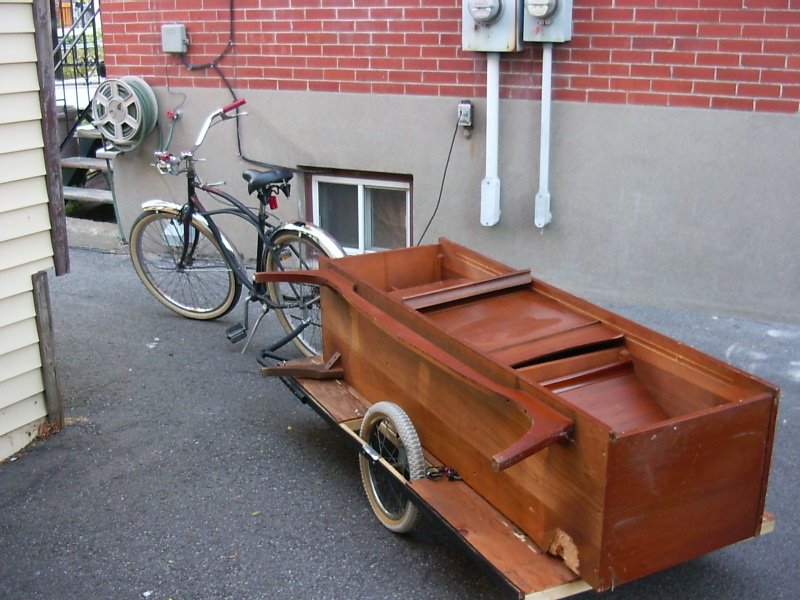
A little while ago I built a big cargo trailer so I could carry big and heavy loads. Th experience was succesful, but the trailer is a bit too big for everyday use like getting groceries. So I decided to build a smaller one with a built-in carrying box to avoid dirtying my groceries or whatever stuff I wanted to carry. Here you will find a complete how to article on how I did this, except for the hitch. The details for the hitch construction can be found on the big trailer build.
My first idea was to build this from broken hockey sticks. New lumber is always green and it never comes out straight. Hockey sticks are always straight, strong and broken ones can usually be found for free. But no luck in finding hockey sticks at this time of the year, but I did find a baby crib in the trash and that would do just fine. It also came with a board to cover the frame, bonus! I also found a kids bike with 14 inch wheels and tires in the trash and an old abroller to make the trailer arm. Broken dreams of easy perfect sixpack abs would now be transformed into sexy strong leg muscles! I salvaged parts from the bike as well that can be used on full size bikes, a sidepull brake caliper and pads, brake cable and housing, chain, a headset washer for my CCM Galaxie project, a bell, various nuts and bolts.
Second, I screwed the frame

Third, take some electrical box cover plates to make wheel mounts. Cut them in half. Drill a hole and then with a hacksaw, cut a channel for the axle to go in. I made one a little higher than the other to allow for some camber in the wheels(The wheels tilt inward if you look at the trailer from the front or back). This makes the trailer more stable. Mark your plates "inside" "outside" so you don't mix them up during assembly. Mark the middle of the frame and the middle of the plates. Drill some holes and bolt the plates to the frame. Put on your wheels and make sure that they are both parallel and straight to the frame. Take off the wheels and paint the frame.

Fourth, reinstall the wheels and make your trailer arm. I used an old abroller, but any piece of steel or aluminium tubing properly bent will do. The distance between the trailer and the hitch attachment should be 16 inches, I have a 26 inch wheel bike . I screwed in a piece of wood to the frame to elevate the arm to the proper height and then screwed in the arm in that piece thinking it would be strong enough...WRONG! At the first test ride, I almost lost my trailer into rush hour traffic, I had put in a safety strap just in case and that saved the day. I went back and drilled two holes through the arm, wood spacer and the frame. I used two front wheel axles to bolt everything solidly together. I ignored my first rule of homebuilt vehicles: When in doubt, ALWAYS OVERBUILD!
Fifth, Screw in the carrying box to the frame and use some washers. I bolted the box at 6 places. I also added a small tool box in the front to carry my lock and bungee cords in the same fashion. Leave some space between the tool box and the main carrying box so you'll be able to open its cover. Screw in some hooks around the frame so you can attach bungee cords to lock the lid in place or to strap down extra stuff carried on top of the box. Install a reflector on the back of the box or a light if you plan on using it at night. Pin to your bike and go get stuff.


The first grocery run
I used the trailer on the very first day. I went out to get $60 worth of groceries about 3km away. I used to go and get whatever I could carry in one bag or on my rear rack, which is not much. People where looking at me funny when I came out of the store and headed for the bicycle stands with my grocery cart! I had bought the following:
- 2X 2 litres of Diet Pepsi
- 1X 4 litres of milk in three bags
- 1X 1 litre of skimmed milk
- 1X 1 box of 8 frozen hamburger patties
- 5X Packages of various cold cuts
- 4X Cooked 3 pieces fried chicken meals with coleslaw, fries and sauce.
- 12X hamburger buns
- 12X hotdog sausages
- 12X hot dog buns
All of this fitted inside the box without any problem. I had some doubts when I started unloading my cart at the check out counter, but my doubts were squashed soon enough.
I carried this home with no problems and I felt great. I'm happy with my new toy and I hope you build and enjoy one yourself.
-Lumber = free
-Wheels = free
-Steel tubing = free
-Hardware = $8
-Box = $8
-Leaving the gaz guzzling, money pit, breaks at the worst possible time minivan at home for getting stuff I need = priceless!
'Til next time, keep your hands dirty and Godspeed.
Gerry
My first idea was to build this from broken hockey sticks. New lumber is always green and it never comes out straight. Hockey sticks are always straight, strong and broken ones can usually be found for free. But no luck in finding hockey sticks at this time of the year, but I did find a baby crib in the trash and that would do just fine. It also came with a board to cover the frame, bonus! I also found a kids bike with 14 inch wheels and tires in the trash and an old abroller to make the trailer arm. Broken dreams of easy perfect sixpack abs would now be transformed into sexy strong leg muscles! I salvaged parts from the bike as well that can be used on full size bikes, a sidepull brake caliper and pads, brake cable and housing, chain, a headset washer for my CCM Galaxie project, a bell, various nuts and bolts.
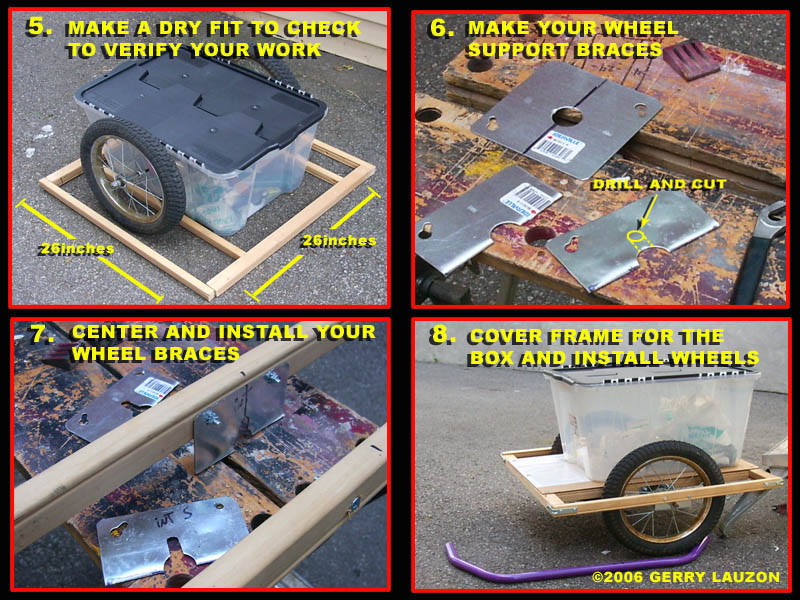
First I dismantled the crib bottom to salvage the lumber and board. I cut everything to size for my use. The trailer measures 26 inches by 26 inches. Since I was using a front and rear wheel, the gap between the outside and inner side was different. Take your measurements from the wheels you'll be using and make the frame accordingly.
Second, I screwed the frame

Third, take some electrical box cover plates to make wheel mounts. Cut them in half. Drill a hole and then with a hacksaw, cut a channel for the axle to go in. I made one a little higher than the other to allow for some camber in the wheels(The wheels tilt inward if you look at the trailer from the front or back). This makes the trailer more stable. Mark your plates "inside" "outside" so you don't mix them up during assembly. Mark the middle of the frame and the middle of the plates. Drill some holes and bolt the plates to the frame. Put on your wheels and make sure that they are both parallel and straight to the frame. Take off the wheels and paint the frame.

Fourth, reinstall the wheels and make your trailer arm. I used an old abroller, but any piece of steel or aluminium tubing properly bent will do. The distance between the trailer and the hitch attachment should be 16 inches, I have a 26 inch wheel bike . I screwed in a piece of wood to the frame to elevate the arm to the proper height and then screwed in the arm in that piece thinking it would be strong enough...WRONG! At the first test ride, I almost lost my trailer into rush hour traffic, I had put in a safety strap just in case and that saved the day. I went back and drilled two holes through the arm, wood spacer and the frame. I used two front wheel axles to bolt everything solidly together. I ignored my first rule of homebuilt vehicles: When in doubt, ALWAYS OVERBUILD!
Fifth, Screw in the carrying box to the frame and use some washers. I bolted the box at 6 places. I also added a small tool box in the front to carry my lock and bungee cords in the same fashion. Leave some space between the tool box and the main carrying box so you'll be able to open its cover. Screw in some hooks around the frame so you can attach bungee cords to lock the lid in place or to strap down extra stuff carried on top of the box. Install a reflector on the back of the box or a light if you plan on using it at night. Pin to your bike and go get stuff.


The first grocery run
I used the trailer on the very first day. I went out to get $60 worth of groceries about 3km away. I used to go and get whatever I could carry in one bag or on my rear rack, which is not much. People where looking at me funny when I came out of the store and headed for the bicycle stands with my grocery cart! I had bought the following:
- 2X 2 litres of Diet Pepsi
- 1X 4 litres of milk in three bags
- 1X 1 litre of skimmed milk
- 1X 1 box of 8 frozen hamburger patties
- 5X Packages of various cold cuts
- 4X Cooked 3 pieces fried chicken meals with coleslaw, fries and sauce.
- 12X hamburger buns
- 12X hotdog sausages
- 12X hot dog buns
All of this fitted inside the box without any problem. I had some doubts when I started unloading my cart at the check out counter, but my doubts were squashed soon enough.
I carried this home with no problems and I felt great. I'm happy with my new toy and I hope you build and enjoy one yourself.
-Lumber = free
-Wheels = free
-Steel tubing = free
-Hardware = $8
-Box = $8
-Leaving the gaz guzzling, money pit, breaks at the worst possible time minivan at home for getting stuff I need = priceless!
'Til next time, keep your hands dirty and Godspeed.
Gerry
Saturday, August 26, 2006
HOW TO BUILD A BIG CARGO TRAILER, TRAILER IN USE
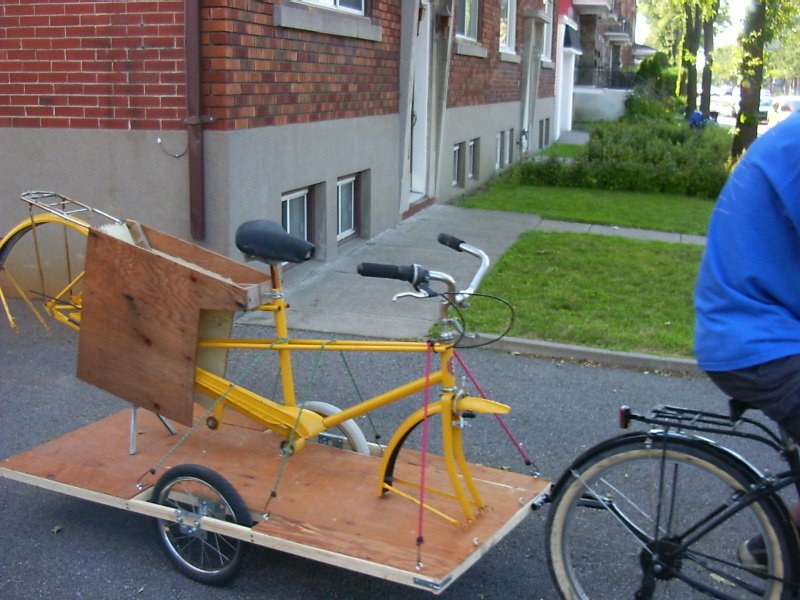
Just an update for the Big El Cheapo Bicycle Cargo Trailer. It's fun to show you how to build a trailer, but it's also fun to show you how it's used. Here we have two pictures of the trailer in use, the first image was a test. I carried the tandem bike frame just to see if the trailer could do the job. The second image, the trailer is actually working hard. I was testing the small grocery cargo trailer when I found this big piece of furniture by the side of the road. I rushed back home and pinned the big trailer on the cruiser and went back for it. The load was so well distributed that the hitch was not affected at all by the heavy load. I pedaled using only the two lowest gears and it went pretty good.
In the image, you see the bike being supported only by it's standard kickstand.
If you want to build a small grocery getter trailer for your bike, check out my new build article on the subject.
Til next time, ride safe.
Gerry
Wednesday, August 23, 2006
HOW TO REPAINT YOUR BICYCLE
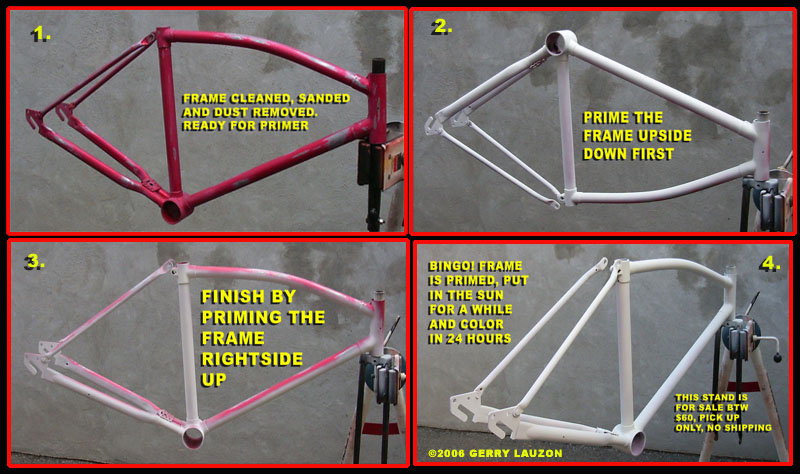
I am repainting and rebuilding a vintage CCM on my other blog: Great Canadian Bike Overhaul. If you want to know how to repaint your bicycle, you can view the articles linked below with all the information regarding this task. The bicycle is presently in the primer stage. Color and clear coat will follow within the week, weather permitting(I have to work outdoors).
Sunday, August 20, 2006
HOW TO PREVENT BICYCLE THEFT
Bicycle theft is rampant in major cities and suburbs. Nothing stands in the way of a determined scumbag who wants to grab your ride away from you. But, there are some steps you can do to prevent that.
AT HOME
Your main objective is to make life hard for any thief who wants to steal your stead. May it be at home or when your bike is left by itself somewhere else. Let's start with home shall we? I've heard of determined thieves who took off with a bike that was left on a third balcony with no stairs, so read on if you think that your ride is safe at home. If you have a bike of any value, you should never leave it outside for extended periods of time. In urban areas that is just not possible. Forget about taping up your frame to mask it's make and model. Thieves know what they are looking for and they will make your bike if it's worth a bunch of cash. If you can't let your baby sleep indoors and it has to stay in a shed or storage locker, make sure that the storage space is properly locked AND properly lock the bike itself. Hide it from prying eyes as well, no need to advertise that you have an expensive ride waiting to be snatched up.
LOCKS
On the subject of locks, what you pay is what you get. If you spend a few bucks to lock up your $1 000 bike, it will disapear. Especially if the bike is left out of sight for more than an hour. My lock is a basic no name U-Lock, but I never leave my cruiser alone for more than 30 minutes. If you need to leave your bike somewhere, get a decent lock. Better yet, get a real trash bike just for your day to day stuff and use the nice one when you know you won't have to leave it for long. Your heart won't break as hard. Gauge how much you want to spend with the value of the bike, regular cheap chain and padlocks are useless.
LEAVING YOUR BIKE OUT THERE
Thieves need privacy, an easy target that won't take them a long time to get and won't attract attention. The worst possible place to lock a bike is with other bikes in those big public racks. Would you question anywone fiddling with a lock at a rack? Of course not, he's probably some guy having trouble with his lock, right? WRONG, he's breaking the lock and nobody will give him a second glance. He's done this many times and it won't be is last. Big public racks are like the bike section at Walmart for thieves. I've even seen a lady get her 3 speed roadster with a wicker basket get ripped off in one of these. You are better off locking it by itself elsewhere in plain sight for everybody to see. But be careful, don't use a tree, they cut them(Yes they do, seen it with my own eyes.) and if you use a pole, make sure it's solidely in place and not bolted. Some poles are sometimes loosened ahead of time by thieves just for that purpose. The best one I've seen yet was a rider who locked the bike on the library's flag pole, talk about being in plain sight!
THE TOOLS AND TACTICS OF THE BAD GUYS
Thieves use specialty tools for their dirty work. They use shortened bolt cutters that are easy to hide inside jackets, they use modified car jacks to pry U-Locks, they use some type of spray to freeze and then break the lock with a hammer. They also use your lack of attention, your laziness or wishfull thinking that nothing is going to happen while you're in the store for 2 minutes and your bike is left unlocked. In those cases, all they need is their bare hands. Remember, thieves are predators and predators always go for easy targets. That's on top of the fact that they not only stole your property, but they now have an instant getaway vehicle.
MAKE THEIR LIFE HELL
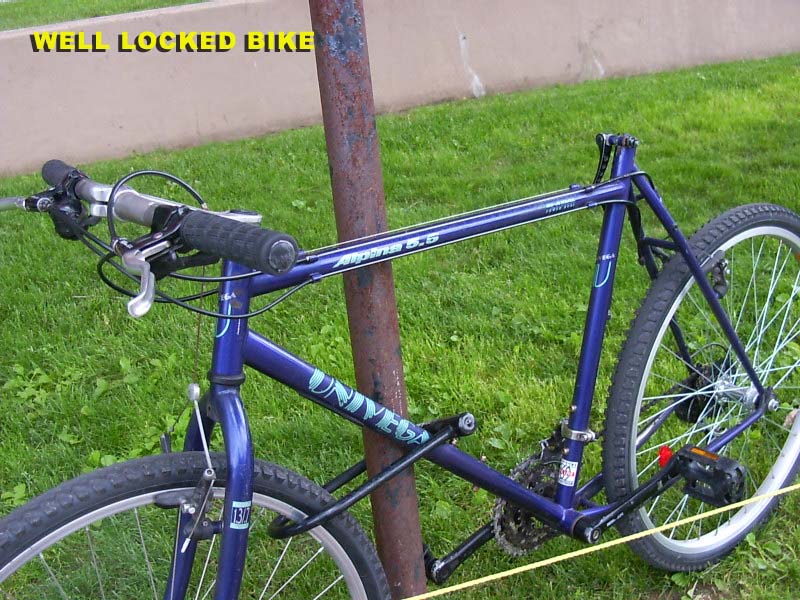
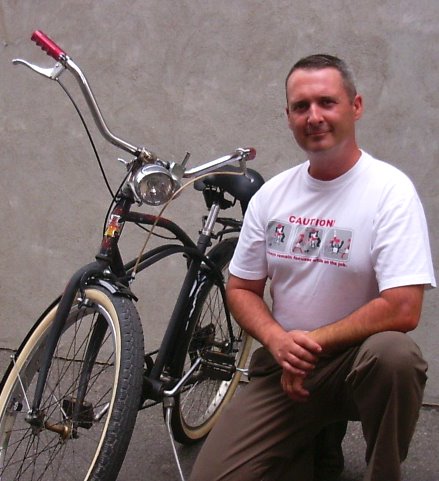
Having a good lock is not the only answer to bike theft prevention. Using it properly needs to be adressed as well. The space inside a U type lock needs to be packed with all the bike you can. This will prevent them from inserting the jack tool. Point the keyhole downwards, it is a lot harder to wack it with a hammer this way. Take off whatever is removable by hand, seats and wheels with quick release are just begging to be stolen. The worst I've seen was a brand new bike with an expensive lock. It was parked in a public rack at a train station. The U-Lock was passed in the rack and inside two spokes, of the front wheel, which was equiped with a quick release and still on the fork! When I came back, sure enough it was gone except for the front wheel. If the thieves had a decent wire cutter, they could have made off with the entire bike, minus two spokes that could have been replaced for a few dollars. They didn't bother, easy target. Another thing you can do is to sabotage your ride. The only drawback is that you have to remember to deactivate them before you ride off yourself. One way is to upshift all of your gears once you are stopped and locking up. There is a chance that the chain might break off when the bum makes his getaway and he might just leave it. The picture at the top of the post shows a well locked bike. It is locked on a pole that is cemented in the ground, it is in plain view, the seat was removed and the lock is pretty full.
Whatever you do, if someone absolutely wants to rip off your ride, they will. Just make sure that you do your part and take every possible precaution. Even though bike theft is not on top of the list of crimes for most Police Departments, take the time to register it and keep the registration paper in a safe place. You will know your bike's serial number and it will be easier to claim if it is ever found(It does happen sometimes). Another thing you should do, is to make a copy of that paper and insert it inside the handlebars, you can prove your ownership without question that way.
Here's a great video on bike theft prevention and how to know the enemy.
Until next time, ride safe and Godspeed
Gerry
Footnote
THE BLACK BIKE PROJECT
In June of 2004 I had a brilliant idea. A friend gave me a 3 speed roadster he had found in the trash knowing that I fixed up bikes and that I might use it for something.
I use to live in the western suburbs of Montreal and bringing a bike downtown was a pain. I painted the entire bike(except for the seat) flat black and made it rideable with whatever used parts I had. I brought it downtown and locked it up in plain sight on a busy street in front of a restaurant for future use, in a small city rack. I used a cheap U type lock that I had and made sure to fill it up.
2 weeks later it was still there and I managed to use it. I didn't go in the city for another 3 weeks after that. I was actually driving downtown for business and found the bike still there, but the seat was missing. By the end of August, I saw it again and this time the rear wheel was bent. At this point I figured I would leave it there just to see what would happen(I'm sure the restaurant owner wasn't too happy about that.).
The last time I saw it was in late september, the front wheel was gone(It wasn't locked with the rest of the bike), the frame was now bent, but the lock was still holding firm. The city workers finally chopped the lock off and tossed the bike at the end of October when they put away the bike racks. Just goes to show that a properly used lock, even a cheap one, can do a good job(I know the bike was trashed, but it was still there!).
Thursday, August 17, 2006
HOMEBUILT STREET LEGAL STREET LUGE WITH BRAKES

I know what you're saying:"What is this doing in a bicycle blog?". Well, what you are looking at, according to the province of Quebec Highway Safety Code, is a bicycle. Ok, let's start from the beginning.
Back in the late seventies, I was a skateboarder. I would find the biggest hill I could and bomb down that thing as fast as I could. I didn't do tricks or flips. I was a gravity junky. 10 years and some common sense later, I wasn't skateboarding anymore but I saw this street luge on TV andthought it was awsome. The main drawback is that it was missing something that I cherished after a few scary accidents, mainly brakes. I put the idea aside for a possible future maybe project...
...until 3 years ago. I don't remember if it came to me while on the can or in the shower but I was thinking to myself that if I built a street luge, not only should it have brakes, but it should be street legal to avoid any hassles from the law. Street luges are considered as skateboards here and a skateboard is illegal on public roads. But not bikes,hmmmmmmmm.
So I did what any good lawyer would do(No, I am not a lawyer)and I read the definition of a bicycle in the Highway Safety Code. It said something like this: A bicycle should have at least one brake, if there is only one brake it should be on the rear wheel. A bicycle must have a red reflector in the rear, a white in the front and yellow in the wheels. That's it, no mention if it should be 2, 3 or 4 wheels, gravity or pedal powered and no definition of the steering mechanism. My plan came to be.
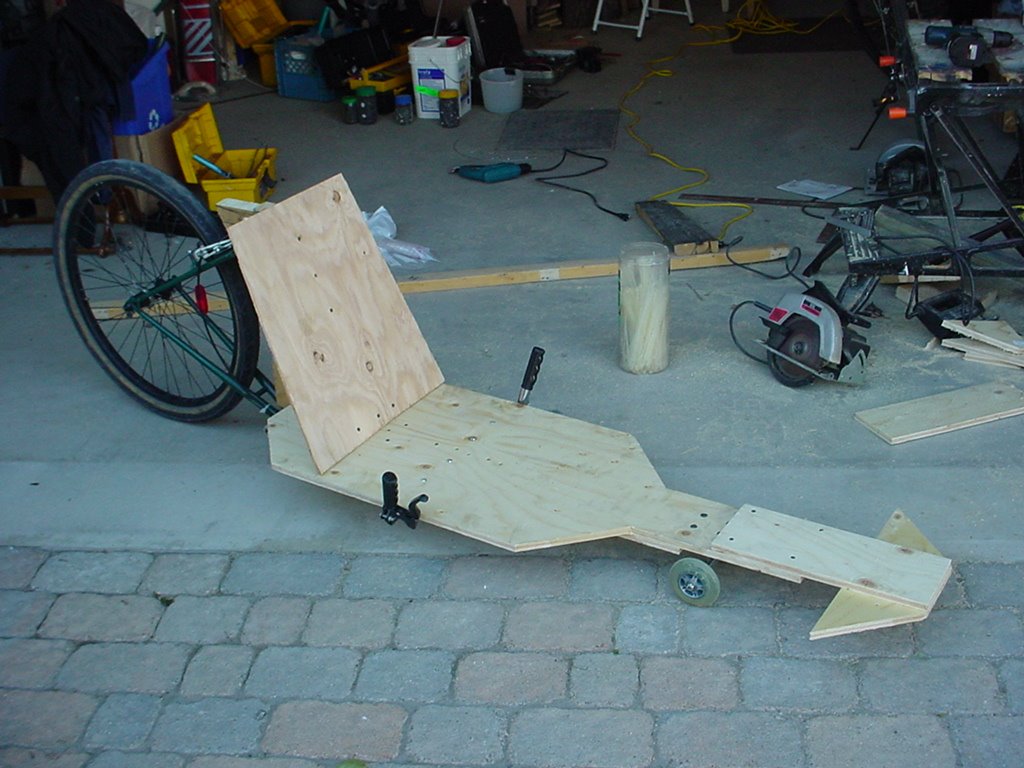
I took a rear triangle from an old mountain bike equipped with brake pivots on the frame. I connected the triangle on a wood frame that I built myself from plywood and 2X4's. I slapped on a longboard truck in the front with a pair of rollerblade wheels. I bolted some handlebars to the sides to hold the brake handle and slapped on a high pressure slick on the rim of the rear wheel and tried my luck.
My friend Bob helped me put the whole thing together(He had the decent power tools and garage)and we tested the thing on a small hill to begin, his driveway. After all, even though I was pretty sure that it was going to work, I had no existing material to refer to, so small steps. IT WORKED! You would lean and it would steer, wow! So being all happy with our success, we parked the thing, bought some paint, slapped some reflectors as per the regulations, figured out where we would do our first run and I had to take care of one last detail.
I had to seal the deal on my legal twist. I went to my city hall and bought a bicycle license for the luge. I used the serial number on the donor bike's bottom bracket and registered it has a "Lauzon Cycle" Model"008". This being my eight build. I installed the plate on the luge and inserted the registration papers in my wallet. This would cover all the legal angles. Even if I was issued a ticket after informing the officer that it was in fact a bicycle with documents to prove it, a judge would toss the case out with a registration that was recorded prior to the infraction. This actually came in handy on one test run when the local constabulary questionned what "that" was and I produced the paperwork while pointing to the plate. "Have fun" was all he said while scratching is head before he left.
Our first run involved myself, my friend Bob and my son. We chose a nice easy hill with a bike path and we clocked 40 km/h. The luge was steady with no shakes. Actually, the faster it went, the more stable it was. We then took it to a freshly paved back road in the mountains and clocked 45km/h. At 3.5 inches from the ground that's starting to be pretty fast. I went nuts and decided to try it on the main road.
"Are you nuts!" was the phrase I heard from Bob. I said"No man, look there is a good 30 second delay between cars. You follow me with the van and everything will be cool." In retrospect, it was pretty stupid. But I guess my guardian angel was working overtime and the road conditons were pretty crappy anyway. No decent speed could be reached and I pulled off the road pretty quick to the relief of my best buddy.
During those first experiments, we found that the brakes were working good. Actually, too good! They would lock up the wheel fast and we would end up with no stopping power. My son left a 40 foot brake mark on the pavement and a huge flat spot on the tire trying to avoid ditching in a river, jamming the brakes immediately after a loss of control. We learned there that braking with your feet was not out of the question and the rear brakes could help us slow down at best. My son found the whole thing quite funny, I was happy he came out of it in one piece and waited at least 3 weeks before sharing the story with my wife. Kids need danger in their life or they'll always be afraid of everything.
With all this new knowledge, practice, gained courage, some old clothes, old shoes and a definite need for more speed, we headed for the killer hill. A 1/4 mile, 45 degree monster with a bike path right next to it that we could run on. I had my old airforce helmet rigged to work with a couple of talkabout radios, since the rider needed info from a spotter halfway for incoming traffic report. We managed to break the 60km/h barrier. That was my goal in the beginning of this project and we made it, all three of us. My son did 60.5km/h, I did 63km/h and Bob holds the record at 65km/h. We managed at least 5 runs each that day. I'm sure your not impressed with speeds that represent about 38 mph. But remember, this was done with gravity power alone, with a thing that was slapped together with a trash bike, some 2X4's and plywood in about an afternoon. At the end of that day we realized that we managed to push the enveloppe and survive with all of our parts intact. I was starting to get scared and so were my partners in crime.
We decided then and there to quit while we were ahead and avoid a possible guided tour of our local trauma center. The luge was retired and put away until it was time for me to move. Having no space in my new home to store it, I had stripped it of it's parts and put it on the curb. Funny thing, 1 hour later a kid passed by and saw it. I happened to be in the front yard at the time. He told me that he heard about this thing and since I was getting ride of it, could he have it. I told him how it worked, what parts to get, light a candle at his favorite church and point it down a hill. The kid was happy and left with the luge. I saw him 6 months later and he was still in one piece and having a blast with it.
BUILDING THE LUGE(Take note that this luge is NOT race legal)
WARNING! This thing is dangerous. If you build one and hurt or kill yourself, that's not my problem. I'll give you here the basic steps on how to build one. If you can't figured it out from these instructions, then you shouldn't be riding one, period. The luge was never taken on winding roads with curves, so I have no idea how it handles. It was always taken down straight hills. The brakes don't work that great. They slow you done or lock up, maybe disc brakes would work better, but I don't know that for a fact. Be prepared to brake with your feet. Wear leather gloves, old clothes and for God's sake wear a crash helmet. Never ride down hills with vehicle traffic, there's just no time to stop, trust me on that one.
You need some good thick plywood, some 2X3's or 2X4's, wood screws, a rear bike triangle, rear bike wheel with a slick tire, a longboard truck, soft longboard wheels(don't use rollerblade wheels like I did, bad, bad, bad), 9000lbs test wood glue, bike handlebars, two left aluminium crank arms, 2 rear wheel axles, nuts and bolts and 2 steel plates.
Cut up the bike to keep the rear triangle intact. You'll need a bike with a three piece bottom bracket. Leave the pedal axle in, you'll need that later. Construct the frame of the luge by using the 2X4's as your basic vertical frame. Sandwich your vertical frame with plywood by gluing then screwing it in with the wood screws. Drill two extra holes in the crank arms at the same spot. Bolt both of them on the pedal axle with both of them in the same position. Align them at the base of your wood frame at the back, drill holes through so you can bolt the crank arms to the wood frame with the axle rod and bolts. You will have to add sections of 2X4's between the cranks and the wood frame to fill the gap. Tightened everything as hard as you can. With some steel plates, nuts and bolts, sandwich the bike and wood frame together at the top.
Now you can put in the floor and backrest using the plywood. Put in the truck and wheels. One thing that you don't see on the photograph, that was added later for strenght, is another piece of 2X4 that was installed on top over the truck to make like a bridge. There is a gap in the frame underneath to install the longboard truck. Glue and screw that piece in. Install the brakes and handlebars.
If you're insane enough to build this and try it out, make sure you start small and where there is no traffic. Check every screw and bolt after each run. The vibrations will take this thing apart fast, I know this from personnal experience. Walk whatever hill you decide to go down of before hand so you can register obstacles and clean up debris. Don't do this alone or more than 20 minutes away from mediacl help. This Wyle E. Coyote contraption is just asking to hurt you. For those of you out there who are responsible enough to create and ride something like this, have fun and Godspeed.
Remember: When in doubt, OVERBUILD.
Gerry
Notice: In spite of my Red Green outfit in the picture above, no duct tape was used or harmed in the making of this project.
Monday, August 14, 2006
CHEAP AND INEXPENSIVE RECUMBENT: RENT, USED OR THE HOMEBUILT WAY
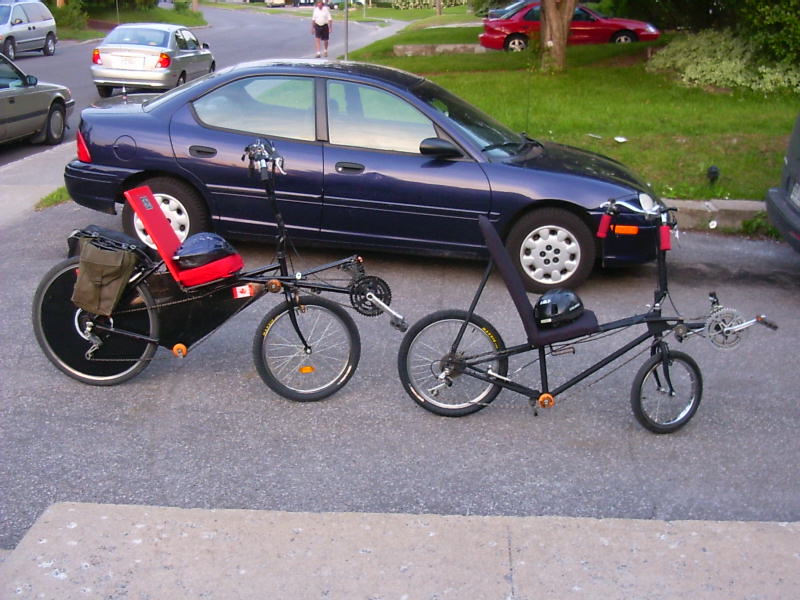
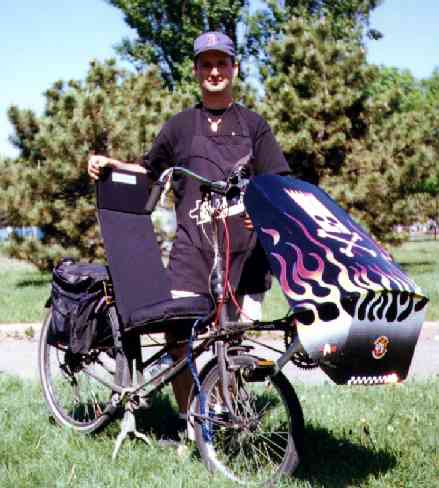
I have received some request about making a how-to article about building a recumbent. I intend to build one just for this blog, but it will take a little time and I have more general information to give out before I do this. This post is a primer to get you started and guide you in the right direction until that article is created. Here you have two pictures of recumbents I built myself. The one with the flame job is the first one and the two others are my last builds. Four more recumbents where built between those and I actually bought a manufactured one. I might not be a recumbent guru, but I know what I'm talking about. So let's get started.
Many of you are caressing the dream of owning a recumbent, but you wonder if it is worth the extra expense. Your first step is to get all the information you can on the subject. Get educated on terms and what a recumbent is all about. The very first search I did when I first got connected on the web was "recumbent bicycle" and it went crazy from there. At last I had access to all the information I could possibly want on the subject. A lot more than a few scenes in the movie "Scanners".
The one thing that struck me was the variety present out there. Long Wheel Base(LWB), Short Wheel Base(SWB), Over Seat Steering(OSS), Under Seat Steering(USS), Front Wheel Drive(FWD), streamliners, trikes and all other kinds of craziness in between. Everyday there is a company or a homebuilder who adds to this wild variety of bikes.
Recumbents have the advantage of a more powerful pedal stroke and a more comfortable seating position. The seating position utilizes more muscles in the legs. It is the same power you have from pushing something with your legs while sitting with your back against a wall. As for the seating position, well you are sitting down on a chair, you can't get more comfortable than that! Well actually, you can. One disadvantage of sitting down in a chair is that you can't get up to avoid the hits from bumps and holes in the road and you can't get up on the pedals to use your upper body strenght to climb hills.
Two solutions for these drawbacks: 1-Rear suspension will take care of most bumps and make for an even more comfortable ride. 2- Lots of gears and more mileage in the recumbent position will developp those dormant muscles in your legs and with time, hills won't be that much harder. Bottom line is that recumbents are better for long rides since you won't kill your butt, hands and neck during the ride. My biggest kick about riding a recumbent is to lean down at 45 degrees on a hard and fast turn while sitting down in that comfy chair/seat. What a blast, it feels like riding a fighter jet at 10 inches off the ground. Trust me, it's just awsome.
To get on a recumbent on the cheap is not easy. You have a few options.
- Get on the net, get out your tools and build one. There are all kinds of homebuilt recumbents on the net. From wood framed bents made from 2X4's, to no-weld construction and full carbon composites. You don't know how to weld, no big deal. Prepare your pieces and hire a welder. This the 21st century dude, outsource it!
- Rent it, there are some bike shops out there who offer recumbents for rent. If you are lucky enough to have access to such a place, use the opportunity to try out different kinds to find out what you like best.
- Buy used, some people out there have bought the wrong bike for them and are desperately trying to get rid of them. These bikes are not for everybody and finding a buyer is sometimes hard. There are also people who end up in possession of a recumbent without knowing their true value. It's rare, but it happens. Go hunting for your lucky break.
Now if you are ready, it's time to explore. I'm leaving you with some links that will get you started. Recumbent and HPV people are very friendly and eager to share there knowledge. Ask questions if you don't find the answers you are seeking, join discussion forums and get your hands dirty! Warning, homebuilding HPV's is addictive, that's it you've been warned. It's now out of my hands.
Check out these sites for a good start:
www.recumbents.com
www.ihpva.org
www.wisil.recumbents.com
www.ihpva.org
www.wisil.recumbents.com
wooden recumbent,
homebuilt trikes
My bikes on flickr.com
www.atomiczombie.com
homebuilt trikes
My bikes on flickr.com
www.atomiczombie.com
Until next time, ride safe and Godspeed.
Gerry
Gerry
Sunday, August 13, 2006
HOW TO START YOUR OWN BICYCLE REPAIR BUSINESS

Bikes have been around for over a hundred years. More bikes are produced in the world every year than cars. A bike makes you 21 times more efficient covering a mile than on foot. A bike is cheap to maintain and operate. Unlike an automobile, you own it, it doesn't own you. Depending on where you live on this earth and your income a bike is either a toy, a recreation device, a transportation vehicle or a tool. With the recent price hike in fuel, bikes are not about to vanish from the transportation map.
All this means is that there will always be a need for people to repair them. Bicycle repair is simple and doesn't require heavy tools, machinery or a large working space. It does however require knowledge, a few specialized tools and a passion for biking. This article is long and you might want to refer to it again. Feel free to bookmark it for later consultation or print a hard copy.
GATHER INTELLIGENCE
Before you start, you need to get solid information. If your lucky enough to have access to a local trade school or community program that will teach you to be a bike mechanic, great! Jump in with both feet, watch and learn. If not, the other way is to teach yourself. First thing you have to do is to get a good technical manual on the subject. I mean a bonifide real hardcopy that you can leave on your workbench for quick reference. Spend the money, in the long run you will see that it's a wise investment. You can read how to fix bikes on the web, but nothing beats a good solid manual that is divided in easy to look up chapters. Even this blog is not complete enough to learn to become a mechanic, I've yet to start on 1/4 of the material that's needed.
Learn to build wheels. No bike mechanic is truly a real bike mechanic without this skill in my opinion. You have to learn this from someone who will sit down with you and explain the process. There are also some great tutorials about wheel building on the web. I had the chance to have both and thru the years I have managed to become a decent wheel builder. Noting is more relaxing for me than to sit down and lace up a new wheel. This is the ultimate craft that you MUST learn. After building a few wheels, aligning them will become very easy.
Lastly, keep informed on the new trends by reading bike magazines on a regular basis. I need to brush up on this myself.
TOOLS OF THE TRADE
You'll need some basic tools like metric size open wrenches, tire spoons, chain breaker tool, a good tire pump with pressure gauge, spoke wrench, a complete set of allen keys, screwdrivers, ratchet set with size 9 to 17mm, wire cutters, adjustable pliers, flat bearing cone wrenches, crank arm pulley tool, a work stand and a trueing stand for wheels. I'm probably missing some stuff, but as you go along in your jedi bike mechanic quest, you'll learn to buy what you need. This list is a good start.
PRACTICE PRACTICE PRACTICE
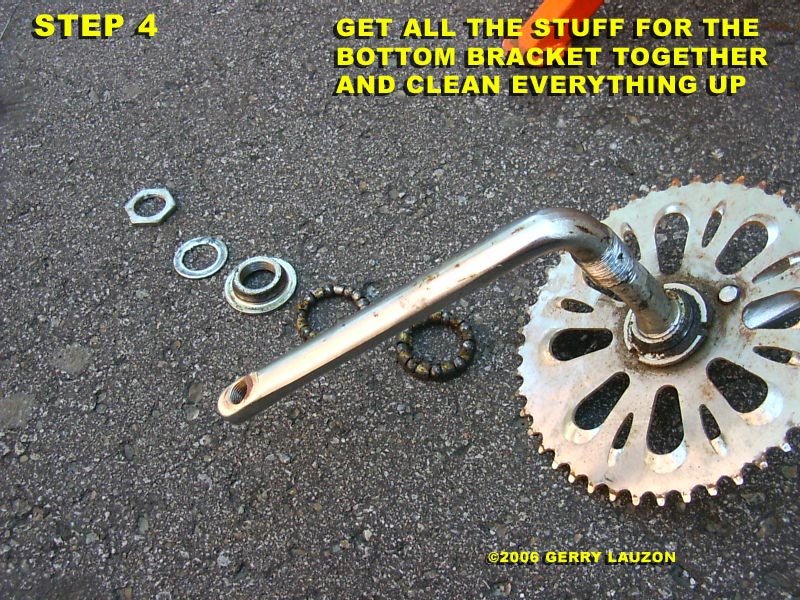
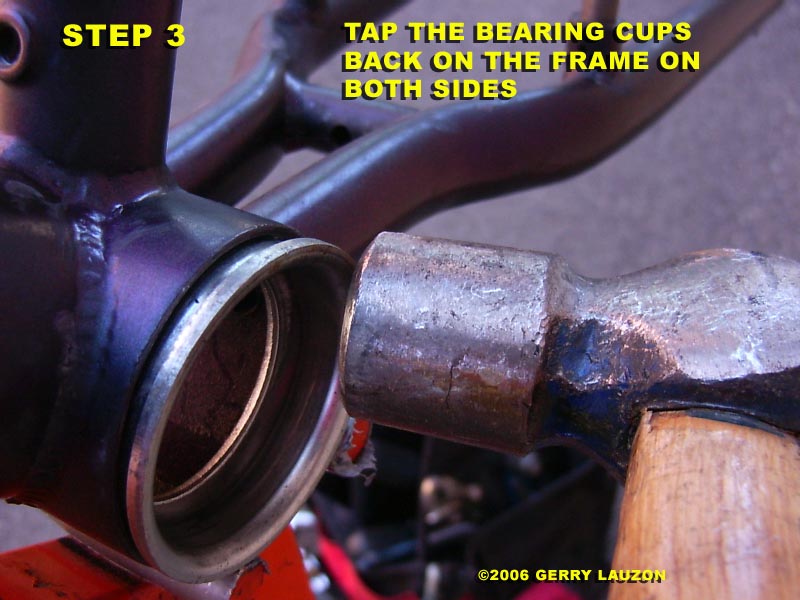
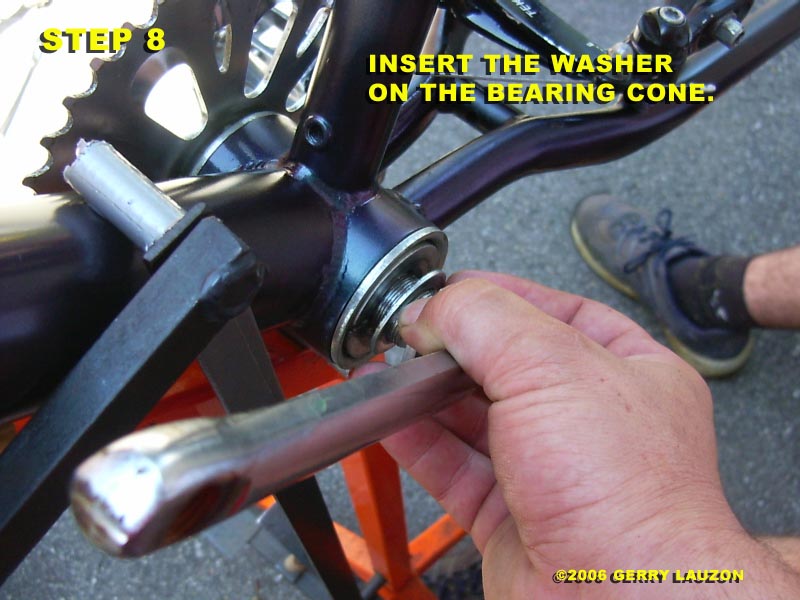
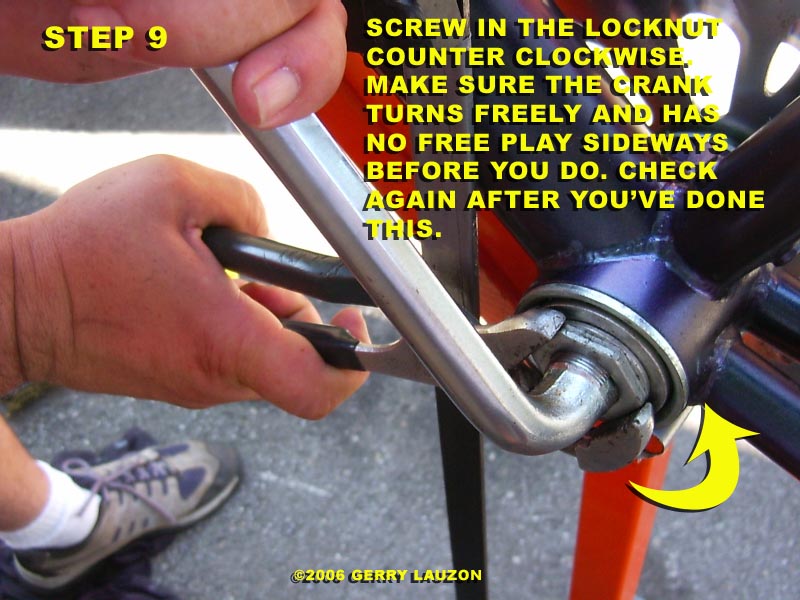
Now before you go out in the world helping people out by fixing their bikes, there is one thing that every newbie mechanic must do: Take your own bicycle apart to the bare frame, regrease every single bearing in it and put it back together. I don't mean just taking off the wheels and putting them back on. I mean to the bare frame, totally naked with just the paint and stickers. If you can do that and safely ride your bike again after you've rebuilt it, you'll know if you have the ability or not. It won't mean that your good yet, but that you do know what you're doing.
Next thing you'll have to do is to find some donor bikes for parts. Anything is good when salvaging for parts. Many bearings, cranks, brake calipers and chains, to name a few, are common to many kinds of bikes. Never overlook a carcass that you can get your hands on for free, you can always use something on it. Taking apart these donor bikes will do two things for you: You will learn how different types of bikes are put together and you will make yourself a decent supply of spare parts. Don't kid yourself, you probably won't be working on the very latest ride that came out of that fancy bike boutique 2 months ago. Chances are you'll be working on bikes that are pretty similar to the ones you are taking apart, mainly chain store specials. Besides, customers love buying used parts since they pay less and you love selling them because they cost you next to nothing.
WORK ETHICS
When taking a bike in for repair, ask the owner what he/she thinks is wrong with it. Listen in carefully for some clues that might help you out on the repair. Check the bike for loose wheel bearings, bad brakes, out of adjustement shifters, frayed cables, loose pedal axle bearings in front of the customer. Tell him/her what you have observed and your evaluation of the bike. If you suspect that there is a possibility of a major problem, tell the customer right away. People appreciate when they know what they are getting into ahead of time and they hate surprises. They'll also appreciate that you took the time to listen to them. If you get a surprise while doing the job, stop the work, call them up and explain it to them. Give an estimate and ask the customer if the work should go ahead.
When you know you have to replace parts, offer a used part if you have a good one in stock. My gauge is half price from new or less. I also throw in used parts for free sometimes. Everybody loves free stuff. When I have to supply a new part, I will usually charge the same price I paid for it since I buy it retail.
When you fix another persons bicycle, they depend on you for their safety. Anything can happen to them if you've missed or forgotten something. Always, and I mean ALWAYS, take the bike out for a test ride yourself before giving it back to it's owner. One loose bolt or badly adjusted brake cable could represent major injuries or death, REMEMBER THAT.
Keep track of your customers and call them up after a week, or if you see them, and ask if their bike is running good. Should you get a negative answer while the bike and customer is in front of you, make sure you always carry basic tools so you can take care of the problem on the spot. If not, always garanty your work and fix the problem for free as soon as you can. Returning customers is what you are looking for, treat them well. Working on a bike from a return customer is very easy most of the time since you know who was the last mechanic that worked on it.
MARKETING YOUR NEW SKILLS
You should start marketing yourself as soon as possible. Talk to friends and family about your talents even while you are learning them. Offer them to work on their bikes for free, it will give you practice and the quality of your work will be spoken to others. People love to brag about good products or services. If you do great work, your friends and family will not hesitate to give you referrals to potential customers.
Volunteer your time. Don't hesitate to give your time to good causes like bike safety rodeos. Community groups are always in need of mechanics when doing events like these, they'll be more than happy to take your offer and they won't mind you giving away your business card in exchange for your services. You will meet a lot of potential customers and they will get to sample your work. They will ask you questions and ask your opinion on many bike related subjects. Don't be afraid to interact with them and be friendly. This is an opportunity to make contacts and build your reputation.
Advertise on your car(if you have one), on bulletin boards, on local free internet classifieds and on your bike. Be aware that if you chose to advertise on your bike, be sure that it is in perfect running order and that it looks good. Even if you don't have a fancy bike, it still as to be clean and look the part of a well oiled machine. I don't advertise on my bike because it looks like crap! But it runs perfectly and I like the fact that it looks crappy. That's just the way I am.
Get people to know you as more than just a bike mechanic, but a bike guru. Give information on bike related topics like safe riding, cycling health benefits and your own cycling preferences. Remember, this is your passion and you want to share it.
PRICING
Since people are reading this from all over the world, it is hard for me the give an actual price for every single job. One thing I can tell you is that I charge a flat fee for a tune up, plus the cost of parts. Here is my definition of a tune up: The bike comes in running like crap and the bikes goes out running fine. Period, whatever it takes for the bike to run good. Some bikes take me 2 hours and some 20 minutes. I only replace or fix what needs to be fixed because I check everything. In the long run, the average makes it worthwhile and the customers are happy. When customers are happy, they come back and chances are you might have to do less work on that same bike when it goes back in your stand.
Of course I will not charge the same fee if all the customer wants is to replace a brake cable or if he/she wants to strip and rebuild the entire bike.
Don't be greedy and sometimes throw in a freebie, it will always come back to you in a positive way at some point. Giving feels great and I consider myself a millionnaire for the many times I had the joy to see a kids face light up after giving him/her a free bike.
HOME BICYCLE REPAIR OR OPENING A SHOP?
That's a big decision. If you are fortunate enough to live where riding is possible 12 months a year it is much easier to do than in a place like where I am with real cycling business happening only 3 months a year. Working from home to start is always good. You get to build a customer base and that is priceless when starting a new business. Beyond that I can't really help you. I've always been asked why I didn't open a bike shop and my answer has and always will be: I like biking too much. With only 3 nice months to ride here, I don't want to spend them with my elbows in grease in a neon lighted little shop. I prefer doing jobs once and awhile now and I get to choose my customers. I've moved recently and lost all of my customers and realised that I wasn't riding that much anymore. So now I'm more picky about my customers and I only do jobs when I feel like it. If you want help on opening your own shop, check out your local chamber of commerce or of course there is always the web. I gave you the basics for a bike repair business, but I won't get into how to get hooked up with bike manufacturers and parts suppliers. I never did that so I'm not qualified to give you that information. But if you want it bad enough, I'm sure you will find it.
If you decide to get into bicycle repair, either at home or opening a shop, remember this: Everybody offers the same thing at about the same price. People know they have to pay for your services and they are willing to do so. What they are looking for is SERVICE. That is the key in my opinion, great friendly service will always get you more customers.
LAST WORDS
Rule number #1, have fun. If you enjoy what you are doing, you will be a good mechanic, work will always find you and you will keep your passion alive. If you ever decide to start in the bike repair field, email me and let me know how this little article helped you out. I'm also willing to answer any questions. This post will most probably be revised from time to time.
Until then, ride safe and Godspeed.
Gerry
HOW TO REMOVE RUST ON CHROME BICYCLE PARTS


Nothing kills the look of a bike like chrome parts that have rust on them. If the rust is straight thru the metal, it is already too late. Same thing goes if the chrome as started to flake. But it doesn't hurt to try. A very good friend gave me some fenders for my cruiser and I was half an inch from painting them flat black to match the frame. Then I thought, "Let's see if they would look good all cleaned up" before doing a no-turning-back move like that. If you look at the last pic, you'll realize, I think, that I did the right thing. Here's how I did it:
First you'll need some steel wool, I used a fine one for this job since the rust was not that bad. No need to scratch the metal too hard for nothing.
Second you'll need some metal polish to lubricate, and polish while you rub with the steel wool. Liquid polish works better for me.
Lastly, you'll need a clean rag to buff out everything after you've removed the rust. Mine is pretty dirty, but works great.
Rub the metal-polish-loaded steel wool on the part until you see the brown rust pits vanish. Don't do a circular motion, go in a back-and-forth motion instead to match the length of the part. Circular scratches will show even if they are very small.
Once you've made all the rusty spots go away, take your polishing rag, a clean cotton t-shirt can do the job, and buff the piece until you are happy with the result.
You can always finish with a regular application of metal polish without the steel wool after you're done.
Nicely polished chrome parts will always make any bike look good, even my flat-black-rattle-can painted cruiser. I can't leave this locked anywhere now! It will definitely sleep in the house starting today.
Until next time, ride safe.
Gerry :)
CHECK OUT THE FOLLOW UP ARTICLE WHERE I ACTUALLY TRY THE ALUMINUM FOIL RUST REMOVING TRICK HERE: http://www.howtofixbikes.ca/2010/03/how-to-remove-rust-on-chrome-bicycle.html
Saturday, August 12, 2006
Bicycle seats: What you have to know


The only part of the bicycle that hasn't really evolved until recently has been the seat. It sounds strange until you remember that the body parts in contact with the hardware was a taboo subject. Nobody would complain much about numb genitals back in 1898 to bike manufacturers.
First off there are two main categories of bicycle seats: women's and men's seat. You can identify them easily by eye right away, skinny seat=men's seat, wide seat=women's seat. This is due to the fact that men and women don't have the same width at the hip sitting bones. The end of the sittings bones are what makes contact with the bicycle seat. So a man could ride on a wide seat, but a woman would feel very uncomfortable riding on a skinny seat. Her sitting bones are not on the seat, but on each side(My girlfriend told me that it actually feels like giving birth!). So ladies get yourself a proper size seat.
Another concern is numb genitals. When this happens to you, it is not something to be ignored or a small inconvenience in exchange for the benefits of cycling. Blood flow is just not going where it is supposed to and this goes for men AND women. New seat designs are out these days with a channel in the middle to allow free blood flow to the genitals. If you are doing any kind of serious mileage on your bike, go to your local bike shop and spend the bucks on a decent seat. My personnel seat is a wide gel padded, spring loaded, cruiser seat with the aboved mentionned channel for proper blood flow.
Once you have your seat, the next thing you need to do is determine the proper height. The proper sitting position on a bicycle is with a slight flex in the knee while pedaling. The way to determine that is to put your heel on a pedal while seated. Your leg should be straight. If it isn't, then you have to put your seat higher. Once you pull your foot back on the pedal, as if you were pedalling, you should have the proper flex in your knee. I've seen many cyclist riding with their knees in their chins just wondering what kind of damage they are doing to them. The proper seat height is very important for the health of your knees, especially if you do a lot of mileage. Take note that your feet might not be flat on the ground when stopped after a proper adjustement.
"Shouldn't my feet be flat on the ground when I'm stopped?" That is a question I hear often and it is a very valid one. If you are new at riding a bike, a child just starting to ride on two wheels or just uncomfortable with standing on your toes, you can adjust the seat lower. Children will not do hard mileage and they will be good at riding pretty quick, so no harm done when it is time to pull up the seat. Adults and seniors not comfortable with this can lower the seat to be "flatfooted" as long as they don't ride hard for long periods of time. Another option is to buy a trike or a new design introduced by Electra bicycles called the Townie bike. This design is the next revolution in bicycling in my opinion. The bottom bracket has been brought forward on the frame instead of directly under the seat. This brings the pedals slightly forward and permits flat footed stops while maintaining proper leg extension. I've tried an Electra Townie myself and it is very comfortable. They look great and I'm buying one as soon as I can.
Remember, the more comfortable you are on your bike, the more often you will ride it.
Until next time, ride safe.
Gerry
BMX REBUILD PART 2

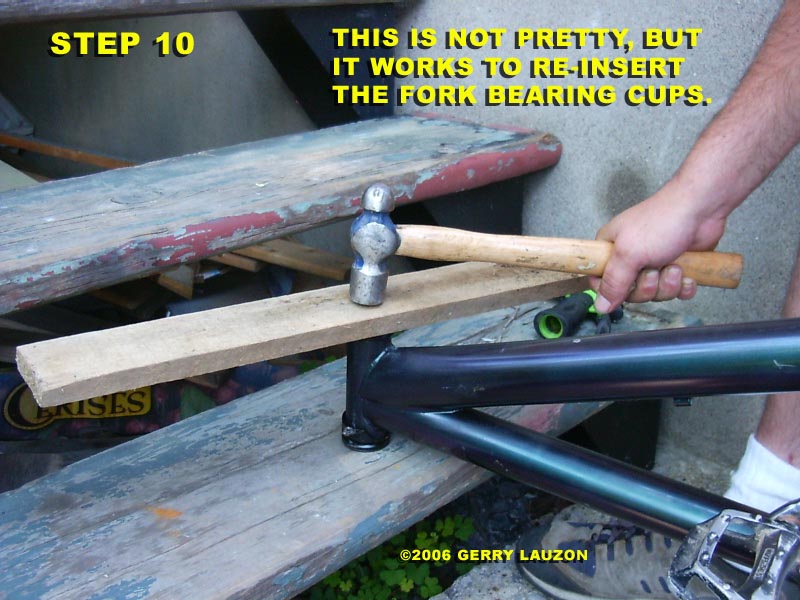


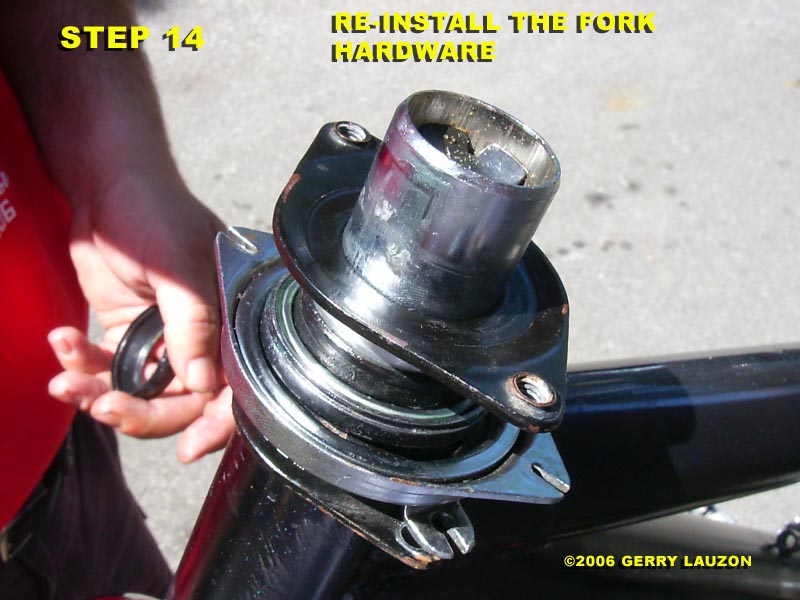


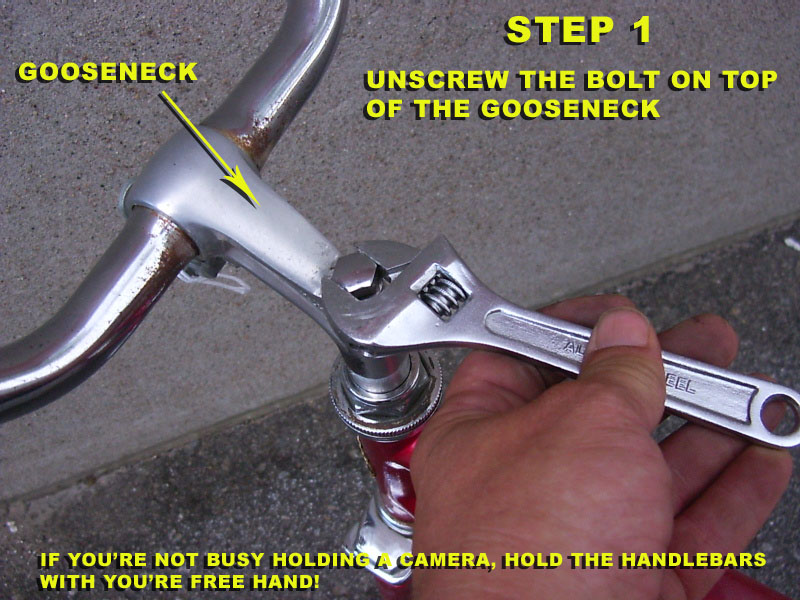
This is the second and last part of the BMX rebuild. I have skipped a few steps in the illustrations since some other articles in this blog cover these. Another thing of note is that this was the first time I had to reassemble a threadless fork without having the benefit of prior disassembly. So don't go thinking that I am a court testifying expert on the subject. I reassembled it until it was solid, took me half an hour to figure out. The main difference with a threadless fork is that the gooseneck plays a major part in holding everything together. So make sure it is properly tightened and take note that the hex bolt on top of the gooseneck is just a cover plug, it has no mechanical value in the process.
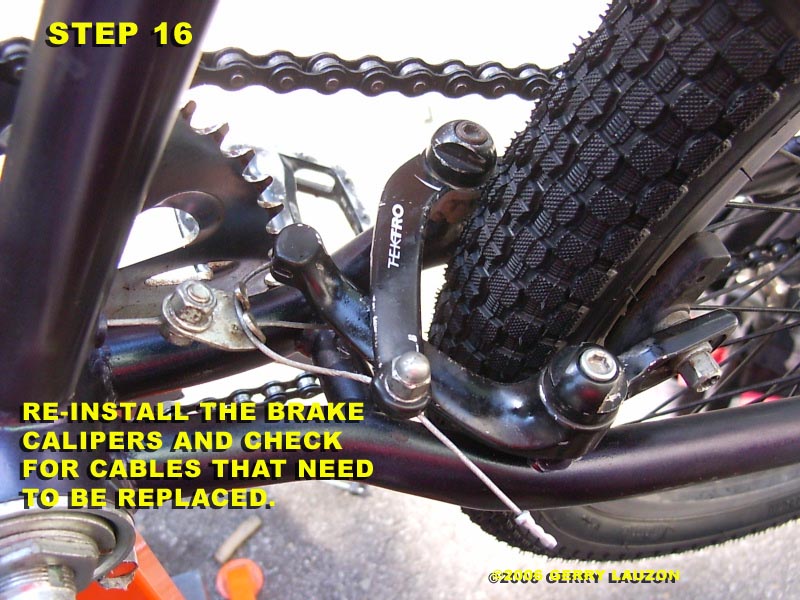
When putting back a BMX together, or taking it apart, check if all the small hardware is up to snuff while you're there. While rebuilding this thing I found a frayed brake cable that had but one strand to live. This BMX only has one brake caliper, imagine the deception of it's owner when that cable would've snapped while trying to avoid hitting a bus or something!
So get dirty and have fun, until next time, ride safe.
Wednesday, August 09, 2006
PEDALS TAKE SIDES SOME ARE RIGHT SOME ARE LEFT or how to remove pedals

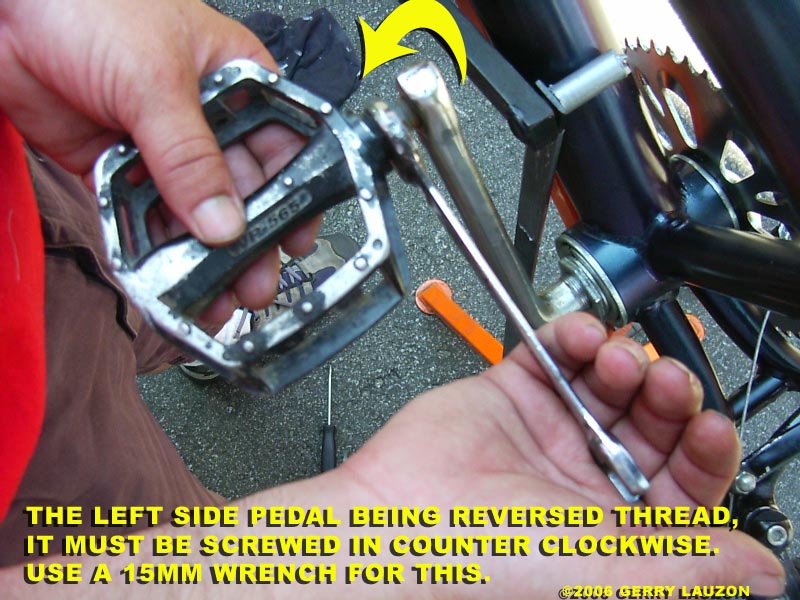
Many amateur mechanic make the mistake of switching sides when re-installing pedals. Pedals have a different thread pattern on the left and right side. The right side pedal is installed and removed the usual way, clockwise in and counter clockwise out. The left side goes in counter clockwise and comes out clockwise. The left side is reversed thread. Both pedals are usually marked near the thread with a "L" and a "R" to identify them. Take note that pedals come in two different sizes threadwise. Bring the old ones with you if you need to replace them. The tool you will need for pedals is a 15mm open wrench.
Until next time, ride safe.
Gerry
BMX REBUILD PART 1

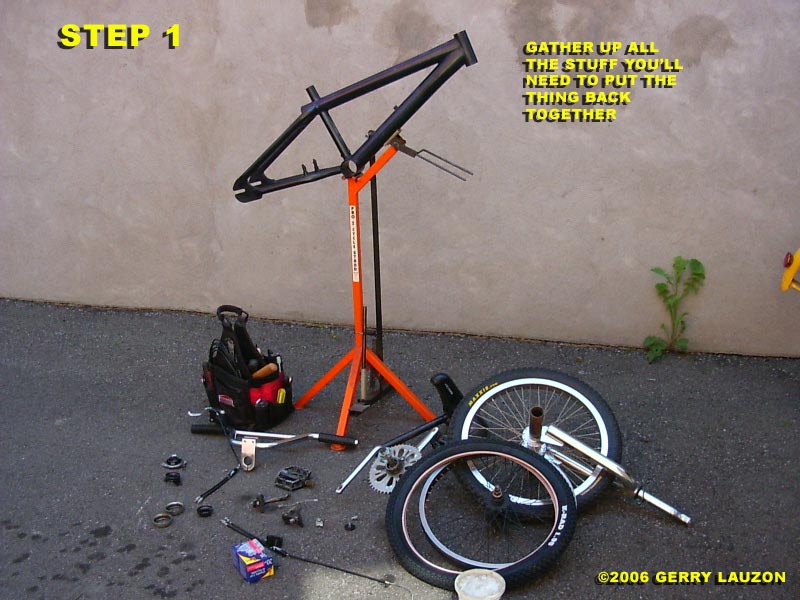


I have a kid in the neighbourhood who heard that I fixed bikes. He had taken apart his BMX to do a paint job himself and now had no clue how to put it back in one piece. So in exchange for an appearence on this blog and a few lawn mowings, the kid is back on his newly painted BMX and you get to see how it was done. This also gave me an opportunity to work with a threadless fork for the first time. The trick about those is that the gooseneck plays a very important part in keeping all of it together.
src="http://pagead2.googlesyndication.com/pagead/show_ads.js">
This article is image heavy and so I will make it in two parts. Also, most of the details you don't see in this rebuild can be found elsewhere on this blog or will be coming up very shortly. I don't know the make of this particular BMX, but from what I can make of its construction, it is made to withstand heavy punishement in extreme conditions.
One last note, when putting back a bike together after a paint job, be careful not to scratch that brand new delicate finish.
Tuesday, August 08, 2006
REMOVING HANDLEBAR GRIPS THE EASY WAY WITH A MIRACLE PRODUCT YOU PROBABLY ALREADY HAVE

Removing grips might sound pretty difficult, but it's not. If you have some lemon furniture polish handy, it's a breeze. Simply spray on a small rod of any kind(a wheel spoke does a pretty good job) it will do. In the images, you see that I'm removing a grip from the outside. If your grip is capped at the end, simply insert your rod from the inside of the grip. Apply some on the handlebar to reinstall grips, it will dry with time and they will seize back in place(just don't put too much).
Lemon furniture polish can be used to clean your bike. Yes it does a great job of everyday cleaning, you'll find that dirt has a harder time to stick to it, it will revive the finish and it will smell great too! Just spray the frame, wipe the dirt off with a clean rag and buff it with another clean soft rag.
Any furniture polish will do, as long as it is with lemon. Why you may ask? Another great thing about the stuff, this is where the lemon part is important, is that it can degrease just about anything. I've managed to remove caked on grease on old chainrings without any problems at all. Just make sure you keep the stuff away from your chain, rims and bearings when you clean your bike with it.
Watch for a complete BMX rebuild article coming this week. Until then, ride safe.
Gerry
Sunday, August 06, 2006
FIXING A BROKEN BICYCLE CHAIN


Fixing a broken bicycle chain is pretty easy. If you read this blog you probably went out and bought your chaintool. That's all you need. This tool works with every type of chain. In this example we are fixing a BMX bicycle chain. There are two types of chains, chains for bikes that don't have multiple exterior gears like a BMX, 3 or more internal speed hubs and coaster brake bikes(Lowriders, Musclebikes, Beach Cruisers, Choppers, etc...). Then you have your multiple exterior gear bicycle chain for 10 to 24 speeds(which I think is insane, but that's for another article). These chains are found on road racers, mountain bikes, chain store specials and they also come in different sizes. The main concern being the width of the chain. A 15 speed chain will be slightly larger than a 24 speed chain. Tell your local bike shop what you need and they will give you the proper size.
Now back to the task at hand. If you are replacing a chain, the new one will probably be longer than you need. Just install it on the smallest gear at the pedals and the smallest gear at the wheel to determine what length you will need and that the derailler is not tensionned too much. The BMX, Sturmey Archer, Nexus and Coaster brake crowd doens't have to worry about what gear to put it on, just make sure that your rear wheel is installed at the proper place when measuring and be prepared to make some minor adjustements.
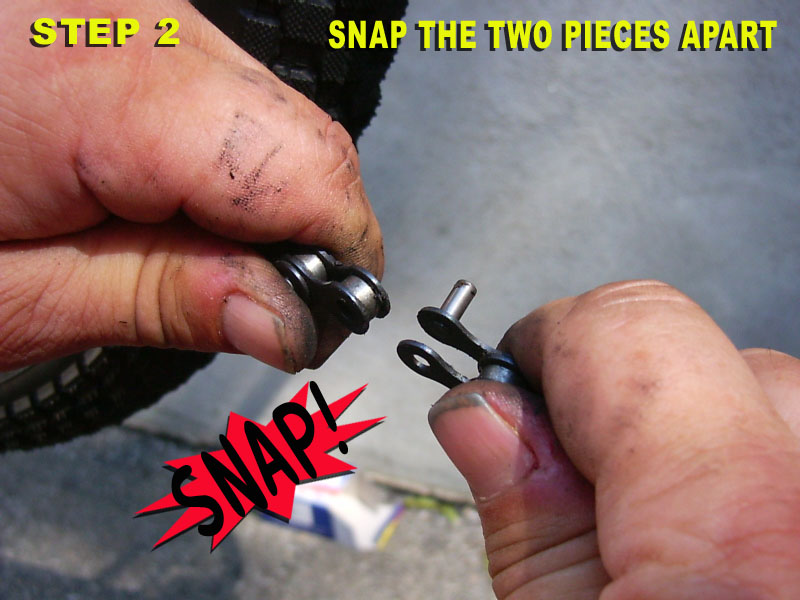
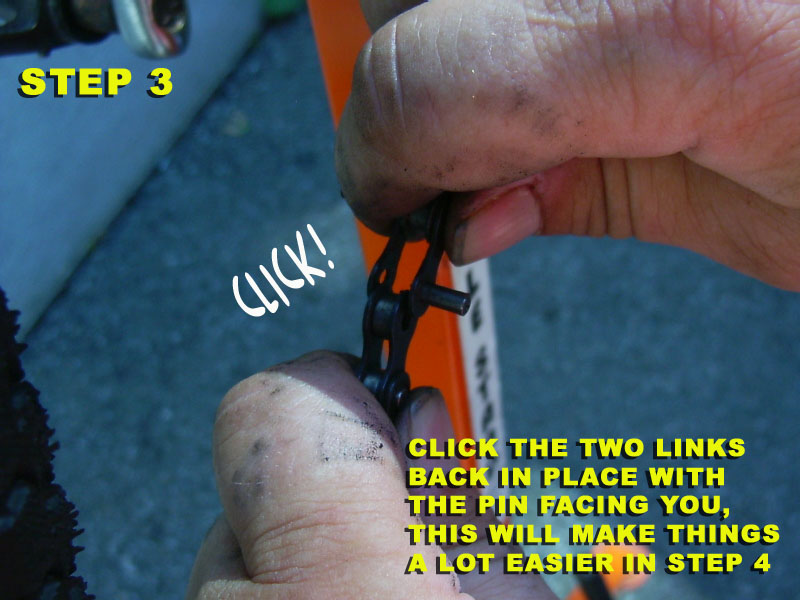
Links are removed by pushing out the retaining pin almost completely from the "female" link and rejoined with the "male" link by pushing the pin back in.
Now that you have cut(or "broken") your chain to the proper length, leave it on the wheel gear and remove it from the gear at the pedals(it's called the chainring). Now you have some slack to reconnect your chain. Once you're done, replace the chain on a few top gear teeth of the chainring and pedal forward. Voila! You are done and ready to go.
If you have a broken chain, you can probably get away with removing a link or two. It is easier to get away with this on a derailler chain since the tension is variable, but much harder on a one gear bike like a BMX that as no flex in the chain, the rear wheel will have to be repositionned in order for this to work. The cause might be abuse on your part, a very tired chain or just simple bad luck. If you ride a lot or depend on your bike to work good, spend a few bucks on a new chain.
The only difference between fixing a broken chain and replacing it, is that you remove the broken link and toss it. If the chain is too short and won't fit, you have to add a link. They don't sell those, so you have to get a link from a spare chain or simply buy and install a new one.
Check this post to see the chaintool in action.
Tip of the day: Always keep an old chain or those extra links left over from a new chain replacement, as spares. You'll never now when you'll need them.
Til next time, ride safely.
Saturday, August 05, 2006
Great Canadian Bike Overhaul part 2
I have now removed the fork and you can check out the set by step instructions at bikeoverhaul.blogspot.com
Friday, August 04, 2006
Great Canadian Bike Overhaul part 1
I have received some request to restore an old bike and blog the project. That is a great idea and I have been itching to start something new. I haven't restored a bike in a while and this should be fun sharing it with all of you.
I am not looking for a particular bike and like most of you out there, the budget is tight. So I'll be scrounging the trash, local garage sales and thrift stores for an interesting subject. Any of you who want to donate a carcass are welcome to email me.
Now this will not be a concour bike. My restorations are more practicle oriented and I try to keep the spirit of the bike without sacrificing usability. I'll document every step of the project, even the search, so keep posted.
UPDATE: Bicycle carcass found. Check it out at my new blog on the subject here.
Thursday, August 03, 2006
Wow! This is nuts or coming soon.
This blog was created with the intention of helping out people with some bicycle repair knowledge and I never taught that it would get so much attention!
I've received requests to show how to align wheels and how to restore a bicycle from the ground up. In order to give you the proper information, because there is a lot of it, I will create 2 more blogs for this in order to make sure that things are not too crowded. The wheel blog will cover everything from building a wheel to installing a tire. The bike overhaul will contain every possible detail as well. By the way, I've found a subject for the bike restoration, so all of you fans out there won't have to wait to long for this to begin.
This is my first blog. I made it during my vacation and now I am back to work. Time is limited, but I will be updating everything and putting up the new blogs within a week. So keep posted, there's a lot of material and I'm not about to run out of it.
I've also noticed that readers of this blog come from all over the world. It's a great feeling to know that you can help people from all over the planet from the comfort of your home.
Keep your comments and questions coming. I respond on a regular basis.
Wednesday, August 02, 2006
About this bicycle repair blog
This blog will help you with bicycle maintenance and bicycle repair. Everything from chain lubrication to wheel alignement will be covered in time. Come back and check old postings as well since they will be revised with new information from time to time. I will also be building some special projects and bicycle restorations. Your comments and questions are always welcomed. They make this blog even better. Remember, taking care of business yourself is not that hard.
Bicycle chain lubrication and maintenance: The best and cheapest chain lube around is Automatic transmission oil. It is synthetic and a quart will last you a very long time for the price of a small bottle of bicycle chain lube. On very dry or rusted chains, apply it with an old toothbrush dipped in the tranny lube. On less needy chains, you can apply it with a non-needle syringe link by link. Always wipe any excess and make sure none of it falls on your wheel rim (this would make braking very difficult or impossible for awhile). Tranny oil works great for a lot of other things as well. Avoid using regular motor oil at all cost. This mineral oil is a magnet for dust and foreign particals on your drivetrain.
Tuesday, August 01, 2006
Adjusting Brake handles: You need those too!
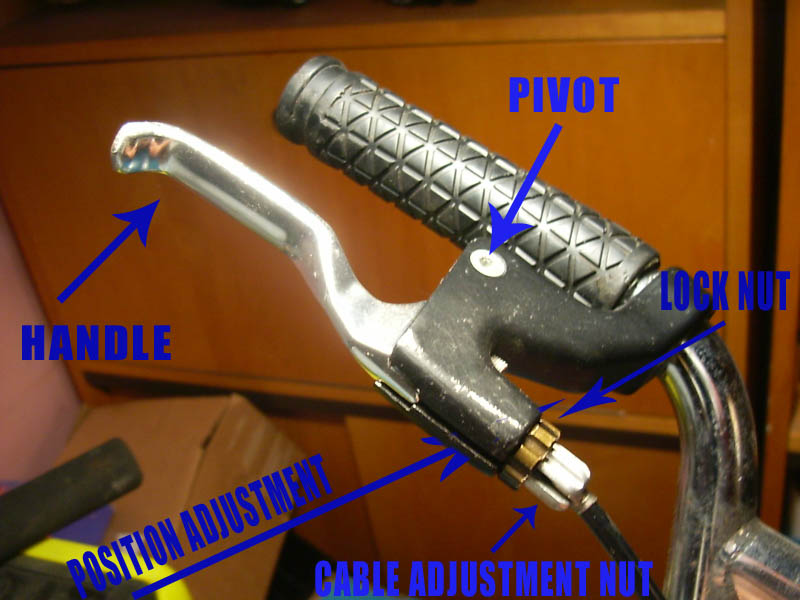

I realized that I made a post about brakes but never mentionned brake handles! They are pretty simple, but can be the source of problems.
Make sure that the cable housing adjustment nut is all the way into the main body of the brake handle before working on your brakes. This can be used to adjust your brakes on the fly or to tweak them a bit after a brake job. It shouldn't be screwed all the way out, then you have no more room for adjustement.
To remove a cable is very simple. Just align all the moving parts so that the slot in them aligns with the one on the main body. Remove and replace, that's it.
Tip of the day: Adjust the position of your brake handles so that your hands and wrist are comfortable with your fingers resting easily on the handle while you ride. You shouldn't be flexing your wrists while riding, it is unsafe and uncomfortable. Remember, the more comfortable you are on your bike, the more you will ride.
How to grease bicycle wheel bearings


You asked for it, here you have it. Wheel bearings on a bicycle are an important part of bicycle maintenance and by making sure that everything is well lubed in there, you can avoid costly bicycle repair down the road. Well lubed bearings also provide an easier ride.
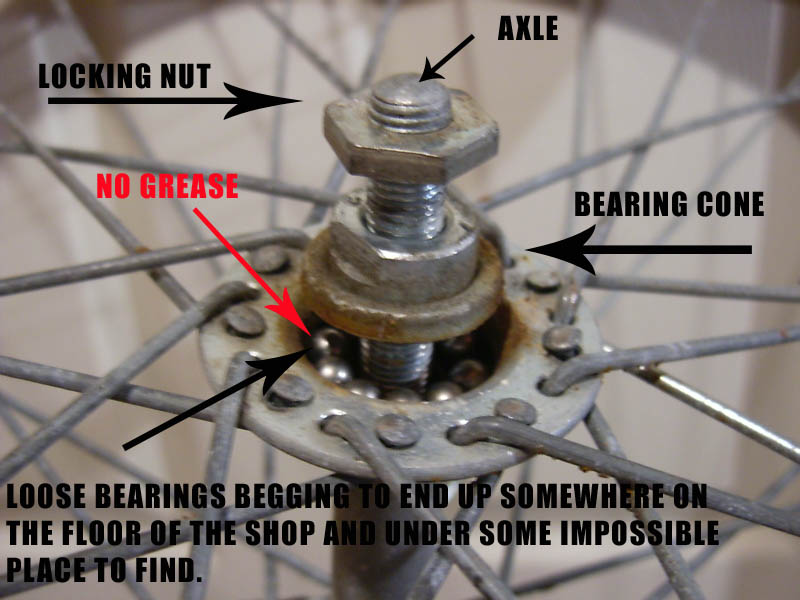
The wheel bearings sit between a cone screwed to the wheel axle and the cup in the wheel hub. They must be properly adjusted and greased. To find out if everything is ok without taking everything apart, simply remove the wheel from the bike and turn the axle with your fingers. Everything turns nice and smooth without any play? Good, then you probably don't have to worry about anything. If the axle is stuck, very hard to turn or is very loose, you have to regrease your bearings propbably anyways. Here's how to:
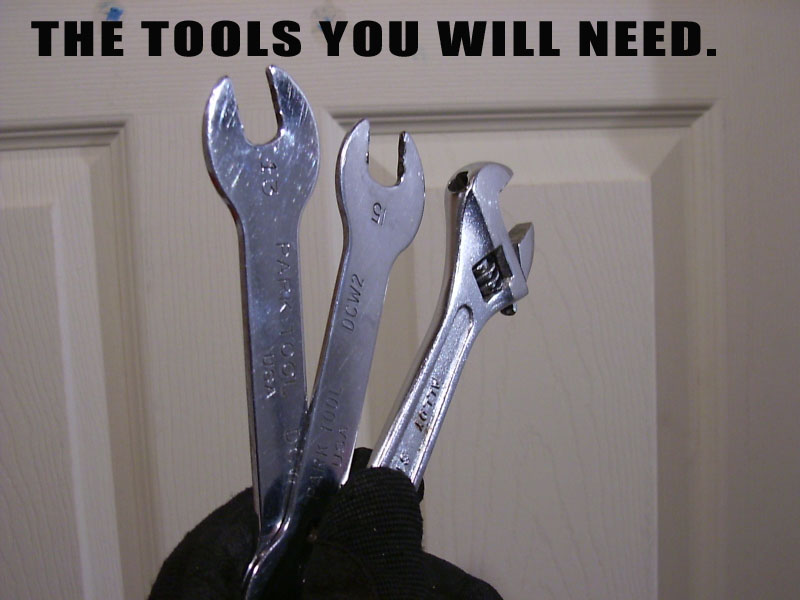
1. You must get yourself some flat open wrenches, Park Tools makes good ones, make sure they are in sizes 13mm and 15mm. Those are the most common sizes. You won't get away using anything else for the bearing cones, so don't even try. Any kind of adjustable wrench will do for the locking nut.
2. Put the flat wrench on the bearing cone between the hub and the locking nut. Put the adjustable wrench on the locking nut. Hold the bearing cone in place and unscrew the locking nut. The best position to do this is hunched over the wheel while it sits on the ground. Whatever you do, DON'T open the cones at all while in this position. Just unlock it so you can unscrew everything with your fingers later.
3.This is later. Bicycle wheel bearings come nicely snug into crowns these days, but sometimes you still find some that are just put loose in the wheel hub. To avoid all of them crashing to the ground with the possibility of vanishing for ever, grab the axle on the side that is still locked in place and point the end that you've just loosened, up. Now it is time to unscrew the locking nut almost completely off the axle. Next, unscrew the bearing cone to expose the wheel bearings to the light of day. Any grease in there? You'd be surprised on how often I open up brand new bikes and find almost nothing.
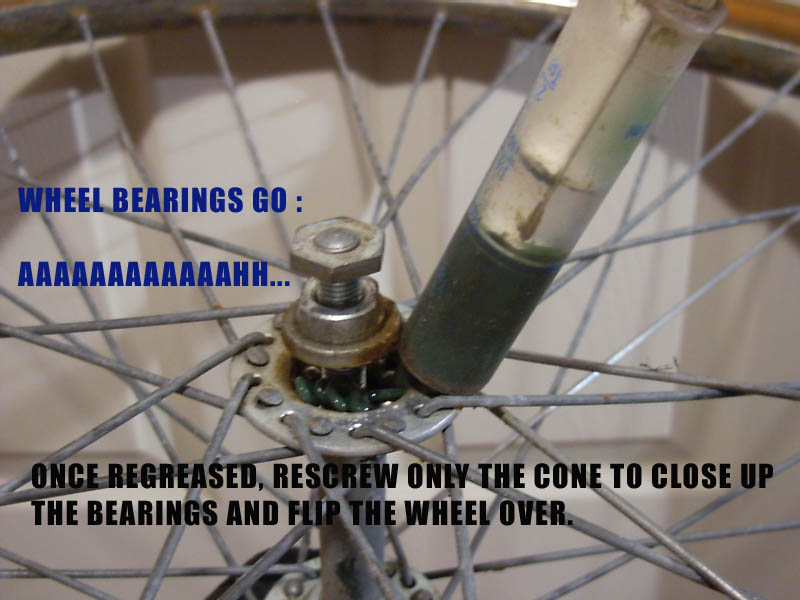
4. Now this is the fast way to regrease your bearings by just shooting grease in the bearings, screwing the cone back in, flipping the wheel over, hold the cone of the bearing you've just greased, grab the axle now facing up, unscrew it to reveal the other side bearings and pack them with grease. But the proper way is by taking everything off, clean all the cones, hub cups, bearings, repack with grease and reassemble. One great way to pack grease in wheel axles is by using a small feeder syringe. Only undo one side of the axle, this way you are sure that your axle is always centered when you reassemble it.
5. Reassembly is done screwing in the bearing cone back into place, but not too tight. Bearings should be able to roll smoothly without axle play. Tightened the lock nut into place and check again. If you ever hear crunching noises while turning the axle, dirt has gotten into your bearings and you should start all over again. To avoid this, make sure you work in a clean place. If everything is clean, you might have small pits in your bearing cones or cup. Your bearings will be eaten away with time and it would be a good thing to replace those.
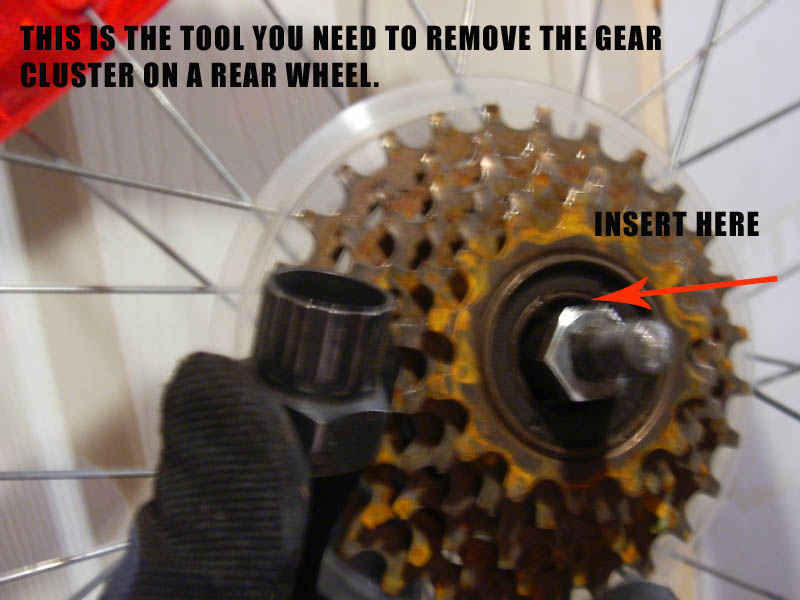
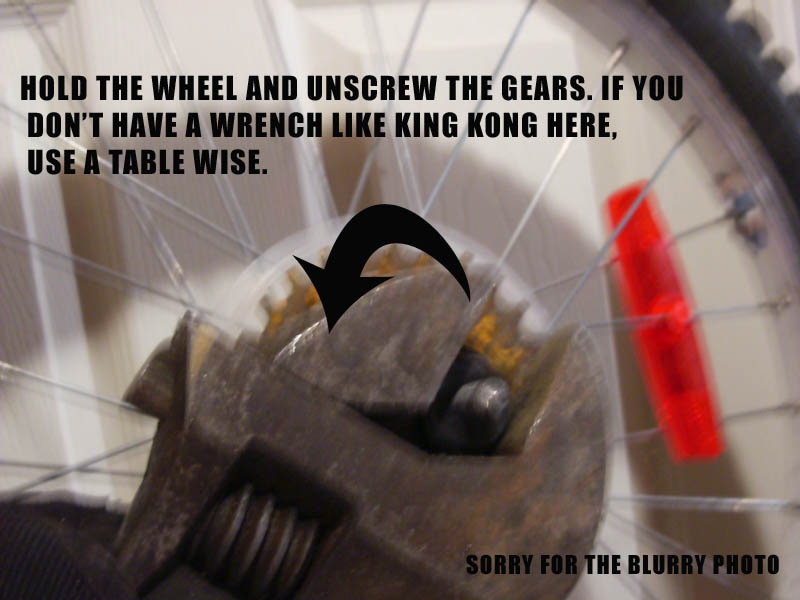
Special note on rear wheel bearings.
In order to repack rear wheels, you have to remove the gear cogs on them. In order to do this, you need a special socket to unscrew it. Check with your local bike shop for the proper one. Their are a few models and types. Coaster brake or inner speed hubs are almost bullet proof and very rarely need regreasing. Those should be handled by a pro.
Tip of the day: My favorite grease recipe is a 50/50 mix of green axle grease and any type of white teflon based bicycle grease. The teflon grease is very good but isn't very thick and tends to liquify easily. The green axle grease adds muscle to it. Try it.
Subscribe to:
Posts (Atom)


