OUR ADVERTISERS
LINKS TO SOME OF MY OTHER STUFF
Tuesday, January 30, 2007
WHITE LED VINTAGE BICYCLE HEADLIGHT HOW-TO
Last summer I recycled a Sylvania LED light puck and a vintage headlight for my cruiser by taken it apart and jamming it in there. It works great and battery life is truly not an issue. I didn't document it because I figured that the puck at $10 was too expensive and the job was just too complicated. That's apart from the fact that it was a real crappy job and by some miracle it is still working to this day.
Then I came across those white LED keychains for $1. Now that's very affordable and they work off of 2 small 3V batteries cells. Now I'm no electrical engineer and what I'm about to present may not be a good set up, proof of the matter is I almost set this thing on fire while building it! So if any of you have additionnal info regarding resistors and such, please feel free to illuminate our lantern and post a comment about it. The pun was totally intended. :)
So here's how I did it. First, take that keychain light apart and retain the white LED. everything else you can toss away. You can keep those 3V cells for another project.
Second, get yourself a 4 AAA battery holder to get the 6 volts required to run that LED, a small switch and some wires. Don't forget the 4 AAA batteries. Wire it all up and make sure it works.
Third, take the bulbs and side connector of the headlight out. The switch screws right into the empty hole left by the connector on the headlight, no need to drill. Lose whatever wiring is left in there. Keep the brass clamps to hold your battery pack in place later.
Fourth, you'll need to plug the upper bulb hole with something shiny like chromed tape so you don't lose any reflective surface. Make a plug out of cardboard or anything else that will press fit the LED in it and the plug into the main bulb hole. If you need to use glue here, do not use superglue, it will fog up your lens and LED for ever. Use white glue, it has a strong bond when dry and it becomes clear when dry. Test everything again, close it up and install on your bike.
Those batteries should last a very long time. Now all you need is an LED red flashing light in the back and you can go night cruising without worrying about losing power to those vital lights. Remember, your main obejective is to be seen. Those white LED's do not go unnoticed, trust me.
Till next time, ride safe and Godspeed.
Gerry
Labels:
"bike repair",
bicyle,
headlight,
led,
vintage
Sunday, January 21, 2007
HOMEBUILT BICYCLE CHOPPER PART 3, REDOING THE BANANA SEAT AND MAKING A SUICIDE SHIFTER
I always wanted a bike with a suicide shifter. It was pretty easy to make. I took a seat tube from a women's frame and cut it. I gave it a slight bend at the bottom. I flattened the end that would bolt to the bracket. I didn't flatten it all the way, you need a little space left so you can slide in the cable and have it move freely to operate. I drilled a hole for the cable and then I made two cuts on the arm to be able to install the cable and then for it to work. I made another hole for the nut and bolt assembly. A nylon washer was installed between the shifter arm and the bracket to allow some movement. I finished it off with a knife handle from a toy knife bought at the dollar store for a buck. That's how much money I have put into this project so far, one dollar!
My attention was then brought to the seat. I did a crappy job of redoing it some years ago and I was more than willing to screw it up again. I don't really mind since all I want is for it to be comfy and not look half bad. The fabric used was an old black t-shirt. I separated the two seat pans, cut a piece of high density foam to size, sprayed adhesive on the pan, installed the foam on the pan. I then sprayed everything that was going to touch the fabric with that stuff and stretched it on. I then cut away the excess fabric and rejoined both pans together. A word of caution, those tabs are not made to be flexed back and forth too many times. Be careful or they will snap off and you won't be able to reconnect the pans. Well, I'm not about to put leather on a Boyd Coddington car anytime soon, but it's clean and it didn't cost me anything.
So go get your hands dirty and have some fun.
Til next time, ride safe and Godspeed.
Gerry
Tuesday, January 16, 2007
INEXPENSIVE CUSTOM BICYCLE OR THE RAT ROD BIKE
Many of us enjoy our bikes and would like a more "custom" feel to them without spending the big bucks. The rat rod bicycle is a prime example of this. Following in the footsteps of the automotive craze of rat rods, that are primarely build to run and then for looks when money permits, these bikes are an inexpensive way to get into the kustom lifestyle, no welding required. The field is not limited to vintage cruisers, but anything that is rat looking with a personnal touch from it's owner. The more you make yourself, the better. Paint jobs are often of the rattle can variety and rust is considered a color. Mind you, some bikes have pretty intense paint jobs, but it is not a requirement.
The rat rod bike crowd is very friendly and open as well. The people over at the rat rod bike forum are very friendly and share information freely. Inspiration is abondant as well with members showing off their rides in the bike gallery. This type of bike is right up my alley. I have even entered in the rat rod bike build off. Everyone can afford entering the rat rod bike scene. Sometimes all it takes is a ride to the local city dump or curbside during garbage day. What's cool about custom bikes is that they don't require plates, insurance, driver's license and you can afford a fleet of them!
At the top you have a few prime example of what a rat rod bike is. All of them started as heeps of junk and were made to look cool by their respective owners. Come and join us at the rat rod bike website, join the forum and enter the bike build off. Check my entry while you are there( It's the Fire Truck bike). Here are the links:
ratrodbike.com
locojoe.com
montreal freakbikes
chopperbicycle.net(those guys are in another galaxy for kustoms, check them out too)
Til next time, ride safe and Godspeed.
Gerry
Sunday, January 07, 2007
HOMEBUILT BICYCLE CHOPPER PART 2
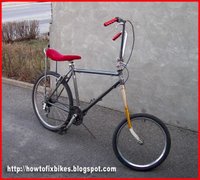
This was not very complicated. Building the fork being the hardest part, the rest was to find and assemble some parts. I got the seat and handlebars from the CCM Galaxie project. This bike will be getting brand new units to replace those. I didn't want to waste brand new parts on a rat chopper project.
The only serious issue was installing the sissy bar on the bike. Mountain bikes are not built for this, but installing them directly on the rear wheel was not that hard. All you need is some thin nuts! I then installed a gooseneck shifter for the rear derailleur and a brake lever for the V-Brakes.
Slapped everything together and went for a ride. Objective 1 was speed: check, it's pretty fast. Objective 2 was braking power: check, those v-brakes lock up that rear wheel on demand. Objective 3 was comfort: check, very comfy riding position. I will however raise the seat one notch for the sake of my knees. Received the following comment while doing a very short test run around the block from some guy: "COOL!" It would seem that Objective 4 (looks) is not as bad as I taught.
Next step will be to get a fresh can of flat black paint for the entire thing. I will also go shopping for a 26X2.125 whitewall rear tire, add a headlight and make a big suicide shifter. The shifter will not only add to the cool factor, but will also be more practical than the current set up. That tiny shifter is too far away for proper shifting. I will replace the 3 gear chainring with a one gear unit.
So, total cost of the prototype so far: ZIP, ZERO, NADA! Not one penny, I just used what I had to figure out if it was possible. This ride is so much fun, that now I am more the willing to drop a couple of bucks in it. It sure isn't pretty, but it rides great.
I will post one last article when it is painted and finished.
Til next time, ride safe and Godspeed.
Gerry
Wednesday, January 03, 2007
MAKING YOUR OWN BICYCLE CHOPPER PART 1
DISCLAIMER
What you are about to read is totally unsafe, if you go ahead and build this, I will not be responsible if you injure or kill yourself. If you are stupid enough to think that this bike is as safe as a regular bike, then you deserve what's coming to you and you have been warned. Nuff said!
I used to build chopper bikes myself when I was a kid, the idea was to do the same thing as everyone else and damn the consequences. By todays standards, I should be dead! The longer the better was the kick and you didn't give a damn if it didn't turn or the front wheel fell off.
Well now guys like me are older and wiser. We also have a lot of toys called power tools to make better choppers and what's coming out now is pretty amazing. I just want one of these. Not having the cash for a thousand dollar frame and not finding what I want, I decided to venture into making one myself. Remember, when going the homebuilt route for anything you may save some cash in the process, but you will have to put in a lot of your time to learn as you go. But what you learn is yours forever. So I decided to learn about choppers.
As when I started building recumbents, I will have to do with what I have available at hand to keep cost down. So in my pile of crap I found 2 forks, one 20 inch wheel, the banana seat from the CCM Galaxie that I have to change anyways and the ape hangers from that same bike that will be replaced soon. For the frame, I chose a mountain bike frame that I have hanging on the ceiling for the past 10 years. I always hated that thing and it's useless right now.
Like when buying a bike, building a bike yourself requires that you ask the important question: what do you want to do with it? What I want from a chopper first is for it to be practical. I want my bike to be fast on flats and able to climb hills. I want the bike to be confortable and lastly I want it to look good. At this stage of prototyping homebuilt style, looks take a back seat at the very back of the station wagon. I have to find out if stuff works and I have to learn. This rat bicycle chopper will be about function and learning. The frame will be used later to build the bike I actually want by chopping bits and pieces of it.
So for now we will build the fork. This is to give the bike a certain stance and to get that chopper feel. You need 2 forks for this. One will be inserted in the frame of the bike and the second one will be inserted into that fork to actually hold the wheels.
It is a pretty straight forward operation. Cut the legs off the second fork at the base. Mark the second leg with the first one after you cut it to have the same lenght. Afterwards, cut the fork that will go into the frame right before it starts to bend. Measure the same way as before to insure an equal cut.
Insert the legs into the cut frame fork as far as you can, making sure that everything is straight at the end. One way to do this is to find a door frame with a wall next to it. Put the base of the fork on the door frame and then see if the ends of the fork touch the wall equally. At this point, the fork should be paralell to the ground. Make the necessary adjustements. Once you are satisfied that everything is straight, make holes where both forks join together and put a couple of nuts and bolts in there with some lock washers. We used to just bang them in place when I was a kid and it was only a question of time before you popped a wheelie and the front wheel would decide to do it's own thing away from you and your bike. These days it takes longer to heal and it's much more painful, take the time to bolt it in or even better, get it welded.
Install on the bike and admire your handy work. Next post will be about installing the hardware and maybe even a test run. I eventually want to make a suicide shifter for it and I have yet to figure out how I will do that. So stick around as I learm and maybe even hurt myself!
Till then, ride safe and Godspeed.
Gerry
Subscribe to:
Posts (Atom)