OUR ADVERTISERS

Showing posts with label homebuilt. Show all posts

Wednesday, May 06, 2009

BICYCLE FRAME EXTENSION PART 3


I finished the extension, hooked up the brakes and installed the fender. I managed to cobble up together a rack from some steel brackets and a piece of flooring. Right now, I'm at a loss to make this rack work and bring it into a real practical mode. I have one problem: WEIGHT!

This bike would be great at doing double duty as a battleship anchor. It weighs a ton. I guess it's what you get for building it yourself for free. I was expecting this of course and I had changed the wheels from the original steel jobs to alloy to get at least a little break. Going up any incline, this bike will remind you that it's no Ally McBeal. The other side of the medal is that whenever you point something that heavy downhill, it doesn't require much effort from you to go fast.

Handling is a bit weird but the bike is very comfortable. The addition of V-Brakes was a good idea as well. All and all I am pretty happy with my monster since it will make me grow legs like the Hulk in no time. :) Now if I can only figure out this rear rack thing!?!

Until next time, ride safe and Godspeed.

Gerry :)

Wednesday, April 01, 2009

BICYCLE FRAME EXTENSION PART 2 CHAIN MANAGEMENT

It's not a little thing like a coronary that's going to keep me back from some R&D on my latest Sport Utility Bike project...all right it does make me go a bit slower I'll admit.

So once the frame extension is in place, I had to install the rear derailleur and chain. In this case about two chains and a half compared to a regular bike. All that chain and the places where it is supposed to run is an invitation to slapping around and grinding some frame paint! This is where chain management comes into play.

This is one of the first things you learn, by force of necessity, when building homebuilt recumbents. The chain is a lot longer and runs through a whole bunch of funky places, it needs to be guided along. In our case, it's a pretty simple case of slightly guiding the chain and giving it some extra tension. For that purpose I use hard plastic hose made for underground lawn sprinklers. It can be found at the local hardware super store and I bought mine at $10 a few years ago for a roll of 100 feet.


The hose will eventually need to be replaced after a few thousands miles. Despite the looks, this set up is surprisingly quiet. You can use something a bit better looking than black tape to keep the hose in place, but it does the job quite well.

Next step will be to put together the big rack. I have some steel for the framing and I'm thinking about using some left over flooring wood for the main top body.


Until next time, ride safe and Godspeed.

Gerry :)

Monday, March 23, 2009

HOMEBUILT BIKE FRAME EXTENSION


In spite of chaos at work and digging out of home improvement Hell, I've managed to get one of my Spring time projects started. I've been using my Firmstrong Chief bike as my workhorse now for some time and I always wanted a big cargo bike of my own design. Since the Chief is very comfortable and easy to ride, it was a logical step to see what I could do to upgrade it instead of starting from scratch again. I like to be able to carry a lot of stuff and although trailers are great for that, I must admit that they are a pain to haul.

Xtra cycle makes a great product that includes an extension and a rack to make any bike into a serious cargo hauler. I've seen them and they are worth the money no questions. However, I think you folks would enjoy a homebuilt project more than just a simple install/product review article. I'm also a cheap skate and I had all this scrap lying around for free to put this thing together!

Xtra cycle was the inspiration for the want and this great instructable(trebuchet03's article) was the inspiration for the how. Making a bike frame extension requires a few things, the rear triangle from a cheap suspension mountain bike, the down tube from another bike with part of the head tube still on and some brackets.

I simply bolted the rear triangle of the MTB frame where the rear wheel on the Chief is supposed to be using it's pedal axle and the bolts that come with it. I then measured the cut down tube for lenght while the bike was resting on a block at the proper height. I cut the tube, clamped it in a wise for it to fit inside the shock mount on the rear triangle and drilled a hole for the mounting bolt. The other end of the tube was then secured to the seat tube of the cruiser using 3 clamps. Why 3? Remember the golden rule of homebuilt anything, when in doubt, overbuild!

The bike is nowhere near done, I still have to make the custom 34 inch long rear rack that's going on it, but extensive testing of me jumping my big butt on the seat has proven successful with no flex whatsoever.


Keep posted for the rest of this build.

Until next time, ride safe and Godspeed.

Gerry :)

Thursday, December 25, 2008

HOW-TO MAKE A REAL CHEAP HARD SADDLE BAG

Sometimes you look around the house and miss the obvious treasure trove of stuff just lying there or about to be tossed away. Case in point, a simple plastic peanut butter jar and a pair of plastic tie wraps can give you a very usable hard saddle bag.

Clean any plastic jar with a screw-on lid, just make sure it's not too wide. If you hit it with your legs while pedaling it will be very annoying after a few miles.

Use a marker and while centering the jar under your seat, mark two spots on each side of the seat rails. Cut four small holes and pass two plastic tie wraps in there. Use quality tie wraps on your set up, unless you don't really care about losing your new container.

Strap them on the seat rails and fill it with stuff. If you want to make it completely water proof, simply add a dab of silicone over the holes for the tie wraps.

That's it. you're done. I hope some of you will find this post helpful.

Until next time, ride safe and Godspeed.

Gerry :)

Sunday, May 18, 2008

HOW TO BUILD AN INEXPENSIVE SUSPENSION RECUMBENT BICYCLE AT HOME PART 4


Now that the seat is installed, it's time for the job that will rack your brain big time: chain management. On regular bikes this is pretty obvious, the chain goes straight from the chainring sitting in front of the rear wheel not too far ahead.

In our case, the chain has to make a few detours to get from the chainring to the rear wheel and must avoid a whole bunch of things on it's way there and back. Before you start making your chain management set up, make sure you install everything on the bike, brakes, cables and every little doodad that goes on there. You must know what will be in the way of the chain before you install it. Remember, we're not working with plans here! One of the easiest ways to bring the chain from the rear to the front is with black PVC type tubing. I use the kind that is put in the ground for lawn sprinkler systems. 100 feet for $12, it should last you a lifetime. Those types of tubes usually last one season, so all the extra is not for nothing. It is surprisingly quite, you just have to make sure you secure the tubing with a good amount of duct tape strategically placed so the tube doesn't move with time. Leave the very front and back of the tube loose so that the chain can move when shifting from one gear to another.


That takes care of the top part of the chain, now for the lower part or the return section of the chain. When the chain is moving in the lower section, it isn't under tension and we can get away with less strength in our deviation set up. I use a grinded rollerblade wheel secured at the old bottom bracket by using a front wheel axle jerry rigged on the left bearing cup. It holds pretty nice and is very quite. I allow the wheel some movement on the axle so the chain can remain more straight in its path back to the rear wheel. I also added another wheel which I made from an old printer bracket wheel that I attached to the clip that holds the front boom. I sandwiched an old derailleur wheel on it. I used that one to clear the top of the fork while the chain is on its way back to th rear of the bike. I could have used another rollerblade wheel type of arrangement there as well, but I already had that set up lying around.


Now at this point the bike can be powered. Before you start installing all the accessories and other little knick knacks, install a working rear brake and take it out for a ride to see if your prototype is actually functional. I did with mine and that's when I found out that...

IT'S A TOTAL FLOP!

Yes, sadly this is a possibility when you hodge podge a homebuilt bike together. Before I started this build, I figured there was going to be some flex when pedaling the bike caused by the rear suspension, but I wasn't expecting that much. The thing bounces around like a clown bike when under full pedal power from a dead stop. Climbing hills is just very hard labor and extremely slow. I had tightened up the spring on the cheapo shock absorber, but it wasn't enough.

Mind you, the suspension does its job while going downhill or when you're up to speed on the flats. But unless you want to train to get legs like Lance Armstrong, going on even the slightest incline is murder for your leg muscles. There might be a way to lock the shock when you need it or a better quality shock might work better, but I don't have the time or money right now. I need a working recumbent for a big critical mass event in 2 weeks. Not only does it need to work, it also has to be broken in, no time to do repairs on a big ride like that. So on with:

PLAN "B"


Plan "B" is my previous short wheel base recumbent that my son affectionately called the "Pocket Rocket". It is made from and old CCM mixte frame. It runs on a 20 inch rear wheel and a 16 inch front wheel. I had some elements like the front boom and brake bosses welded on by a welder for hire. Cost of the welds back then came to about $20. Next post will be about slapping the Rocket back together. Sorry about this let down, but things like these happen when you make stuff yourself from junk. Remember that practice makes perfect.

Til next time, ride safe and Godspeed.

Gerry :)

Homebuilt recumbent part 1
Homebuilt recumbent part 2
Homebuilt recumbent part 3

Monday, May 12, 2008

HOW TO BUILD AN INEXPENSIVE RECUMBENT BICYCLE AT HOME PART 3

Well it's been a while, but the snow has finally melted and the Sun has decided to come out. So it's time to build bikes again. In this post I will talk about 2 sections of the build, the steering column and the seat brace and seat, so off we build!

MAKING THE STEERING COLUMN

This recumbent has over the seat steering. This requires for the handlebars to clear your legs while they crank the pedals. I accomplish this by using a few parts from scrap bikes.

Part 1 is a stem that I took from a mountain bike. I removed the clamp that holds the handlebar and kept the sides so that I could attach the second part. Part 1 actually goes into the steerer tube of the fork, it's the main stem.

Part 2 is just a piece of frame from the top tube of a racer bike cut to lenght. I then drilled some holes so I could attach it to Part 1, the main stem.

Part 3 is a regular road bike stem that is shoved inside Part 2 and tightened up as usual. I chose a road stem since I wanted the handlebars close to me.

Part 4 is a pair of moustache handlebars that can usually be found on old roadster bikes. You can also use a regular flat bar. I chose these because that is my riding position of choice.

Get all this stuff together, bolt everything real tight and you have yourself a steering column for your recumbent. Did I mention bolt everything tight? Don't skimp that part for later.


THE SEAT BRACE AND SEAT

The seat brace was going to be a challenge on this suspended bent. I couldn't use the rear stays for support since they are moving. I found the solution in some left over tubing from an old bike rack. The tubes were pre-bent to shape. I flattened the bend to add some strength, drilled a bunch of holes in the tubes, bike frame and then I bolted everything together tight with nylon lined bolts. The seat is just 2 pieces of plywood slapped together with door hinges and bolted to the braces in the appropriate holes.

This set up is my worst looking educated piece of guesswork that I have ever done. Awkwardly, it is also the most sturdy! The seat will have some fine adjustement done later on and will be padded. The rear suspension will take most of the hits, but plywood is still not that comfy, it will be padded.


The next installement of this build will be about chain management. This is the part where you get headaches.

Remember that if you are building one of these things, overbuild and tighten every thing down hard. In this build alone so far I have 10 added combination of nuts and bolts not found on a regular bike. That means 10 other things than can go wrong, don't forget it.

Til next time, ride safe and Godspeed.

Gerry :)

Homebuilt recumbent part 1
Homebuilt recumbent part2
Homebuilt recumbent part 4

Sunday, September 09, 2007

HOW TO BUILD AN INEXPENSIVE SUSPENSION RECUMBENT BICYCLE AT HOME PART 2 THE FRONT BOOM

Before we build anything, we need some more parts. You need a road bike frame and fork. The fork will be used to connect the front boom to the frame and you will make the front boom from the lower part of the road bike frame. See and enlarge the image. You will also need the top tube of that bike to make the steerer tube extension which will be covered in the next post.

So you had some fun with the hacksaw and you have all your bits, let's start. I removed the bits of the seat tube on the mountain bike frame since they won't be needed. This will save just a little weight as well. Not a lot, but homebuilt recumbents are notorious for being heavy, so every little bit helps.

Now I have a drill press, but since most of you out there don't, I will use a regular drill to make my holes so you can see that it is possible. 15 years ago when I built my first recumbent I had a revelation when I realized that a fork steerer tube would fit almost perfectly inside a seat tube. That's where all those road bike frame parts come into play. Cut the lower frame of the bike as illustrated in the first image, cut more and remove some length later if it's too long. Now set that piece aside after cutting a slit about 4 inches long in the seat tube where it will be inserted in the steerer tube. This will help when installing the clamps in final assembly.

Now take the fork and cut it at the end where it starts to curve. Close to that cut, drill a hole on each side. Make sure that your holes are aligned. Now slide the cut fork in the mtb frame so that the steerer tube faces forward. See where you want to make your holes in the mtb frame and mark them. Drill the holes and bolt the cut fork into place. Voila, you have done the first step in building the front boom. The front boom will hold the pedals, crankarms and front deraillleur.

Noticed that we only installed one nut and bolt, this is to permit you to see where you want the boom assembly to sit. You want to make it as level with the seat as possible and high enough so you don't hit the wheel with your feet when turning and pedaling. At this point, it's educated guesswork since we have no seat, so do the best you can or wait for the end of this story. Building a recumbent yourself involves a lot of guesswork and return visits to the drawing board. Heck, that's half the fun. :) This recumbent will most probably end being the kind that you hit the wheel when you pedal and turn sharply. I don't have a problem with that since I found a solution for me some years ago: don't pedal when you turn.

After finding where you want the boom to sit, mark where your holes will be and drill them. You might end up with a gap between the fork legs and the mtb frame. Fill those gaps with washers and make sure to use the same number and size on both sides. Your boom must be aligned with the rest of the frame. Bolt down tightly and you will check those bolts for tightness after a few miles when it's done, if you have half a brain.

Lastly, insert the road bike seat tube that you cut into the steerer tube and admire your progress. At this point we don't have a seat and we are pretty clueless on where it will finally end up. So for now we will leave it alone.

The next post will cover the handlebars and how to make an extension for them.

Until next time, ride safe and Godspeed.

Gerry :)

Recumbent build Part 1
Recumbent build Part 3
Recumbent build Part 4

Sunday, September 02, 2007

HOW TO BUILD AN INEXPENSIVE SUSPENSION RECUMBENT BICYCLE AT HOME PART 1


WARNING! LONG POST BELOW.

Well it should be, how else can I explain all this. :) I have been building recumbent bikes myself for the last 12 years. I've built 7 or 8 of them, I stopped counting at some point. "Recumbent Bicycle" was the very first search I did when I got connected on the web and that's where that crazy quest started. My main goal was to build a reliable recumbent for not too much cash. It took me 7 (or 8) bikes to accomplish that and I had a blast in the process. Building your own bike provides even more pleasure in the "quest" itself of making your own ride work. Finding solutions for all the bugs and actually making it work is truly rewarding.

I loved building and riding these bikes until I built the last one that was actually a very reliable ride. Then many things came into play for me to lose interest, I had reached my goal, I moved to the city (Montreal streets are notoriously bad) and I started getting into cruisers. Until 2 weeks ago when something happened...

...I hurt my back! No way I could ride my cruiser in this condition. The timing was awful since I was planning to ride at critical mass and I was invited for a night cruise with the Hannan choppers afterward. So out came my pocket rocket recumbent from the mothballs and I rode for at least 8 hours and had a blast that evening. I was surprised that after at least 5 years of leaving that thing alone in storage, all I had to do was adjust the brakes, put some air in the tires and it ran solid the entire ride. Even did some pretty stupid stuff and came out of it with flying colors.

The other ingredient for that mechanical soup, that you are about to learn about, was a donation of a full suspension mountain bike from a friend. I started thinking"hmmm, I always wanted to build one with a rear suspension..." and the mad recumbent builder took over like Mr Hide.

So here we go, let's build a rear suspension recumbent bike from junk. :)

First thing I had to do was strip the old mountain goat to the bare frame. There was nothing left to use on this thing. It was one of those rare bikes that I find with no useful parts left and the damn thing made me sweat 2 hours to take it apart. I had to hacksaw my way to her guts! I will have to make sure that corrosion doesn't become an issue later on, it was bad.

I gathered the parts that I already have: 20 inch wheel and tire, matching fork( I can't keep the original fork because I want to lower the frame and be able to use brakes on the front wheel.), a spare rear shock(nothing fancy just a regular Chinese job) since the original one is dead and my faithful "Pocket Rocket" recumbent to donate the rest of the parts. I will have to make another seat since the suspension doesn't allow me to use the one from that bike, more R&D.

After stripping the mtb I installed the fork and 20 inch wheel to see how it will sit and give me some ideas for problems to come. One big issue in any recumbent build is chain management. This one won't be different. Expect a full post just for that. At this point it is time to decide how you will progress and think of solutions. Good exercise for your brain believe me.

The next ingredient that we will need for this build is a men's road bike frame for various parts, more on this in part 2. Now this post will have all the links to all the articles for this build. I will try to update the build at least once a week. This all depends on how things go and what kind of wall I hit.

Lastly, before you go out all crazy and build one of these, be warned! These bikes go real fast downhill and if you are not careful about how you build one, you can very simply kill yourself. I am not there to take you by the hand to build anything, so don't come crying to me if your are stupid enough to build a bike half assed and get hit by a truck. I have listed other recumbent sites in the sidebar and I have many recumbent sites in the Bicycle Search Engine, do your research. Finally, always respect the number one rule of all homebuilders: When in doubt, OVER BUILD.

Til next time, ride safe and Godspeed.

Gerry :)

Recumbent Build Part 2
Recumbent Build Part 3
Recumbent Build Part 4

Sunday, January 21, 2007

HOMEBUILT BICYCLE CHOPPER PART 3, REDOING THE BANANA SEAT AND MAKING A SUICIDE SHIFTER


I always wanted a bike with a suicide shifter. It was pretty easy to make. I took a seat tube from a women's frame and cut it. I gave it a slight bend at the bottom. I flattened the end that would bolt to the bracket. I didn't flatten it all the way, you need a little space left so you can slide in the cable and have it move freely to operate. I drilled a hole for the cable and then I made two cuts on the arm to be able to install the cable and then for it to work. I made another hole for the nut and bolt assembly. A nylon washer was installed between the shifter arm and the bracket to allow some movement. I finished it off with a knife handle from a toy knife bought at the dollar store for a buck. That's how much money I have put into this project so far, one dollar!

My attention was then brought to the seat. I did a crappy job of redoing it some years ago and I was more than willing to screw it up again. I don't really mind since all I want is for it to be comfy and not look half bad. The fabric used was an old black t-shirt. I separated the two seat pans, cut a piece of high density foam to size, sprayed adhesive on the pan, installed the foam on the pan. I then sprayed everything that was going to touch the fabric with that stuff and stretched it on. I then cut away the excess fabric and rejoined both pans together. A word of caution, those tabs are not made to be flexed back and forth too many times. Be careful or they will snap off and you won't be able to reconnect the pans. Well, I'm not about to put leather on a Boyd Coddington car anytime soon, but it's clean and it didn't cost me anything.

So go get your hands dirty and have some fun.

Til next time, ride safe and Godspeed.

Gerry

Sunday, August 27, 2006

HOW TO BUILD A CHEAP BUT GOOD BICYCLE TRAILER

A little while ago I built a big cargo trailer so I could carry big and heavy loads. Th experience was succesful, but the trailer is a bit too big for everyday use like getting groceries. So I decided to build a smaller one with a built-in carrying box to avoid dirtying my groceries or whatever stuff I wanted to carry. Here you will find a complete how to article on how I did this, except for the hitch. The details for the hitch construction can be found on the big trailer build.
My first idea was to build this from broken hockey sticks. New lumber is always green and it never comes out straight. Hockey sticks are always straight, strong and broken ones can usually be found for free. But no luck in finding hockey sticks at this time of the year, but I did find a baby crib in the trash and that would do just fine. It also came with a board to cover the frame, bonus! I also found a kids bike with 14 inch wheels and tires in the trash and an old abroller to make the trailer arm. Broken dreams of easy perfect sixpack abs would now be transformed into sexy strong leg muscles! I salvaged parts from the bike as well that can be used on full size bikes, a sidepull brake caliper and pads, brake cable and housing, chain, a headset washer for my CCM Galaxie project, a bell, various nuts and bolts.

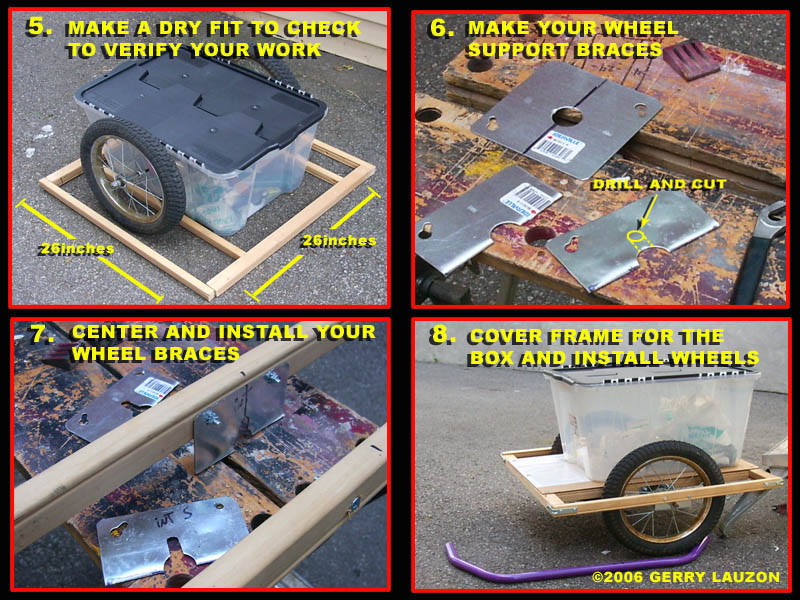
First I dismantled the crib bottom to salvage the lumber and board. I cut everything to size for my use. The trailer measures 26 inches by 26 inches. Since I was using a front and rear wheel, the gap between the outside and inner side was different. Take your measurements from the wheels you'll be using and make the frame accordingly.


Second, I screwed the frame
together using Robertson wood
screws and steel corner braces. I then did a dry fit assembly just to make sure that everything was coming out right.


Third, take some electrical box cover plates to make wheel mounts. Cut them in half. Drill a hole and then with a hacksaw, cut a channel for the axle to go in. I made one a little higher than the other to allow for some camber in the wheels(The wheels tilt inward if you look at the trailer from the front or back). This makes the trailer more stable. Mark your plates "inside" "outside" so you don't mix them up during assembly. Mark the middle of the frame and the middle of the plates. Drill some holes and bolt the plates to the frame. Put on your wheels and make sure that they are both parallel and straight to the frame. Take off the wheels and paint the frame.


Fourth, reinstall the wheels and make your trailer arm. I used an old abroller, but any piece of steel or aluminium tubing properly bent will do. The distance between the trailer and the hitch attachment should be 16 inches, I have a 26 inch wheel bike . I screwed in a piece of wood to the frame to elevate the arm to the proper height and then screwed in the arm in that piece thinking it would be strong enough...WRONG! At the first test ride, I almost lost my trailer into rush hour traffic, I had put in a safety strap just in case and that saved the day. I went back and drilled two holes through the arm, wood spacer and the frame. I used two front wheel axles to bolt everything solidly together. I ignored my first rule of homebuilt vehicles: When in doubt, ALWAYS OVERBUILD!

Fifth, Screw in the carrying box to the frame and use some washers. I bolted the box at 6 places. I also added a small tool box in the front to carry my lock and bungee cords in the same fashion. Leave some space between the tool box and the main carrying box so you'll be able to open its cover. Screw in some hooks around the frame so you can attach bungee cords to lock the lid in place or to strap down extra stuff carried on top of the box. Install a reflector on the back of the box or a light if you plan on using it at night. Pin to your bike and go get stuff.


The first grocery run

I used the trailer on the very first day. I went out to get $60 worth of groceries about 3km away. I used to go and get whatever I could carry in one bag or on my rear rack, which is not much. People where looking at me funny when I came out of the store and headed for the bicycle stands with my grocery cart! I had bought the following:
- 2X 2 litres of Diet Pepsi
- 1X 4 litres of milk in three bags
- 1X 1 litre of skimmed milk
- 1X 1 box of 8 frozen hamburger patties
- 5X Packages of various cold cuts
- 4X Cooked 3 pieces fried chicken meals with coleslaw, fries and sauce.
- 12X hamburger buns
- 12X hotdog sausages
- 12X hot dog buns

All of this fitted inside the box without any problem. I had some doubts when I started unloading my cart at the check out counter, but my doubts were squashed soon enough.
I carried this home with no problems and I felt great. I'm happy with my new toy and I hope you build and enjoy one yourself.

-Lumber = free
-Wheels = free
-Steel tubing = free
-Hardware = $8
-Box = $8
-Leaving the gaz guzzling, money pit, breaks at the worst possible time minivan at home for getting stuff I need = priceless!

'Til next time, keep your hands dirty and Godspeed.

Gerry