OUR ADVERTISERS

Showing posts with label "bike maintenance". Show all posts

Saturday, April 12, 2008

REGULAR BICYCLE MAINTENANCE, WHEN IT'S NOT AN OPTION ANYMORE


Bicycle maintenance is always important, but at some point it becomes necessary to organize yourself a regular, if not yearly, routine. Case in point, I recently had an interesting discussion with one of my readers, I will call him Robert (That's his bike in the picture by the way), who met this nice French woman, moved to France, ditched his car and started using his bike to get around everywhere. Now Robert, not his real name, is faced with the fact that his bike needs some well deserved maintenance and attention.

If you decide that your bicycle will become a more regular means of transportation in your life, there are some things you have to be willing to do. Now that your bike is not in the same category as lawn furniture priority wise, it is time to look after it with more regularity. When a bike is just used for recreation once and awhile, people take them to the shop or replace them when they break down. What you have to realize is that a well taken care of bicycle can last you a lifetime.

Chain lubrication should be attended to at least once every season and twice that if it sleeps outdoors (step AWAY from the WD40, use real bike chain lubricant). Schedule rear brake cable replacement at least once a year. If the cable is still good, rotate it to the front brake and get rid of that cable. Check your brake pads if they need to be replaced, rotate them fornt to back once a year. Rotate your tires front to back once a year to make them last longer. If you do any kind of serious mileage, replace your chain once a year. Take a look at your derailleur cables and schedule replacing if they are rusted or frayed, rotate them as well if you can. Put a dab of lubricant on every piece of exposed metal at least once a year and spot paint any paint chips on the frame. These task can be done by anyone with very basic tools. The only special tool needed in what I mentioned in this paragraph is a chain tool, you should definitely have one of those and carry it with you when you ride. Trust me it will pay for itself the first time you bust your chain in the middle of fraking nowhere! Clean your bike once a week, dirt is it's enemy. I use lemon Pledge furniture polish, it's a degreaser, it leaves a protective coat of wax so dirt doesn't stick on my frame, it makes the finish look very shiny and it smells nice too(make sure you don't spray any on your drivetrain, it will absolutely remove any lube you have on there).

Now you can always go for the big jobs like re-greasing all the bearings on your bike once a year. This will require some specialized tools and the knowledge dispensed elsewhere in this blog. If your are not confident enough to do the work yourself, don't despair, just farm out the work to your local bike shop. Since you are educated about the needs of your ride, you can be more specific about the work you want done to it and it will save you time and money.

Lastly, make simple verifications on a regular basis. A loose nut and bolt here and there is quickly fixed and will prevent bigger problems down the road. Also check your tire pressure once a week, you are the propulsion system and even 1 psi too low will affect how hard you have to crank those pedals.

When you own a car, you are a slave to it working long hours to pay the monthly bills that it generates, but with a bike it is the reverse. It is so low maintenance and low cost that it serves you. However, keeping it in good running order will make it happy and you as well in return.

Til next time, ride safe and Godspeed.

Gerry :)

Sunday, June 24, 2007

FIXING AND MAINTAINING YOUR BIKE FOR AN OPTIMUM RIDE!


I haven't posted in a while and I guess you can figure out why. Especially if you live in the snowbelt, it's summer and riding is a major part of my agenda. I can't write and ride at the same time now can I?

This year I decided to ride a single speed coaster brake cruiser. The decision was first based on looks (They do look cool!) and also on the fact that I was tired of hauling all the tools necessary to fix a busted derailleur or brake calipers everytime I go for a decent ride. A coaster brake cruiser requires very few tools and it lightens the tool bag big time. A cruiser also builds a good pair of legs!

A one speed cruiser bike is very demanding on hills and it's pretty heavy. So everything you can do to help yourself to move forward with less effort helps. These tips apply to any kind of bike. They are things that most people overlook or don't know about that robs them of a very enjoyable bicycle ride. Let's face it, the easier and more comfortable a bike is, the more you ride. So here it goes:

  1. TIRE PRESSURE: Buy a floor pump with a gauge and check your tire pressure on a regular basis. Rubber tubes are porous to a point and you do lose air over time. A low pressure tire will slow you down a lot. Pump it up to the prescribed pressure and you will see a huge difference.
  2. WHEEL AND PEDAL AXLE BEARINGS: The bearings in your bike are what makes everything turn smoothly. Make sure they are greased properly by doing a simple check, turn the front and back wheels to see if they turn freely. Get the chain off the front chainring and see if you can turn the pedals without feeling any resistance.
  3. LUBE THAT CHAIN: It sounds crazy, but a badly lubed chain will rob you of some power. I noticed this when I ran a recumbent with a chain 2 and a half times longer than a regular bike. The thing ran a lot better when the chain was properly lubricated.
  4. IS ANYTHING RUBBING?: If you are riding with a brake pad rubbing on the rim all the time, this will take away a lot of your pedaling power for nothing. Again, spin the wheels to see if they turn freely. Check also if the wheels are sitting properly in the frame and that the tires or not rubbing on it.
  5. SEAT POSITION: If your seat is too low, you will have a hard time pedaling and you might even hurt your knees. I have seen people riding their bikes with their knees sticking out sideways countless times and somehow they don't seem to enjoy themselves.
  6. GEARS, USE 'EM IF YOU HAVE 'EM: Give yourself a chance and leave from a dead stop on a lower gear. I often see people leaving a traffic light on the biggest chainring in the front, pedaling hard, looking in pain and hurting their knees. Use the middle or small chainring and learn to shift that bike or get a one speed cruiser!
  7. PUT YOUR BIKE ON A DIET: Do you have any kind of junk on your bike that you don't use or that is there for no purpose? If so, remove it. A heavy bike will show it's bad side when climbing hills or going against a hard head wind. You are the only thing powering that beast, so every ounce counts.
Bike maintenance not only preserves your bicycle, but it also makes for a more enjoyable ride and like I said before the more fun it is, the more you do it.

'Til next time, ride safe and Godspeed.

Gerry :)

Monday, March 19, 2007

SPRINGTIME BICYCLE CHECKLIST


Well with spring around the corner, many of you are aching to get that favorite ride of yours out of the shed or basement and on to the pavement. Before you do so, there are a few things you should check out on your bike before you head out into cycling bliss. Here's a checklist to guide you in that task:

  • CHECK TIRE PRESSURE AND INFLATE ACCORDINGLY Those rubber tubes are actually porous and you do lose some air during that storage period. Don't be alarmed about that, it's normal.
  • CHECK FOR TIRE WEAR Look if you have any bald spots or balloons in the sidewalls. If you don't need to replace the tires and you have a matched set, rotate them from front to back. They will wear evenly and last a lot longer.
  • CHECK BRAKE LEVER AND CALIPER ACTION Nothing sucks more than ruining your first ride with your brakes deciding not to show up for work at the first corner. Don't end up has a hood ornament on a Mack truck and make sure these work properly.
  • CHECK BRAKE PAD WEAR Pads do wear out after a while. If they look decent, do a rotation and they will last longer. In general the rear pads wear out faster than the front ones. It may be the other way around according to the way you ride.
  • CHECK ALL CABLES Derailleurs, brakes, check everything. If you see rust or a cable starting to fray, don't wait and replace immediatly. Especially the brake cables, remember that hood ornament thing?
  • CHECK YOUR CHAIN AND LUBE IT Back pedal and watch for any links that are jammed. Oil the chain with anything but regular engine oil or WD40(I use transmission fluid myself). If your chain has many thousands of miles and looks slack, replace it.
  • CHECK FOR ANYTHING LOOSE I mean everything. If it's screwed or bolted, it will come loose at some point. Check them all!
  • CLEAN YOUR BIKE Yes that's right, clean it. Dirt and filth actually helps a bike to deteriorate. Take some lemon furniture polish and clean it nice. Your bike will thank you for it and you'll be looking good. It smells nice too!
Last thing to remember when you go out there for the first time, is that the roads might not be up to snuff. Be careful since it takes a while before all the roads are cleaned of dirt, debris and pebbles. Don't forget the potholes and those brainless SUV drivers that are not used to seeing you on the road.

Til next time, ride safe and Godspeed.

Gerry

Sunday, December 24, 2006

HOW TO ADJUST A FRONT DERAILLEUR


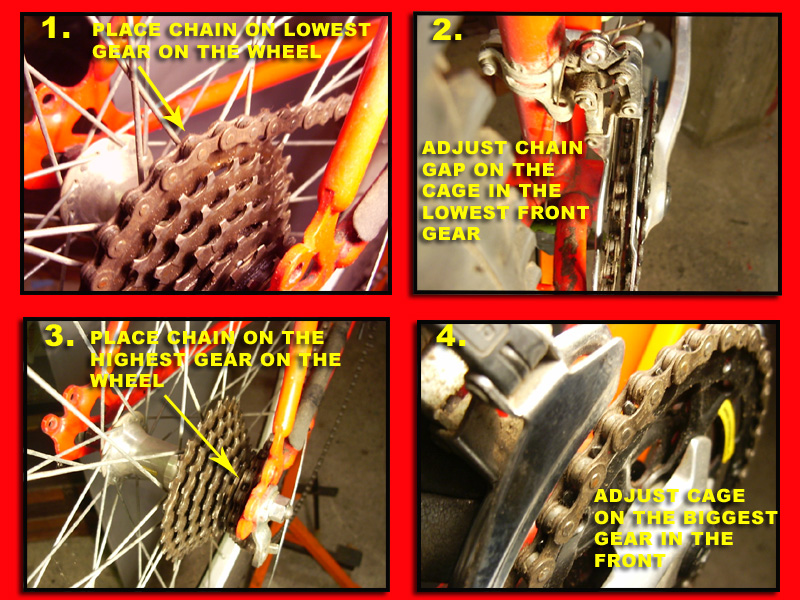
A recent comment and request from one of my readers made me realise that I never posted on how to adjust a front derailleur. This is because none of my rides presently have one of these and I just simply forgot about it. So here we go, excuse the crappy pictures, but with the weather I'm stuck indoors and I haven't figured out how to take good ones inside....yet.

The front derailleur is a simple thingamabob that is springloaded and pulled by a cable to push the chain on the gear you want at the pedals. This how-to applies for 2 and 3 gear chain rings. Once you've adjusted with my method, the middle one should take care of itself on a 3 gear set up.

Before you begin, there are a few things to verify. First, make sure the derailleur cage is aligned with the chainring gears. Second, make sure the height is correct by pushing the cage with your hand towards you to make sure that it doesn't hit that last gear. If you need to move the derailleur, undo the cable and loosen the frame bolt and make the necessary adjustements. There, I just saved you at least 45 minutes of yelling, screaming and swearing!

Next, don't bother doing any adjustements before removing the cable from the derailleur. Let's start fresh. At the same time, verify that the cable is moving freely. Cables that are housed in a sleeve up to the derailleur sometimes have a nasty habit of jamming. What happens is that the sleeve's opening points upward on the derailleur and invites water in to deposit itself in there and marries it and the cable with a generous amount of rust. Replace cable and sleeve if that is the case.

Ok, derailleur moves freely by pulling it with your hands and the cable moves freely. Now keep the cable disconnected and put the shifter in the lowest gear position. Your chain should rest on the gear closest to the frame on the chainring(that's the name of the gears attached to the pedals)if you turn the pedals.

Next, shift the rear derailleur to the lowest gear in the back. That's the gear closest to the wheel spokes. Now look at the clearance between the inside of the front derailleur cage(closest to the frame) and see if you have a small gap between the chain and the cage. If the chain is rubbing on it or the gap is too wide, take a screwdriver and adjust the "L" screw on top of the derailleur. Turn the screw until you are satisfied with the results. Clockwise should push the cage outward and counterclockwise inward.

Now to verify that your gap is not too big, leave the chain on the lowest gear on the chainring and shift the rear derailleur to the highest gear, that's the one closest to the frame. If your adjustement is good, the chain shouldn't rub on the outside wall of the front derailleur cage.

Lastly, reinstall the cable and with keeping the chain on the highest gear in the back, shift the front derailleur to the biggest chainring while turning the pedals. Did the chain completely come off the chainring? That's because the front derailleur cage went too far and pushed the chain off. You will need to turn the adjustement screw "H" clockwise until the derailleur stops just before pushing the chain off the chainring. The reverse is true if the cage doesn't go far enough and the chain refuses to go on the last chainring.

That's it.

Til next time, ride safe and Godspeed.

Gerry