OUR ADVERTISERS

Showing posts with label "bike blog". Show all posts

Monday, August 24, 2015

New/Old project a Bike Revival

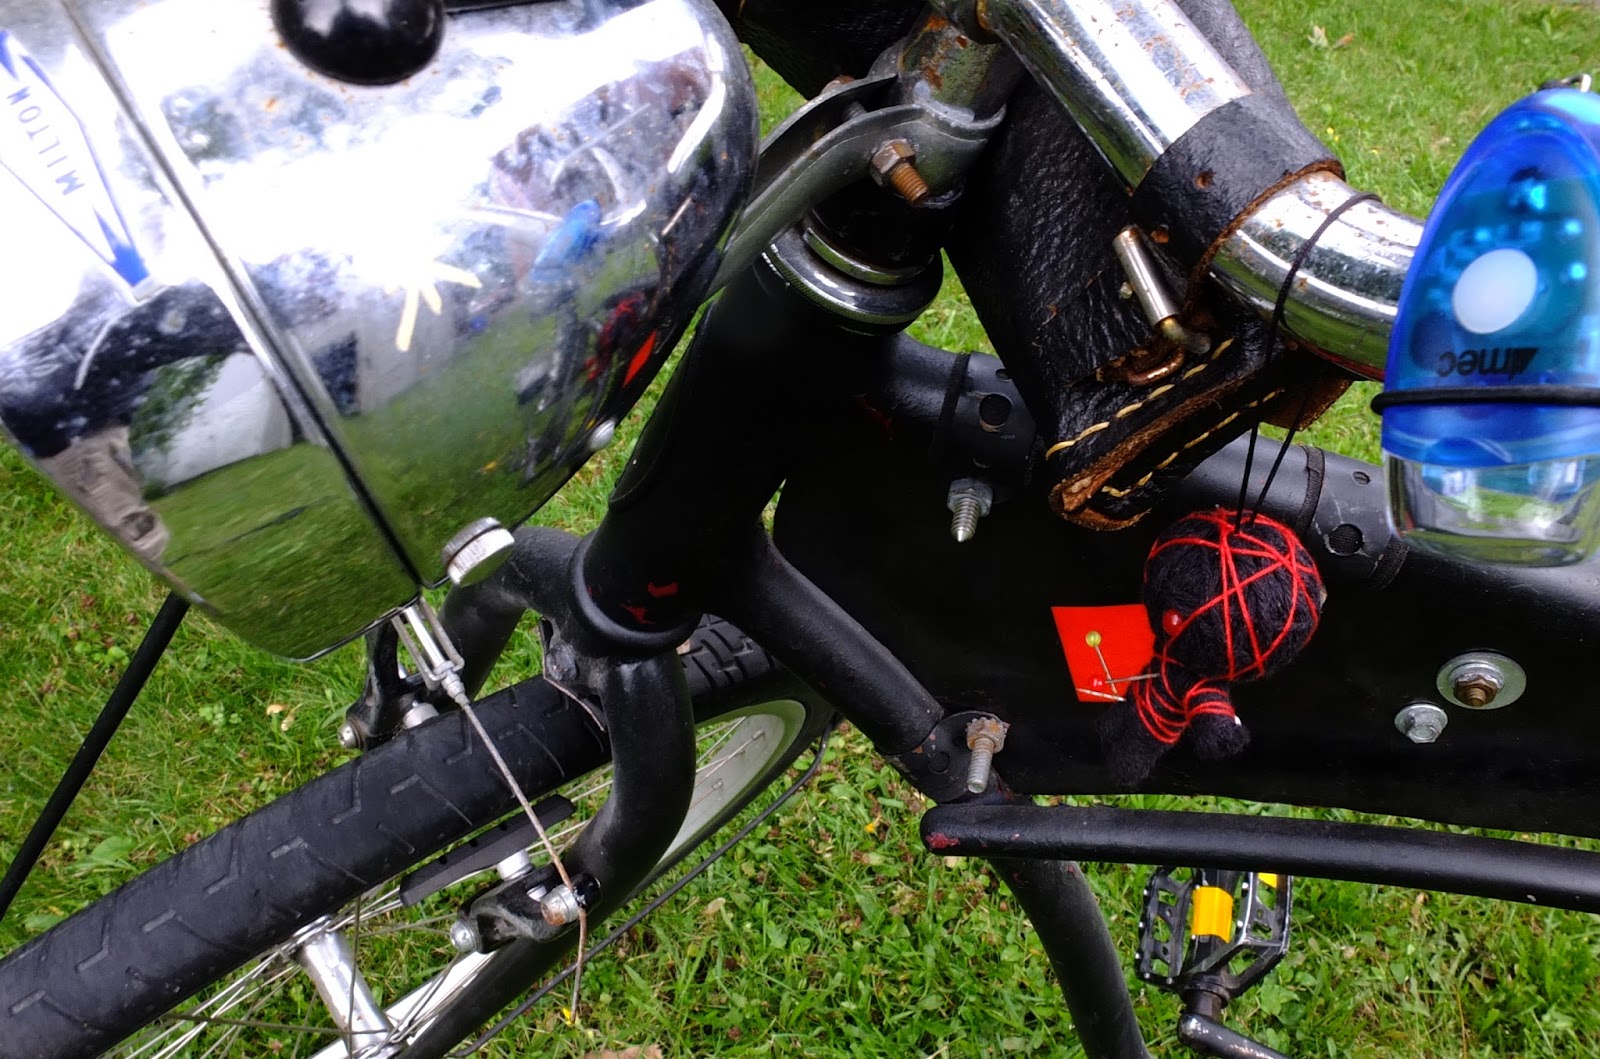
Yesterday I took a stretched chopper I slapped together 4 years ago and fell in love with it all over again. I built it out of 2 frames I had lying around, a Schwinn cruiser and a mixte frame. I stole the idea from a friend who did this design by bringing 2 frames together at the bottom bracket.

I went ahead with my own idea to stretch it even more. I wanted cool looks and a comfortable riding bike. I wanted my cake and eat it too! Well after 4 years, 150 miles and one crash, proof of concept as been overly tested. It's comfortable and reliable like a tank. Now I need to go beyond the semi-gloss black paint and add some character to this thing.

The main goal is to make it look so rough that you would want a Tetanus shot before riding it but the mechanics of it underneath will be perfect and well balanced. This build will be in 2 parts.

First I want to do a full mechanical tune up to all the components and take care of the overall finish. I would like the bike to be in riding condition before the end of the Fall season. Secondly, since I am getting a bit older, I want to install an electric assist system to it that I have lying around. I'll also be adding a full lighting system and make some other cool doodads.

Keep posted for another instalment of this revival next week. Here's some shots of the bike as it sits right now.


The bike as it looks right now
Custom made tire front fender, might be keeping that.

Details of the bolt on Bottom Bracket extension

Shifter with knob found on the ground by my Wife in South Portland Maine, go figure! definitely keeping that.

Foot operated rear brake because I ran out of brake cable. Keeping it but must improve. Doesn't work that good.

Lighting system will be fully redone.

Lunch box saddle bag. To be replaced. This is the sole survivor from the original pair. The other one was destroyed in a crash. Never lock up the front wheel when turning.  :)

Until next time, ride safe and Godspeed.

Gerry  :)

Wednesday, November 11, 2009

I'M BACK!


Well I guess only crazy people don't change their minds and that's why I'm glad I didn't say I was pulling the plug for good in my last post. I guess I needed to get away for a while and that put things back into perspective.

You can thank my 1956 Raleigh Sports for this return to bike blogging. I took it out of the shed yesterday to bring it in for a warm winter storage in my basement shop and it just hit me. I love bikes! What was I thinking? The sweet leather saddle, the old yet sexy finish and those skinny black tires just begging to be taken for a spin. I did and then it all came back.

So right now I don't have much to write about since I've been mopping in my corner feeling sorry for myself and doing other worthy yet not as fun things as bike stuff. So I promise you an intelligent post before Monday. In the meantime, if any of you wish to read about anything specific, please feel free to ask about it in the comments and I'll be more than happy to oblige if I can.

In conclusion, I'll share with you my final thoughts on surviving a heart attack and being hit by a car within 6 months: If the almighty wants me back, so be it! Until then, let's have some fun and live.

Until next time, ride safe and Godspeed.

Gerry :)

Friday, January 30, 2009

HOWTOFIXBIKES VERSION 3.SOMETHING, UPGRADES AND REVISIONS


Reader comments on the Facebook group about adding tags made me do what ended being a well deserved revision of every post ever made on this blog. It made me realize that some of the earlier articles had no tags and that some of the pictures are all screwed up because of the multiple redesigns and change of templates over the last 3 years.

I might have known about bicycle mechanics and making decent pictures in the beginning, but I was pretty clueless about putting a website together! Well, I've seen the light and I will be doing a major revision of everything in the following weeks. Proof again that reader input is very valuable to me and to this living bicycle website.

I might have to do the same thing I did with links and make a separate post with links to all the articles there instead of having them all on the right side of the site. What do you think? Please let me know as I need your valued opinion once again.

A million thanks to all of you who take the time to read me.

Until next time, ride safe and Godspeed.

Gerry :)

Monday, January 19, 2009

LINKS TO OTHER BIKE SITES I LIKE. (Mostly bikes anyways.)


Since the right sidebar is getting quite crowded and the links of other websites and blogs of interest, including howtofixbikes.ca reader's, is getting longer, I decided to gather them all here. I will also add any other blog or website of interest here in the future. So please feel free to suggest any additions for me to review and I will gladly add them. Here's the list:

Retro Vintage  My local buddy Wesley who restores vintage bikes.

DIGnGO   (High-end bicycle tours throughout Europe.)

Jack's Garage  (A reader's blog about homebuilt recumbents, you gotta see this)

Underground Velo (Another Rat Biker friend of mine)

Reciclone (A reader's bicycle restoration blog in Spanish and English)

TWOSPOKE.COM (Bike forum for all tastes)

Reusable Grocery Bags

Bike Reviews

Local Bike Trader

Bike Trailer Blog

Bike Hugger

Opus Urbanista Blog

Velocouture

The Bicycle Bum (Huge directory of bike makers)


Rat Rod Bikes Discussion Forum

CHUNK 666 (Bike craziness at it's weirdest!)


North Baltimore Bike Brigade

For the love of bicycles

Cycloculture

Bicycles and Beansprouts, a journey

Biking Brits


Righteous Velo Metal Broad

Bike commuting adventures in France

bikehacks.com


Montreal Gazette Bicycle Blog


The Bicycle Tutor

The Bike of Doom


For Bikes Sake!


Kustom and Classic Bicycles


BMX site and forum

ridethisbike.com

recumbents.com

The IHPVA site for recumbents


Ottawa Bicycle Club

Blog for the self sufficient family

Makezine, make anything!

Enjoy!

Until next time, ride safe and Godspeed.

Gerry :)

Thursday, January 01, 2009

HAPPY NEW YEAR!


Once again another year is over and a new one begins. This blog is in its third year and the fun never stops. I plan on continuing to give you the best information about bikes in the matter that you are used to.

I was planning to use my holiday break to finish my bike maintenance book. I had figured that all that was left to do was the format to make it look nice...AAAAAAAAARGH! Somehow I got a brain fart somewhere and just realized that I have a few more things to do.

So, I will publicly commit myself to you, my readers, on getting this manual available online to you by February 15th 2009. Mark your calendars because I am usually pretty good with deadlines. This does not qualify has a New Years resolution, actually I have another post on this coming up in the nest few days, but an actual commitment to get my lazy butt in gear. It's fun being lazy but it gets boring fast and it's very counter productive.

I hope that all of you and your families have a prosperous, safe and happy 2009.

Until next time, ride safe and Godspeed.

Gerry :)

Thursday, December 25, 2008

HOW-TO MAKE A REAL CHEAP HARD SADDLE BAG

Sometimes you look around the house and miss the obvious treasure trove of stuff just lying there or about to be tossed away. Case in point, a simple plastic peanut butter jar and a pair of plastic tie wraps can give you a very usable hard saddle bag.

Clean any plastic jar with a screw-on lid, just make sure it's not too wide. If you hit it with your legs while pedaling it will be very annoying after a few miles.

Use a marker and while centering the jar under your seat, mark two spots on each side of the seat rails. Cut four small holes and pass two plastic tie wraps in there. Use quality tie wraps on your set up, unless you don't really care about losing your new container.

Strap them on the seat rails and fill it with stuff. If you want to make it completely water proof, simply add a dab of silicone over the holes for the tie wraps.

That's it. you're done. I hope some of you will find this post helpful.

Until next time, ride safe and Godspeed.

Gerry :)

Friday, October 24, 2008

HOW TO FIX BIKES ON FACEBOOK AND HOW TO CONTACT ME


That's right, howtofixbikes on Facebook is now a group. I've been a member of Facebook for a little while now and find that it is a great way to make contacts and share ideas. Hence the creation of the "HOWTOFIXBIKES.CA" group.

Come join us to share, rant, rave and post pictures of your ride with all the other readers of this bicycle repair blog. I hope to make this a true international bicycle exchange of ideas. The combination of this blog and the group should make for some interesting exchanges. Don't be shy and post your stuff, ask questions and have fun. I'll be there at least once a day to maintain the place and keep you posted on the latest here.

Come and join us today here: http://www.facebook.com/reqs.php#/group.php?gid=49048827216

You can also contact me directly at: howtofixbikes@gmail.com


See you there soon, Godspeed.

Gerry :)

Thursday, October 23, 2008

THE LAZY AND EASY WAY TO BUILD A BICYCLE WHEEL.


First off, this technique is only good if you need to replace a rim. Also, it will only work of you are replacing the rim on your wheel with the same diameter rim. You won't be able to put a 26 inch rim on an old spoke and hub set up for a 700 bicycle wheel.

Now that we got that out of the way, on with the show.

For the benefit of this post, I will switch rims from alloy to steel for a cruiser project. What you need is your bicycle wheel, a replacement rim of the same diameter, spoke key wrench and some masking tape. Make sure that you are replacing your rim with a straight one. A bent rim will only provide you with more reasons to curse. You can easily check this by laying the rim on a flat surface and any bends will magically be revealed.

Next, take the new rim and tape it to the old one. Now you must match the two rims together. This means that the valve holes must be aligned with each other and the sides of the spokes as well, ie a left spoke hole matches a left spoke and a right spoke hole matches a right spoke, etc...


Now start removing the spokes from the old rim and transfer them to the new rim one at a time. Don't screw the spoke nipples tight on the new rim, we just need them to hold in place.


Once all the spokes have been transferred to the new rim, remove the tape and the old rim. Voila! You have just built a new bicycle wheel the lazy and easy way.


Take your newly rebuilt bicycle wheel and screw all the brass nipples until you can't see the thread on the spokes. If you know how to true a bike wheel, now is the time to put it in the stand and true it. Tension will be put in the wheel after this initial truing and you'll top it off with a final true after that. For those of you who can't, you can go to my article with a video on the subject listed at the bottom or you can bring in your wheel to your local bike shop for final truing. Hopefully you will save some bucks since they didn't have to build it for you.

How-to true a bicycle wheel video link

Until next time, ride safe and Godspeed.

Gerry :)

Wednesday, September 24, 2008

1956 Raleigh Sports project bicycle build, ride and review.


After correcting the small problems mentioned on my last post, I finished putting the bike together and went for a spin. The ride was nice and as expected. But I wanted to take it for a decent ride before I would declare my happiness to the masses.


A long ride teaches you something about a bike that a spin around the block will never do, especially if you have to be somewhere at a specific time. The first thing that hit me, or rather my leg muscles, was how tall the gearing was. The Nexus was in first gear and that thing was kinda hard to push up a hill. Now I understand why Nexus equipped bikes come with those tiny 36 tooth chainrings. Well I wasn't too sad about that. My first idea for the bike was to see if that hub was operationnal since it's going on a future project. Mission accomplished on that front minus the fact that I am still in the "educated gueswork" stage for adjusting the speeds on the Nexus.


That rear wheel will be replaced by a one-speed coaster hub. The other reminder that I got, after arriving at my destination, is that running smaller and higher pressure tires makes you more vulnerable to flats. Yep, got one. It's a good thing it happened right next to the Mile End bike garage.


Lastly, I have to talk about the Brooks B66 touring leather saddle that came with that bike. I've heard from many sources that those saddles were worth their high price( around $150CDN) and, after a few decent rides, I must come to the conclusion that they are right. Wow! What smoothness, comfort and smashing good looks! To think that the one I have is over 50 years old. This is the best saddle I have ever had on a bike.

Now normally this would be the end of this little project, however, it's not. I'm not done yet. I'm still going to change some stuff and I'll write about it next week. I just don't like those handle bars.

Until next time, ride safe and Godspeed.

Gerry :)

Friday, July 11, 2008

HOW TO RIDE YOUR BIKE SAFELY


I’ve done many articles about bike maintenance, but one area that I realize I haven’t addressed is safe bicycle riding. You can have a properly maintained ride, but if you are not careful out there you could be killed or maimed.

So the first thing you must have in mind at all times in your head when riding your bike is this: BE ALERT AND BE AWARE.

BE ALERT

I don’t care if it’s a beautiful sunny day on the bike path and traffic is light, if you don’t pay attention to what you are doing with your head in the clouds and your eyes on the pretty birdies, you open yourself to whatever will happen to you. Unconsciously riding your bike anywhere but in your driveway is THE recipe for disaster. Keep tabs on what is moving and not moving around you. Look ahead and anticipate what the other guy might do, may he/she be a pedestrian, driver or even another cyclist. Keep an eye on the road surface as well, missing manhole covers and crater sized potholes can seriously ruin your day. This might sound complicated and impossible to do, but consider that you have an unobstructed view of everything, your rate of speed is a lot more manageable than a car or motorcycle and, if your brakes are in good condition, you can stop pretty quickly on a very short distance.

BE AWARE

Being aware is not just about your surroundings, it is extremely important, but it is also about being aware of yourself and your bike. What kind of rider are you? Fast, slow? In what condition is your bike? Good brakes, gears working properly, anything about to break on it that you are aware of? Take all these things into consideration before that first push of the pedal. I ride around on a big cruiser sometimes with very bad brakes (for my taste anyways) and knowing that fact I will ride it very casually at speeds that I know it can stop fast…relatively speaking of course. You will never catch me doing stupid stunts in weekday traffic on that thing!

Here are other things to consider:

BIKE PATHS AND CYCLING LANES

Ah yes the safety and convenience of bike lanes…NOT! Even the best case scenario of the protected and dedicated bike lane that physically keeps vehicle traffic away from you has it’s dangers, just imagine what the painted line on the ground variety is like. The list is long in both cases: Opening car doors, unconscious morons on foot using or crossing without looking, Lance Armstrong wannabes, kids sent there by there mothers with their tricycle doing donuts, kids or regular brain-dead cyclist weaving from side to side, parked maintenance vehicles or moving vans, rollerbladers taking both lanes to skate, wheelchair type scooters, and a whole bunch of other things that I’m sure some of you could add. Keep this in mind next time you go for a leisurely ride. The one that freaks me out the most are the mothers walking their baby stroller right in the middle of the path, I think these ladies failed their physics class since a rider and bike moving at 30 km/h can cause serious damage if they or their baby gets hit. Hopefully that rider will have read this post an managed to avoid her in time.

BEING DOORED

This has never happened to me, but I’ve had two close calls. From what I’ve gathered when talking to victims of this type of incident, deceleration is instantaneous and extremely painful. One cyclist ended up in intensive care last week clinging to life after being doored. She bounced off the door and was projected onto incoming traffic and got hit by a truck. When riding next to parked cars, keep an eye inside the vehicles and side mirror to detect movement inside. If you can’t see the inside of a car because of tinted windows or other reasons, take for granted that it is occupied and prepare to evade or stop. Keep an eye on the traffic behind you at all times. I’ve equipped all my bikes with a decent bell so that when I see movement in a car I ring it to make sure the occupant is aware that I’m there. So far it’s worked wonders.

STRATEGY AND TACTICS ON THE ROAD

When riding with traffic you have to take some precautions and adapt your way of riding. Never ride facing oncoming traffic, it’s a myth that it’s safer. Drivers find you out of sync and might not react well, at night your red rear reflector or light is not visible and neither are you. Avoid sidewalks at all cost, it is dangerous for pedestrians and illegal in most places. Don’t forget to keep an eye on what’s happening behind you and keep your ears open. Use all the feedbacks from the road, may it be visible or audible. Never forget that in a hitting contest the car will always win. If you have priority and a driver decides otherwise, don’t insist or you might get killed to get your point across. When you get to an intersection and there is more than two cars competing for the right of way, play it safe. Stop, sit up on your saddle and cross your arms over your chest. This way the other users will see that you are not going anywhere. You can now wait until they’ve all settled their arguments, in a matter of speaking, moved along and safely go through once the intersection is clear. Those few seconds that you’ve waited will insure that you can ride on instead of wasting some precious riding time in a hospital bed. Blasting thru stop signs and red traffic lights is of course extremely suicidal. At least take the time to slow down and look both ways.

SOME PEOPLE HATE YOU

Yes it’s true. Either it’s because we look different, save money on gas or just because we seem to enjoy ourselves and the world, some people find this offensive in the sense that everybody should be as miserable as they are or they are simply stupid period. This type of idiot can try to aggress you with his/her car or throw things at you just for the hell of it. In this type of situation it is imperative that you avoid and evade immediately. Your first priority is your safety and survival, Police reports and arguments will have to wait for later. A car as tons of horsepower, but you are extremely mobile and you can go anywhere. Go places a car can’t go or follow you, keep moving and if you have to, even consider going against traffic. Once you’re in a safe place you can call the Police if need be.

RIDING AT NIGHT

Bikes usually come equipped with reflectors and most people think that this is enough to get by when riding at night...WRONG! Nothing beats a good front light and a red blinker in the back. LED equipped bicycle lights are now available in both red and white. They are inexpensive, easy to find and don't require a cumbersome dynamo to slow you done. If you want total visibility at night, throw in a lime yellow safety vest and only a total blind man or idiot won't see you. There is no technical reason why you should ride at night without being visible. Reflectors are only good so a driver can notice you seconds before he/she plows into you.

LAST WORD

In your mind, prepare yourself for any and all problem that you might encounter while riding. You would be surprised at the difference it can make in any situation. Lastly I will quote a Montreal bike courier who once told me this: “I ride as if I was invisible.” That means that you always take for granted that nobody sees you and you ride your bike the proper way, defensively.

Til next time DO ride safe and Godspeed.

Gerry :)


Update

Here's a copy of an email I received from one of our readers telling of his experience and I think it is worth sharing here. So here it goes:

"I consider myself a very safe and alert cyclist based on many years of riding a motorcycle with the attitude that "everyone out there who can get me, will" and always having an exit plan. I commute 14 miles each way 2-4 days a week to work. I have since given up the motorcycle after my dad lost his life to a drunk driver riding the motorcycle on which I learned.

One situation I never anticipated caused a friend of mine a broken jaw and over a year's worth of surgery. Road conditions were excellent: sunny, dry, and clean roadbed. There was a nice bike lane and the street was long, straight, relatively flat with infrequent cross streets. My friend was in front of me on a road bike, me behind on my Vision recumbent. Traffic was heavy and stop and go while we were cruising along at about 12 mph. A medium sized panel truck stopped in traffic just ahead of us, but since traffic was stop and go we didn't think anything of it. However, the panel truck driver had actually stopped to allow an oncoming truck to turn left into a business driveway (i.e. in front of the panel truck and across our bike lane). The turning truck accelerated and roared in front of us, giving us no time to see him and stop in time.

My friend's jaw hit the bottom edge of the turning truck's flatbed. His jaw was broken and he endured over a year of oral surgeries including a length of time with his jaw wired shut. Had I been in front, I would have gone under the truck due to my lower riding position. I shudder to imagine what that would have been like.

I am used to watching out for traffic turning in front of me from behind, in front, and the sides, which is common at street intersections whether there is a bike path or not. What I learned from this experience was be very wary during stop and go traffic when obscures my vision of oncoming traffic.

Toby
Portland, OR"

Thanks Toby for sharing your experience.

Gerry


Wednesday, July 09, 2008

UPDATE ON THE BLOG AND OTHER THINGS


Well I'm approaching the second anniversary of this blog in a few days and I thought it would be cool to do a little recap and let all of you know what's coming up. When I started this website I had no clue what I was doing, well apart from fixing bikes of course. :) If I had, I would have done a few things differently, but i guess that's what life is for. After all, success is a lousy teacher. I must say however that I'm very happy with the way things are turning out. I've met a bunch of people on and off line, helped a few on the way, helped participate in the rebirth of more than a few bikes and had a great time doing it.

A big "thank you" to all of you, you've made this blog what it is and I think it is more than appropriate to adorn this post with the picture of a reader's bike. The one speed you see pictured is the pride and joy of Johann from South Africa and if you can believe it, he crossed a 100km desert with it. He's planning a 2300km cross country trip next year. Awesome ride Johann.

I know that how to articles have been slow to come lately, but don't despair. I have one around the corner about replacing a rim the easy way stemming from my current Rat Bike Build Off project. Answering emails, comments on the blog and giving time at the local community bike shop has also kept me very busy. A recent email has also prompted me to start something I have been putting on hold for too long, a book.

I was contacted by a publishing agent to write a book about bike repair. The deal never came to fruition and I decided to go about it myself. Wow, talk about a mine field when it comes to publishing a book! My day to day job is a cake walk compared to that.

So in the spirit of Wikinomics and this blog, I've decided to publish it myself and make it available through here. No middle man, so I'll be able to offer it for donations. Just like Radiohead did with their new album, you'll be able to download it and give whatever you want. A hard copy will also be available through Cafepress for a decent price. The writing is all done(no copy and paste, all fresh text) and I'll use some of my vacation time coming up in the next weeks to take the pictures. That's it, I've just committed myself, so keep posted.


Til next time, ride safe and Godspeed.

Gerry :)

Friday, June 06, 2008

HOW TO USE THE SHIFTERS AND GEARS ON YOUR BIKE


I’m always surprised to see that often times people are riding multiple speed bikes and are completely clueless about how to use them. Then I realize that not everybody as the sacred knowledge to decipher these gears, shifters and all possible combinations. I can understand that all this can be a complete mystery to many of you, so let’s go ahead and solve it.

First off, I’ll explain what you have to work with, we’ll use the typical 3 gears in the front and 7 in the back to explain how to use your drivetrain effectively. On a multiple speed bike you have generally 3 gears in the front, called chain rings, and 6 to 8 in the back on the rear wheel. The front gears are controlled by the shifter on the left of the handle bar. The first one is the smallest and the easiest, it is often called the “granny gear”. That gear is typically used for climbing steep hills or getting people back on bikes like it did for me 16 years ago. The middle gear is the one that is used the most on flat surfaces while at cruising speed. The biggest and hardest gear is used when you are going downhill with the wind at your back.

Some of you more experienced riders reading this are probably going “what is he talking about?”. Remember that I am addressing the neophyte here and most people who get back on a bike don’t have the same legs as Lance Armstrong. Strong riders with many miles on their leg muscles can ride a bike from a dead stop using only the biggest gear or chainring. A newer or more casual cyclist would bust his/her knees doing this. So to recap, smallest gear = easy, middle gear = normal cruising, biggest gear = hard.

Now the front gears are used with the combination of the ones on the rear wheel that are controlled by the shifter on the right side of the handlebars. In this case, the logic is reversed, the first and biggest gear being the easiest and the last and smallest being the hardest to pedal. I will list some combinations that will make your riding easier and you will see that although you might have a 24 speed bike, in reality you will effectively use about 5 or 6 of them.

Climbing a steep hill

1st or 2nd gear in the rear, first gear in the front.

Riding on a flat surface or slight incline

1st to last gear on the rear, middle or second gear in the front.

Riding downhill

Last gear in the rear, 3rd or biggest gear in the front. (If you’re not scared. If so, stay in the middle gear)

If you are a new or recently returning cyclist with dead legs, you can stay on the smallest gear in the front and use all the gears on the rear wheel for all your riding. At some point you will develop more endurance and be able to move on to the middle one. Hardcore cyclists who ride thousands of miles a year will be able to do just about everything with the biggest gear only, but for the mere mortals like you and me, you should stick with the middle one.

One final note, always shift gears ahead of time. If you change gears while applying full power to the pedals, you take a chance of breaking your chain. Plan your shifts ahead of time and you’ll be ok. I hope I managed to explained this properly. Your comments and questions are, as usual, more than welcomed.

Til next time, ride safe and Godspeed.

Gerry J

Sunday, May 18, 2008

HOW TO BUILD AN INEXPENSIVE SUSPENSION RECUMBENT BICYCLE AT HOME PART 4


Now that the seat is installed, it's time for the job that will rack your brain big time: chain management. On regular bikes this is pretty obvious, the chain goes straight from the chainring sitting in front of the rear wheel not too far ahead.

In our case, the chain has to make a few detours to get from the chainring to the rear wheel and must avoid a whole bunch of things on it's way there and back. Before you start making your chain management set up, make sure you install everything on the bike, brakes, cables and every little doodad that goes on there. You must know what will be in the way of the chain before you install it. Remember, we're not working with plans here! One of the easiest ways to bring the chain from the rear to the front is with black PVC type tubing. I use the kind that is put in the ground for lawn sprinkler systems. 100 feet for $12, it should last you a lifetime. Those types of tubes usually last one season, so all the extra is not for nothing. It is surprisingly quite, you just have to make sure you secure the tubing with a good amount of duct tape strategically placed so the tube doesn't move with time. Leave the very front and back of the tube loose so that the chain can move when shifting from one gear to another.


That takes care of the top part of the chain, now for the lower part or the return section of the chain. When the chain is moving in the lower section, it isn't under tension and we can get away with less strength in our deviation set up. I use a grinded rollerblade wheel secured at the old bottom bracket by using a front wheel axle jerry rigged on the left bearing cup. It holds pretty nice and is very quite. I allow the wheel some movement on the axle so the chain can remain more straight in its path back to the rear wheel. I also added another wheel which I made from an old printer bracket wheel that I attached to the clip that holds the front boom. I sandwiched an old derailleur wheel on it. I used that one to clear the top of the fork while the chain is on its way back to th rear of the bike. I could have used another rollerblade wheel type of arrangement there as well, but I already had that set up lying around.


Now at this point the bike can be powered. Before you start installing all the accessories and other little knick knacks, install a working rear brake and take it out for a ride to see if your prototype is actually functional. I did with mine and that's when I found out that...

IT'S A TOTAL FLOP!

Yes, sadly this is a possibility when you hodge podge a homebuilt bike together. Before I started this build, I figured there was going to be some flex when pedaling the bike caused by the rear suspension, but I wasn't expecting that much. The thing bounces around like a clown bike when under full pedal power from a dead stop. Climbing hills is just very hard labor and extremely slow. I had tightened up the spring on the cheapo shock absorber, but it wasn't enough.

Mind you, the suspension does its job while going downhill or when you're up to speed on the flats. But unless you want to train to get legs like Lance Armstrong, going on even the slightest incline is murder for your leg muscles. There might be a way to lock the shock when you need it or a better quality shock might work better, but I don't have the time or money right now. I need a working recumbent for a big critical mass event in 2 weeks. Not only does it need to work, it also has to be broken in, no time to do repairs on a big ride like that. So on with:

PLAN "B"


Plan "B" is my previous short wheel base recumbent that my son affectionately called the "Pocket Rocket". It is made from and old CCM mixte frame. It runs on a 20 inch rear wheel and a 16 inch front wheel. I had some elements like the front boom and brake bosses welded on by a welder for hire. Cost of the welds back then came to about $20. Next post will be about slapping the Rocket back together. Sorry about this let down, but things like these happen when you make stuff yourself from junk. Remember that practice makes perfect.

Til next time, ride safe and Godspeed.

Gerry :)

Homebuilt recumbent part 1
Homebuilt recumbent part 2
Homebuilt recumbent part 3

Sunday, April 20, 2008

BIKE ADVOCACY, IS IT FOR EVERYONE?


Well, it should be. For those expecting a How-To article, bad news, this isn't it. Be warned, I'm pulling the soap box and I'm about to vent. So either you go back to Google or get yourself a drink and read on.

Back in January I participated in a "Bike Show" protest type of event outside the building holding the annual car show. I found it was a neat idea to have such an event in the cold of winter and decided to join in. The event was a lot of fun and to my surprise a lot of people attended. It was great to see that the City had some real hardcore people that believed in the cause. I figured if such an event was held for real during the warmer months in a more convenient venue, it would be awesome. Will it did happen this week end, a lot of people showed up, it was great with lots of cool bikes and...I missed it! No ones fault but mine. I tried to do three different things in one day, I planned my day poorly, got lost like an idiot and finally showed up when every body was packing.

This is where, in a nanosecond, this article was born. When I got there with my daughter, we were riding our scooters back from our first club ride. The looks we got from some of the attendees would have made you think we had just slaughtered a beluga whale or dumped a ton of bunker oil right there on the pavement!

We recently managed to pay off our big gas guzzling mini van that my better half loves profusely and that I hate with a passion. Our current situation makes it so that living without a car is impossible. I tried to motivate my honey to bike to work, but it just didn't happen. I even forked the bucks for an electric assist bike, but to no avail. After getting my daughter her scooter last summer, I figured that it would be a much better idea to get one for me and my wife so it could be used for her to go to work and for distant errands instead of the pos mini van. Using the scooter 7 months a year would also stretch the life of the gas guzzler so we wouldn't have to buy another car for a while. Being a newbie at scooting, joining a club is a great way to network, get educated and having some fun. low and behold, my sweetheart is crazy about it and now we will burn 10 times less fuel during those 7 months. Trust me, the fact that I managed to pull this off is close to a miracle, she just loves that mini van!

So by now you're thinking, "what's this got to do with bike advocacy?", absolutely everything. Those looks reminded me that bike advocacy has in it's mist some, willing and unwilling, snobs. Bike advocates are a great bunch, I know a lot of them. Some might say that they aim for Utopia and that's fine. Ever heard of somebody working hard to get to the middle of anything? Neither have I. However, this can be harmful to the cause where people can become purists and expect everybody else to do so. What happens is that the masses get pushed aside unless they completely adhere to the philosophy and the movement just slows down to a crawl.

Bike advocacy must appeal to the masses because the masses are the target, not just a few people who are willing to change their way of life completely overnite. If you keep going in this direction, you'll be preaching just to the choir pretty fast. What the movement needs to do now is to look at the "enemy" and start doing what they do, appeal to the masses. Wally World and the such use mass appeal to get people to buy crap and people do because it's easy. Anybody is welcomed to go in there and throw there money on stuff they don't really need, it's cool, it's great and it's fun. Is it really? Of course not, but people think it is. On the other hand, biking is easy and fun...I mean for real. There's half the selling job already done.

Bike advocates must welcome anyone that is willing to throw a leg over a bike, even if it's once a week. Why should we care if they don't recycle every thing at home or still drive the car because it's raining? Habit comes with use and those people might change their ways in a not so distant future. Even if they don't, at least they will have made a contribution where none was present before. A war is won with many little battles as well, not just big ones.

If you are an open minded bike velorutionary and welcome every one to the fold, I admire you and support you. I do hope that there are many of you out there and I tend to believe that there is. As for the bike advocate snobs, stop it! You are putting the tire pump in the spokes of a great and necessary movement. Sell biking, not how we should be living.

I shall now step off the soap box, peace.

Gerry :)

p.s. The scooter has in no way killed off my passion for bikes. If anything it reminded me that you are totally free on a bicycle.

Wednesday, February 13, 2008

MONTREAL BIKE SHOW


If you're in Montreal and you want to shake some of that winter blues, than you can for at least a few hours during this week end at the 6th annual Montreal Bike Show at place Bonaventure. Here's the press release for the full low down.

MY FREEDOM… MY BICYCLE!

6th Bicycle Show Expodium

Place Bonaventure - Montreal, February 15, 16 and 17, 2008

Montreal, February 4, 2008 – Calling all cycling enthusiasts! The Bicycle Show Expodium is taking place this February 15 to 17 at Montreal’s Place Bonaventure. Now entering its 6th year, the Show is back and better than ever - with an exciting program that’s sure to thrill cycling enthusiasts of all ages. Even the most discriminating connoisseurs will be impressed! Come and explore cycling and its unique sense of freedom! The 6th Bicycle Show Expodium is the place to find information, compare, shop and dream, thanks to family activities, unexpected shows, the largest cyclotourism section ever seen in Canada, a 200-metre long test track and over 200 exhibitors and experts on-site to answer all your questions.

“We’ve got something for everyone,” says Jan P. Dubé, Show promoter and president of Expodium International. “Did you know that cycling is the most popular activity in Quebec, second only to walking? That one out of every two Quebecers bike? That more bikes are sold in Quebec than cars? Whether you’re looking for advice on nutrition, performance, bicycles, equipment, accessories, clothing or cycling destinations, the Bicycle Show Expodium is the place to find everything under the cycling sun… including great ideas for planning future cycling excursions!”

Repeat Success

The annual Bicycle Show Expodium is much-awaited by all cyclists eager to learn more about the latest products and trends, as well as what’s new in cycling destinations. It is the only show in Quebec dedicated exclusively to bicycles and the tremendously popular field of cyclotourism. During the 2007 Show, more than 16,000 cycling enthusiasts descended from all over Quebec to explore the Show’s exhibits and to learn more about this wonderful world on wheels!

This event brings together under one friendly, easy-to-access roof, all the key players in this rapid-growth industry, along with those involved in the many areas related to cycling - be it for sport or recreation. This combination gives visitors a unique “close-up” look at all the top products and services available on the market.

Sunday is Family Day!

The Bicycle Show Expodium understands the importance of cycling as a family. On Sunday, February 17, children ages 12 years and younger enjoy free admission to the Show when accompanied by a parent. It’s a family event that’s not to be missed!

Program

At the Zone Exposants, exhibitors will be showing off a full range of cycling-related products and services, including training, nutrition, etc. Over 200 exhibitors and experts are ready to answer all your questions!

The Zone des Spectacles is home to a series of live presentations. To usher in a new Olympic event for the upcoming 2008 Summer Games, the Bicycle Show Expodium is proud to present a special BMX show by the Haro/Adidas Eyewear stunt team that’s sure to raise some hair and chill a few spines! The Show is also bringing back fashion shows featuring the latest in cycling wear from KSL, a company headed by 2002 Canadian road champion Katy St-Laurent.

The Théâtre du Vélo La Presse is sure to attract large crowds to its 20+ conferences. There, specialists will share in-depth information on techniques, positioning, performance, conditioning and nutrition. One of the most-awaited conferences this year will be from the Université de Sherbrooke VéLUS research group, which will offer exciting new findings sure to shape the cycling of tomorrow. One researcher will provide an overview of past and on-going projects that touch upon every cyclist’s top three concerns: safety, comfort and performance. Also on the program, a nutritionist from Sherbrooke’s Centre d’excellence sportive will discuss nutrition for cyclists and the ever-growing availability of dietary supplements.

The Zone Cyclotourisme is the largest cyclotourism section ever to be seen in Canada, featuring more than 130 cycling travel packages in over 30 countries. Visitors to this zone will also discover the top cycling circuits in Quebec for family outings, romantic excursions or athletic pursuits. Quebec’s strong reputation as a popular travel destination in recent years is highlighted, thanks to the development of the Route Verte, a province-wide cycling network of over 4,000 kilometres of trails. Several Quebec regions will be in attendance, eager to woo cycling enthusiasts with tourism information such as main attractions, bike paths, accommodations and road circuits. Everything you need to plan a cycling-filled summer!

The Théâtre du cyclotourisme offers conferences on the latest trends in cycling travel destinations, including an introduction and exploration of cyclotourism itself - be it solo, in a group or with the family. Conferences will also cover various cycling circuits both here in Quebec and around the world. Yvan Martineau will be one of the main presenters. This journalist and creator of the French-language show “Dans la roue du tour” is an avid cyclist, stemming from his many challenges along the legendary Tour de France. Yvan will discuss Europe’s most exhilarating circuits, along with a presentation that follows a typical day with a cyclotourism club - a booming trend in Quebec.

Test Track

The Expodium even includes an indoor marked path of nearly 200 metres in length to give visitors a first-hand chance to test the handling, flexibility, braking, comfort and suspension of various bikes made available by exhibitors.

The 6th Bicycle Show Expodium, held at Montreal’s Place Bonaventure from February 15 to 17, 2008, is presented in collaboration with La Presse, TQS and the Fédération québécoise des sports cyclistes.

Admission Rates

          Family package: $25.00

          (2 adults + 2 children ages 12 years and under)

          Adults: $10.00
          65 years +: $7.50

          Students: $7.50
          6 to 12 years: $5.00 (Free on Sunday)

          Under 6 years: Free

Visit the Show’s website at www.expodium.ca to learn more about the event’s programs and scheduled activities.

Hope to see you there.

Gerry :)

Thursday, October 18, 2007

THE BIKE OF DOOM, COMMUTING ON A BUDGET


I recently found this interesting blog by a fellow Canadian named Steve George of Winnipeg. Steve commutes to work daily and the situation changed where he couldn't bring his bike indoors anymore. He had to leave it locked outside while at work. Bike theft being a consideration, he didn't want to leave his good bike alone during the day. It would seem that broken and busted bike locks are as common as daisies in that area!

So Steve went ahead and bought a $99 department store bike for his daily commute and blogs about the experience. I find that this well written blog could be of use to a lot of you. I have commuted myself on a POS Wally World special for many years. But that was before my blogging days and I didn't keep track of the adventure. I'm glad that Steve has and that he is sharing it with the world.

So check it out, The Bike Of Doom.

Til next time, ride safe and Godspeed.

Gerry :)

Sunday, September 09, 2007

HOW TO BUILD AN INEXPENSIVE SUSPENSION RECUMBENT BICYCLE AT HOME PART 2 THE FRONT BOOM

Before we build anything, we need some more parts. You need a road bike frame and fork. The fork will be used to connect the front boom to the frame and you will make the front boom from the lower part of the road bike frame. See and enlarge the image. You will also need the top tube of that bike to make the steerer tube extension which will be covered in the next post.

So you had some fun with the hacksaw and you have all your bits, let's start. I removed the bits of the seat tube on the mountain bike frame since they won't be needed. This will save just a little weight as well. Not a lot, but homebuilt recumbents are notorious for being heavy, so every little bit helps.

Now I have a drill press, but since most of you out there don't, I will use a regular drill to make my holes so you can see that it is possible. 15 years ago when I built my first recumbent I had a revelation when I realized that a fork steerer tube would fit almost perfectly inside a seat tube. That's where all those road bike frame parts come into play. Cut the lower frame of the bike as illustrated in the first image, cut more and remove some length later if it's too long. Now set that piece aside after cutting a slit about 4 inches long in the seat tube where it will be inserted in the steerer tube. This will help when installing the clamps in final assembly.

Now take the fork and cut it at the end where it starts to curve. Close to that cut, drill a hole on each side. Make sure that your holes are aligned. Now slide the cut fork in the mtb frame so that the steerer tube faces forward. See where you want to make your holes in the mtb frame and mark them. Drill the holes and bolt the cut fork into place. Voila, you have done the first step in building the front boom. The front boom will hold the pedals, crankarms and front deraillleur.

Noticed that we only installed one nut and bolt, this is to permit you to see where you want the boom assembly to sit. You want to make it as level with the seat as possible and high enough so you don't hit the wheel with your feet when turning and pedaling. At this point, it's educated guesswork since we have no seat, so do the best you can or wait for the end of this story. Building a recumbent yourself involves a lot of guesswork and return visits to the drawing board. Heck, that's half the fun. :) This recumbent will most probably end being the kind that you hit the wheel when you pedal and turn sharply. I don't have a problem with that since I found a solution for me some years ago: don't pedal when you turn.

After finding where you want the boom to sit, mark where your holes will be and drill them. You might end up with a gap between the fork legs and the mtb frame. Fill those gaps with washers and make sure to use the same number and size on both sides. Your boom must be aligned with the rest of the frame. Bolt down tightly and you will check those bolts for tightness after a few miles when it's done, if you have half a brain.

Lastly, insert the road bike seat tube that you cut into the steerer tube and admire your progress. At this point we don't have a seat and we are pretty clueless on where it will finally end up. So for now we will leave it alone.

The next post will cover the handlebars and how to make an extension for them.

Until next time, ride safe and Godspeed.

Gerry :)

Recumbent build Part 1
Recumbent build Part 3
Recumbent build Part 4

Tuesday, September 04, 2007

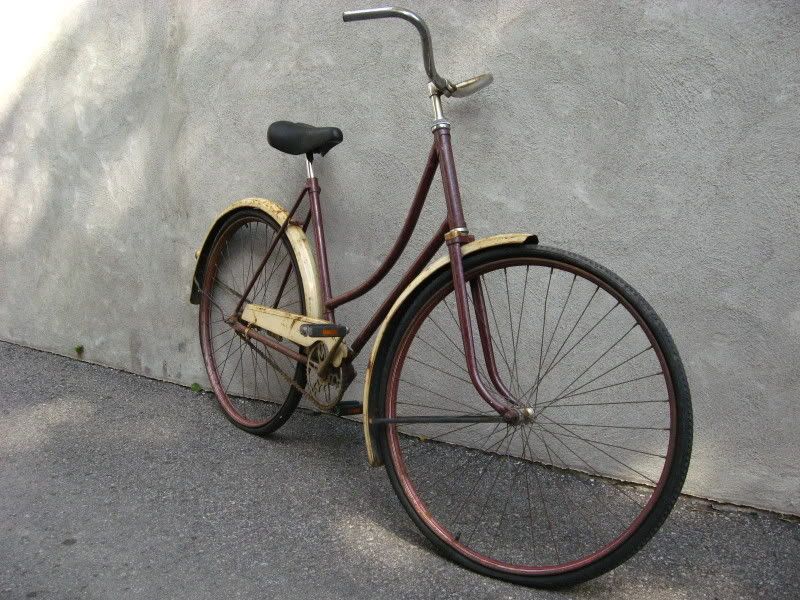
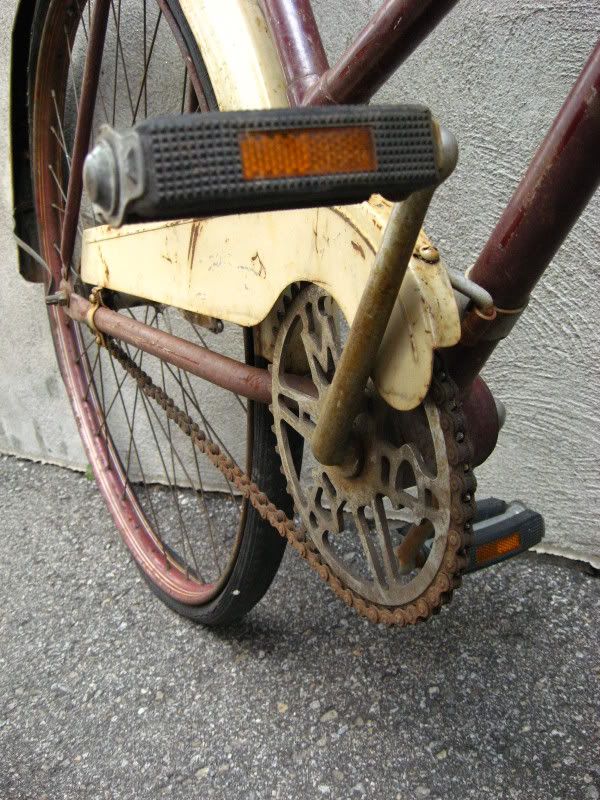
Vintage 1950 CCM Ladies Bicycle, mine...all mine!


Ok, this post is not about how to do anything. It's just about me proudly showing off my new acquisition. A very good friend of mine called me 2 days ago asking if I wanted an old ladies CCM bike from the 40's or 50's. Didn't have to think long about that answer especially since it was free. I always wanted one of those long swooping top tube ladies bike for my collection, to the dismay of my significant other (sorry babe).

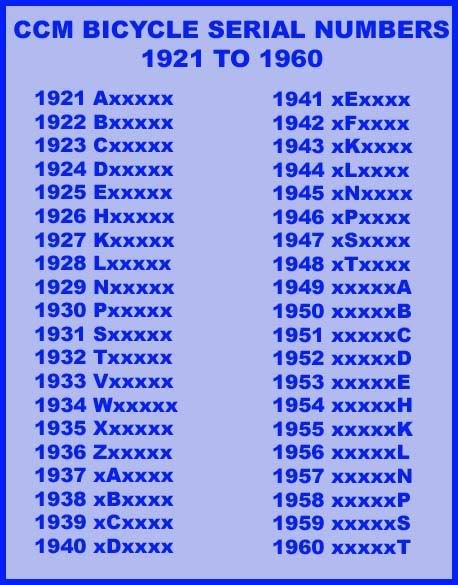
I was able to date the bike using the serial number code. You can see the list below that I found courtesy of drumbent.com. Now I don't now if the series goes beyond 1960 in the same fashion, so if anybody out there knows, please fill us in and I will update this post.


Although built in 1950, the bike is a prime example of late Victorian era bicycle design built for ladies who wanted to go about in those nice big skirts. A lady would just not be seen wearing trousers in those days for any reason. The big swooping top tube made stepping through the frame very easy. Another feature that was found on those ear;y bikes was a net fixed to the rear frame and fender to prevent the skirt from ending up in the wheel spokes. A nice big whicker basket up front would complete the vintage ride.

The bicycle was a big part in the emancipation of women in the late 19th and early 20th century. No longer did a woman need a man to prepare a horse and buggy. The bike was ready to go any time and didn't need any feeding or cumbersome maintenance of the veterinarian or stinky kind. Took up a lot less room as well. All of a sudden, women could go anywhere in town and at a faster rate than walking.

My plans for this bike are not set in stone yet. I really don't have any big ideas. However, I know for a fact that I will not touch the finish of the bike. This rusty used up look gives it character. The wheels are completely gone but the front and rear hub can be laced to another rim since they are of the 36 spoke variety. Hope this post helped to at least inspire someone and motivate them to bring back an "Old Girl" back to life, or any bike for that matter.

Til next time, ride safe and Godspeed.

Gerry :)

Thursday, July 12, 2007

1 YEAR OF BLOGGING ABOUT BIKES


One year ago today I started a journey with no idea where it would take me. I just followed my guts and went ahead sharing my passion for bikes. Thousands of words, hundreds of pictures, 3 digital cameras, hundreds of contacts, over 230 000 hits and countless emails later, I am even more passionate about this endeavor.

A little over a year ago I had no clue what a blog was. A fortunate discussion with my cousin brought me into this fantastic cyber adventure. I started on the 13th of July thinking that it was a sign. My Grandfather's lucky number was 13 and he made it through 4 years overseas during World War 2 in one piece. Thanks Grandpa, it's going well. People told me I was crazy to give this information away freely but I figured that it could help out some people and I would be doing a good thing. Turns out I was right. A man in China being able to commute to work because he can maintain his bike, a single Mom in England who, to the eyes of her son, became a Hero because she was able to fix his rear wheel, a guy who decided to bike again because he figured out how to fix his ride or a kid that decided not to give up and followed his desire to repaint his bike are just a few examples of the positive feedback I have received.


These small events might seem like nothing, but they can have positive repercussions over a lifetime. Because of these small bites of information spread out there, somebody might be able to work and feed his family, have the admiration of a child for life, maybe avoid a heart attack or have the confidence to pursue whatever he/she wants. I am very aware of these possibilities. My day to day job has shown me that small events can have huge consequences in someones life. I feel privileged to be able to do this and I am very proud when ever I get an email telling me that this blog helped you out.

To those who are here for the first time, welcome. Read, learn, get your hands dirty and don't ever quit. To those of you who have enjoyed this blog for a while, a thousand thank yous. Keep posted for more stuff, I'm not about to run out of things to write about and if you have a passion in life, share it with the world. You might make it a little better.

Until next time, ride safe and Godspeed!

Gerry