
My first idea was to build this from broken hockey sticks. New lumber is always green and it never comes out straight. Hockey sticks are always straight, strong and broken ones can usually be found for free. But no luck in finding hockey sticks at this time of the year, but I did find a baby crib in the trash and that would do just fine. It also came with a board to cover the frame, bonus! I also found a kids bike with 14 inch wheels and tires in the trash and an old abroller to make the trailer arm. Broken dreams of easy perfect sixpack abs would now be transformed into sexy strong leg muscles! I salvaged parts from the bike as well that can be used on full size bikes, a sidepull brake caliper and pads, brake cable and housing, chain, a headset washer for my CCM Galaxie project, a bell, various nuts and bolts.
First I dismantled the crib bottom to salvage the lumber and board. I cut everything to size for my use. The trailer measures 26 inches by 26 inches. Since I was using a front and rear wheel, the gap between the outside and inner side was different. Take your measurements from the wheels you'll be using and make the frame accordingly.
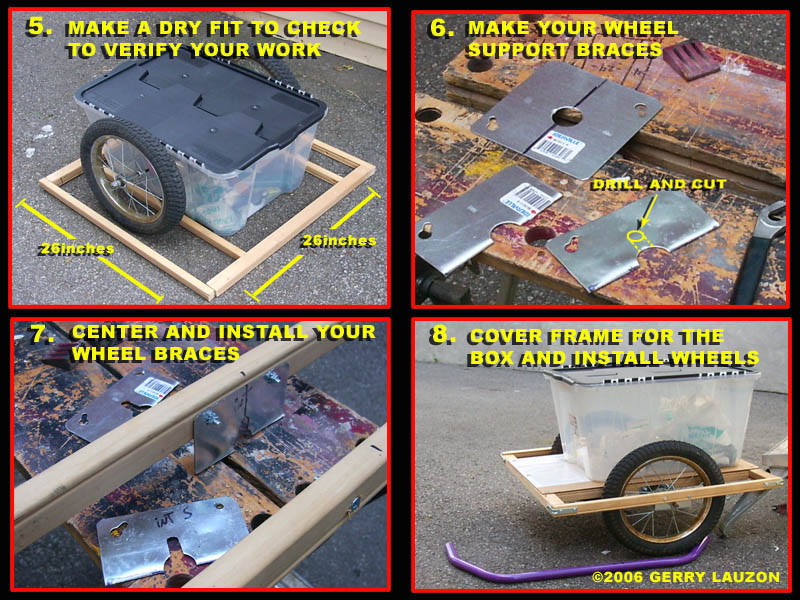
Second, I screwed the frame

Third, take some electrical box cover plates to make wheel mounts. Cut them in half. Drill a hole and then with a hacksaw, cut a channel for the axle to go in. I made one a little higher than the other to allow for some camber in the wheels(The wheels tilt inward if you look at the trailer from the front or back). This makes the trailer more stable. Mark your plates "inside" "outside" so you don't mix them up during assembly. Mark the middle of the frame and the middle of the plates. Drill some holes and bolt the plates to the frame. Put on your wheels and make sure that they are both parallel and straight to the frame. Take off the wheels and paint the frame.

Fourth, reinstall the wheels and make your trailer arm. I used an old abroller, but any piece of steel or aluminium tubing properly bent will do. The distance between the trailer and the hitch attachment should be 16 inches, I have a 26 inch wheel bike . I screwed in a piece of wood to the frame to elevate the arm to the proper height and then screwed in the arm in that piece thinking it would be strong enough...WRONG! At the first test ride, I almost lost my trailer into rush hour traffic, I had put in a safety strap just in case and that saved the day. I went back and drilled two holes through the arm, wood spacer and the frame. I used two front wheel axles to bolt everything solidly together. I ignored my first rule of homebuilt vehicles: When in doubt, ALWAYS OVERBUILD!
Fifth, Screw in the carrying box to the frame and use some washers. I bolted the box at 6 places. I also added a small tool box in the front to carry my lock and bungee cords in the same fashion. Leave some space between the tool box and the main carrying box so you'll be able to open its cover. Screw in some hooks around the frame so you can attach bungee cords to lock the lid in place or to strap down extra stuff carried on top of the box. Install a reflector on the back of the box or a light if you plan on using it at night. Pin to your bike and go get stuff.


The first grocery run
I used the trailer on the very first day. I went out to get $60 worth of groceries about 3km away. I used to go and get whatever I could carry in one bag or on my rear rack, which is not much. People where looking at me funny when I came out of the store and headed for the bicycle stands with my grocery cart! I had bought the following:
- 2X 2 litres of Diet Pepsi
- 1X 4 litres of milk in three bags
- 1X 1 litre of skimmed milk
- 1X 1 box of 8 frozen hamburger patties
- 5X Packages of various cold cuts
- 4X Cooked 3 pieces fried chicken meals with coleslaw, fries and sauce.
- 12X hamburger buns
- 12X hotdog sausages
- 12X hot dog buns
All of this fitted inside the box without any problem. I had some doubts when I started unloading my cart at the check out counter, but my doubts were squashed soon enough.
I carried this home with no problems and I felt great. I'm happy with my new toy and I hope you build and enjoy one yourself.
-Lumber = free
-Wheels = free
-Steel tubing = free
-Hardware = $8
-Box = $8
-Leaving the gaz guzzling, money pit, breaks at the worst possible time minivan at home for getting stuff I need = priceless!
'Til next time, keep your hands dirty and Godspeed.
Gerry


33 comments:
Geryy - I am about 1 hour's work away from finishing my trailer, you inspired and infomed me, thanks! I'll send soome pictures of it when it is done. I plan to use it to find free recyclabes (aka TRASHPICK) and bring my monthly recycling center run into the center, car free. thanks again, and I'll keep you posted.
Dave, you've just put the cherry on top of an already wonderful day. PLease do send me a pic of your trailer at xddorox@hotmail.com when you can and let me know if I can post it in the blog. That goes for any of you out there who are doing the same thing. It would be great to add a gallery of trailers to this post. BTW, I have a video of the big trailer in use coming up soon, keep posted.
Thank you again Dave.
Gerry
Gerry Lauzon, may i use those photos in my convenient truth entry,
thank you
Hi qamm, I would be happy to consider your request. Please give me more specific details of what and why at xddorox@gmail.com
On our Compact Yahoo! Group, folks were very interested in the cargo bikes from Europe. I wondered when I found your site, if you've every tinkered with putting a cargo box in the front instead of a trailer in the rear? See http://www.bakfiets.nl/eng/models.php.
Never had the chance to find one of those front mounted cargo rack bikes. But I find them very cool indeed.
Hi,
the plans are fab
does the trailer arm not hit the back wheel at all ?
Joe
Hi Joe, unless the bike is at a 90 degree angle with the trailer, it will not hit it. This never happens while riding unless you are doing a track stand and willfully put yourself in that position.
Gerry :)
Hi gerry,
I'm 13 years old and ive found your plans so easy to work from i've just made a trailer from your plans but i've made my trailer a bit diffrent i'll send you some pics if you would like ???
thanks
Great to hear that you built one. Please do send me a picture, I would love to see your version of this trailer. Send to: xddorox(at)gmail.com
Gerry :)
Gerry,
I just finished making the mechanism that is to be attached to the bike itself when I discovered that my rear wheel has a quick-release instead of a nut. There is not enough of the axle to mount the plate. Any thoughts on how to get around this? There may be a spacer inside of the last nut before the frame but I'm not sure it can be removed, if it is a spacer.
Thanks,
Steve
You could try and bolt the plate using the fender and rack mounts on the frame if you have them. However, you should be able to mount it on the axle, I've seen those rear axle mounted kickstands mounted on quick releases before.
Gerry :)
Hehe. I tried a similar thing using coachbolts as my axles. Was brilliant until some guy in a van smashed into it and dislodged it. Fortunately, it cost me, what, the price of the box, so I just replaced the wooden base and off I went. Unfortunately, the rough roads keep shaking my bolts undone :s
Have you tried those bolts lined with some nylon? It should keep it together.
Gerry :)
First of all thanks for all this instruction/inspiration.
I'm building a trailer out of a hollywood bedframe and I was at a complete loss about the hitch until I saw your eyebolt and U bolt assembly as a hitch.
Always happy to hear that I helped solve the hitch issue.
Gerry :)
Gerry, I built a trailer from your plans and it works GREAT! I've started using it for my grocery runs along with my pannier bags and have yet to run out of room.
Some modifications I made: I drilled three sets of holes in the trailer base to allow the bin to be in three positions (front, center and back); I used wing-nuts on the bolts holding the bin, allowing a change in position with only a screwdriver; and I added a piece of wire to secure the U-bolt (the first trip out the bolt came out). I will sent a photo to your e-mail address.
Hey Steve, glad to hear that another trailer is born and used. The bolt that secures the U-Bolt has to be tightened with a tool real tight. I had a disconnect in the middle of traffic, so you're wire back up idea is very good. Can't wait to see your pics.
Gerry :)
The instructions on building this trailer are the best i have seen on the internet! I love bicycle trailers!
Thanks.
Gerry :)
ive looked high and low for a decent trailer, i want to take a long ride adventure and carry tent, sleeping bags, cooler and that kind of thing. also thinking of a way on how to make a add on part to carry a 12 ft. kayak on top. your plans are so detailed and perfect that even i cant screw it up. thank you for sharing.
also if you have any ideas for the kayak thing-a-ma-bob i would apprieciate any ideas. thanks charlie
Charles I guess you'll have to figure a way to add a tall rack so you can carry the Kayak without it waking you on the back of the head all the time!
Good Luck
Gerry :)
Hi Gerry.
You have a very nice website. Where can I find free plans to built a three wheel bicycle
Hey John, thanks. There not free but not expensive at atomic zombie. You have a choice of a few models and also a support forum where you can exchange info with other builders.
Check them out at http://www.atomiczombie.com/
Gerry :)
Hi Gerry,
I live in Brisbane, Australia and I found your bike trailer instructions a fantastic help. THANKS for posting them on the web. This is my latest creation. I have called it a Trypcycle!, which is as much a statement as it is a noun. It was made from "waste" objects that were destined for landfill.
I would like to thank everyone in the neighbourhood who left objects out for collection.The upcycled objects previously had a life as... a cot, adult bike, 2 kids bikes, childs blackboard, packing ply, bathroom mirror supports, shelving, a pram a few shoelaces and a bentwood chair and old shelving baskets.
I am yet to add the towing bar for the bike. Due to the weight for safety reasons I will need to add functional brakes for when I am riding. I intend to modify ones that I'll poach from the old bikes.
I have a market stall and wanted a trailer to store and transport my felt that I make and sell. I need it to- store all my felt pieces, open up to display wares for sale, fit in the boot of the Forrester, (and light enough to lift), quick release wheels help here, be highly manoeuvrable, ( swivel pram wheel), easily pushed on foot and easily towed behind my bicycle. Waterproof and bug proof... and be very cheep to make.
To top it off it couldn't look daggy. ( Some left over house paint did wonders there). A couple of free umbrellas that came with sunscreen complete the picture. Later I will make a more permanent lightweight and waterproof/ shade cover. I am on the lookout for a free broken marquee frame to upcycle.
I had trouble sourcing suitable plates to hold the wheels so I used the bits off the frames from kids bikes and hammered the tubes flat and bolted them on to the ladder construction framework. They work well.
I'll send some pictures through to you to post.
Cheers, Siobhan A-Zumble-Zay.com
Hi Gerry Lauzon. my name is Jerry i got all of my material and now going to start building my trailer from your plan,s but a bit diffrent i am useing 26 inch wheel,s thats all i got in wheels. i let you know how i made out when i get it don. thank,s Jerry walton.
Awesome Jerry. Send me pics of your finished trailer. I'd be very glad to see another one built. Good Luck.
Gerry :)
I plan on using a bike with 700cc wheels. Should I add 3" to the distance of the trailer and hitch attachment? Thanks for posting these plans!
It all depends on how much room you want between the wheel and trailer. I think 2 would be sufficient. But that's just me.
Gerry :)
ps Great to read that people are still building these.
Hi
the plans are fab!
Hi Gerry, love the way you broke the work down easy to understand, starting to make mine after the festive time as family and friends stop all my enjoyment. Will let you know how I get .all the best for the festive season Rob.
Hi Garry love the design. How do you secure the axel in the wheel braces from popping out?
Thanks Kyle
lebron shoes
kd 10
moncler outlet
supreme
golden goose
supreme clothing
kevin durant shoes
100% real jordans for cheap
yeezy
golden goose sale
Post a Comment