
Friday, December 28, 2007
PEDAL POWERED BUICK CAR GETS BUSTED!
This stripped down 1986 Buick Regal was fabricated by Montreal artist Michel De Broin. It features seating for 4 people or if you prefer "working occupants". The car was taken out for a spin in Toronto back in October of 2007 and was pulled over by the fuzz within 15 minutes. The car had to towed back to the art gallery where it was being shown off. The driver was issued a citation for operating an unsafe vehicle with a fine that could range from $60 to $500. The artist plans to tow the vehicle to the courthouse on the day of the trial and drive it back after being acquitted.
If I would have done this, I would have placed reflectors in the wheels as required by the Highway Code here in Quebec, removed the original VIN and stamped my own on the new frame, registered it as a bicycle with a plate, make the lights and flashers to work and slapped a "slow vehicle" orange triangle in the back. The only other requirement for a bicycle under the code is the minimum of one brake on the rear wheel and the thing would be street legal, but it couldn't drive on a highway. The car did run in Montreal and was pulled over, but the Montreal officers did not issue any ticket.
The case is due to be heard in early April, keep posted.
UPDATE
The court case was heard and the Judge ruled that even though the vehicle looked like a Buick regal, it wasn't a Buick Regal but something that was made to look like one. The Judge dismissed the charges that the vehicle was dangerous. Citing the report of the issuing Officer, that mentioned the candle powered headlights, the Judge ruled that they were not dangerous and that the vehicle was safe to operate. So not guilty. With the price of Gas, it's an example to be followed. I'd love to build a pedal powered rat VW bus :)
Gerry :)
Saturday, December 22, 2007
THE TRUTH ABOUT WD40 AND BICYCLE CHAIN LUBRICATION
How many times do I hear people telling me that they use WD40 to lube their bike chain and it's just fine. Well, it's not. Watch this video from my friend Alex who's a bike mechanic from Vancouver and you will finally learn the real story about WD40. It's good for all kinds of stuff, but it doesn't belong on your bike chain. Without further ado, here's Alex:
Til next time, ride safe and Godspeed.
Gerry :)
Til next time, ride safe and Godspeed.
Gerry :)
Sunday, December 09, 2007
Japanese bicycle drift King?
Now some say this is not drifting but sliding. I don't care, it's pretty amazing. Watch this crazy rider drift is way through some pretty tight Japanese streets while drifting on his pretty simple commuter bicycle. I guess the smooth roads in Japan must help a lot in being able to pull those power slides like that on a bicycle.
Enjoy
Gerry :)
Enjoy
Gerry :)
Tuesday, November 27, 2007
COMPLETED CCM BIKE RESTORATION
Just wanted to share with everyone my last project that is now complete. The 1950 CCM was a blast to build thanks to the inspiration of the build off at ratrodbikes that managed to get everything in motion. This bike is a sweet ride and i can't wait for Spring when I'll be able to ride it into the ground. Bikes are made to be ridden in my opinion. In hoping that this might inspire some of you to get a new project going.
'Til next time, ride safe and Godspeed.
Gerry :)
p.s. The recumbent build is not dead, I just don't have the time right now, keep posted.
'Til next time, ride safe and Godspeed.
Gerry :)
p.s. The recumbent build is not dead, I just don't have the time right now, keep posted.
Thursday, October 18, 2007
THE BIKE OF DOOM, COMMUTING ON A BUDGET

I recently found this interesting blog by a fellow Canadian named Steve George of Winnipeg. Steve commutes to work daily and the situation changed where he couldn't bring his bike indoors anymore. He had to leave it locked outside while at work. Bike theft being a consideration, he didn't want to leave his good bike alone during the day. It would seem that broken and busted bike locks are as common as daisies in that area!
So Steve went ahead and bought a $99 department store bike for his daily commute and blogs about the experience. I find that this well written blog could be of use to a lot of you. I have commuted myself on a POS Wally World special for many years. But that was before my blogging days and I didn't keep track of the adventure. I'm glad that Steve has and that he is sharing it with the world.
So check it out, The Bike Of Doom.
Til next time, ride safe and Godspeed.
Gerry :)
Sunday, October 14, 2007
TO ALL CRAPPY BIKE SHOP OWNERS!
 Before anybody gets their panties in a bunch, let me say this: Most bike shops and bike shop owners out there are good, friendly hard working folks. This post is not addressed to them, I admire and respect them all. No, this post is addressed to idiots who are not confident enough in their work or are only interested in making an easy buck first and everything else comes second.
I know that this blog would ruffle some feathers. Imagine, giving away free information, what a sacrilege in this world that we live in. I had a few stupid comments left and I must admit I was surprised that I didn't get more. I don't claim on knowing everything, but I am confident that I know enough to help a lot of people. This week I decided to promote the site via an ad in Craigslist in the "free" section. Some bozo decided to flag the ad and that just freaked me out! Hence this post and the above image.
If you are a bike shop owner or mechanic and feel that your business is threatened by this site, think again. You WANT to have informed customers. Informed customers will not go out and buy a new bike at Wally world when it breaks down. They will come and see you. If they don't make you fix that bike, they will buy parts from you. Last time I checked, Wally world and the likes don't service bikes or have any kind of serious part inventory, you have. So you won't be making a fortune on selling a few parts to this informed person, but when they get tired of that Wally world special and want to spend some bucks on something decent, they'll come and see you.
You have to understand what your good colleagues have already figured out: you are not selling bikes, you are selling your shop. Informed cyclist will buy more stuff because they are more inclined to become enthusiast about it. They need a place where they can buy there stuff with confidence, trust someone that can fix their baby when they can't and have a long lasting relationship that they will be more than happy to share with others. I have such a relationship with a bike shop. The owner knows for a fact that he will never see my bike in his work stand, but he knows that I will be buying parts that I need, or don't, and that I always refer people to his shop.
Lastly, remember that everybody offers the same thing at about the same price. What people are looking for is good, friendly and honest service and they will be more than willing to pay for it. Sorry for the rant people, I just needed to vent. I'll be back with more how-to articles this week. It's been crazy lately.
Til next time, ride safe and Godspeed.
Gerry :)
p.s. If the people concerned think that I will slow down because of bullying, you should now this: It motivates me even more to go on. ;)
Saturday, September 15, 2007
RAT ROD BIKE BUILD OFF 2

As of this Saturday sept 15th 2007, the build off at ratrodbikes.com has officially started. You can follow all the action, the drama, the sweat and tears as rat rod bikers duke it out in an all out battle to the end... Oops! Got carried away a bit, hehehe. The second build off at ratrodbikes was much anticipated by many, partly because the membership at the forum as grown a lot since the first one. Rat Bikers also love to build bikes and show off in a very friendly manner.
The build off is the perfect occasion for builders to not only show off their talents, but also to share ideas and find new ones. With almost 400 new members since the last build off, this should be very interesting. I cannot wait to see what new ideas will come out. The rules specify that the frame cannot be modified with welding equipment, this is to keep the playing field level for those who do not weld.
Last build off I showed up late and it was in the middle of winter. My entry ended up being a DNF for lack of nice weather, time and parts. NOT THIS TIME! I have the perfect subject, most of the parts I have or are easy to get and I have a vision! Vision and inspiration are two essential ingredients for this type of endeavor.
So go check it out, enjoy the show or better yet, sign up and join in the madness. :)
Rat Rod Bike Build Off 1
Rat Rod Bike Build Off 2
My entry 1950 CCM "Victoria"
Til next time, ride safe and Godspeed.
Gerry :)
Sunday, September 09, 2007
HOW TO BUILD AN INEXPENSIVE SUSPENSION RECUMBENT BICYCLE AT HOME PART 2 THE FRONT BOOM
Before we build anything, we need some more parts. You need a road bike frame and fork. The fork will be used to connect the front boom to the frame and you will make the front boom from the lower part of the road bike frame. See and enlarge the image. You will also need the top tube of that bike to make the steerer tube extension which will be covered in the next post.
So you had some fun with the hacksaw and you have all your bits, let's start. I removed the bits of the seat tube on the mountain bike frame since they won't be needed. This will save just a little weight as well. Not a lot, but homebuilt recumbents are notorious for being heavy, so every little bit helps.
Now I have a drill press, but since most of you out there don't, I will use a regular drill to make my holes so you can see that it is possible. 15 years ago when I built my first recumbent I had a revelation when I realized that a fork steerer tube would fit almost perfectly inside a seat tube. That's where all those road bike frame parts come into play. Cut the lower frame of the bike as illustrated in the first image, cut more and remove some length later if it's too long. Now set that piece aside after cutting a slit about 4 inches long in the seat tube where it will be inserted in the steerer tube. This will help when installing the clamps in final assembly.
Now take the fork and cut it at the end where it starts to curve. Close to that cut, drill a hole on each side. Make sure that your holes are aligned. Now slide the cut fork in the mtb frame so that the steerer tube faces forward. See where you want to make your holes in the mtb frame and mark them. Drill the holes and bolt the cut fork into place. Voila, you have done the first step in building the front boom. The front boom will hold the pedals, crankarms and front deraillleur.
Noticed that we only installed one nut and bolt, this is to permit you to see where you want the boom assembly to sit. You want to make it as level with the seat as possible and high enough so you don't hit the wheel with your feet when turning and pedaling. At this point, it's educated guesswork since we have no seat, so do the best you can or wait for the end of this story. Building a recumbent yourself involves a lot of guesswork and return visits to the drawing board. Heck, that's half the fun. :) This recumbent will most probably end being the kind that you hit the wheel when you pedal and turn sharply. I don't have a problem with that since I found a solution for me some years ago: don't pedal when you turn.
After finding where you want the boom to sit, mark where your holes will be and drill them. You might end up with a gap between the fork legs and the mtb frame. Fill those gaps with washers and make sure to use the same number and size on both sides. Your boom must be aligned with the rest of the frame. Bolt down tightly and you will check those bolts for tightness after a few miles when it's done, if you have half a brain.
Lastly, insert the road bike seat tube that you cut into the steerer tube and admire your progress. At this point we don't have a seat and we are pretty clueless on where it will finally end up. So for now we will leave it alone.
The next post will cover the handlebars and how to make an extension for them.
Until next time, ride safe and Godspeed.
Gerry :)
Recumbent build Part 1
Recumbent build Part 3
Recumbent build Part 4

So you had some fun with the hacksaw and you have all your bits, let's start. I removed the bits of the seat tube on the mountain bike frame since they won't be needed. This will save just a little weight as well. Not a lot, but homebuilt recumbents are notorious for being heavy, so every little bit helps.
Now I have a drill press, but since most of you out there don't, I will use a regular drill to make my holes so you can see that it is possible. 15 years ago when I built my first recumbent I had a revelation when I realized that a fork steerer tube would fit almost perfectly inside a seat tube. That's where all those road bike frame parts come into play. Cut the lower frame of the bike as illustrated in the first image, cut more and remove some length later if it's too long. Now set that piece aside after cutting a slit about 4 inches long in the seat tube where it will be inserted in the steerer tube. This will help when installing the clamps in final assembly.
Now take the fork and cut it at the end where it starts to curve. Close to that cut, drill a hole on each side. Make sure that your holes are aligned. Now slide the cut fork in the mtb frame so that the steerer tube faces forward. See where you want to make your holes in the mtb frame and mark them. Drill the holes and bolt the cut fork into place. Voila, you have done the first step in building the front boom. The front boom will hold the pedals, crankarms and front deraillleur.
Noticed that we only installed one nut and bolt, this is to permit you to see where you want the boom assembly to sit. You want to make it as level with the seat as possible and high enough so you don't hit the wheel with your feet when turning and pedaling. At this point, it's educated guesswork since we have no seat, so do the best you can or wait for the end of this story. Building a recumbent yourself involves a lot of guesswork and return visits to the drawing board. Heck, that's half the fun. :) This recumbent will most probably end being the kind that you hit the wheel when you pedal and turn sharply. I don't have a problem with that since I found a solution for me some years ago: don't pedal when you turn.
After finding where you want the boom to sit, mark where your holes will be and drill them. You might end up with a gap between the fork legs and the mtb frame. Fill those gaps with washers and make sure to use the same number and size on both sides. Your boom must be aligned with the rest of the frame. Bolt down tightly and you will check those bolts for tightness after a few miles when it's done, if you have half a brain.

Lastly, insert the road bike seat tube that you cut into the steerer tube and admire your progress. At this point we don't have a seat and we are pretty clueless on where it will finally end up. So for now we will leave it alone.

The next post will cover the handlebars and how to make an extension for them.
Until next time, ride safe and Godspeed.
Gerry :)
Recumbent build Part 1
Recumbent build Part 3
Recumbent build Part 4
Tuesday, September 04, 2007
Vintage 1950 CCM Ladies Bicycle, mine...all mine!
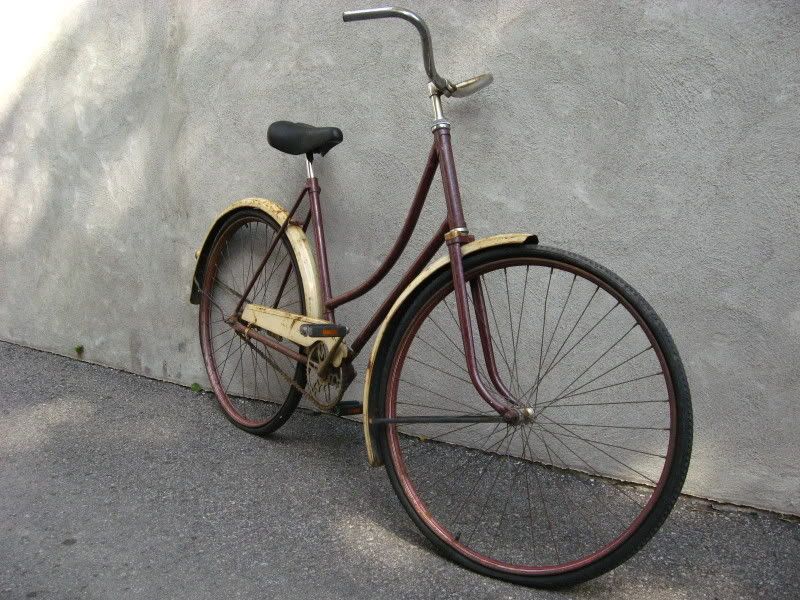
Ok, this post is not about how to do anything. It's just about me proudly showing off my new acquisition. A very good friend of mine called me 2 days ago asking if I wanted an old ladies CCM bike from the 40's or 50's. Didn't have to think long about that answer especially since it was free. I always wanted one of those long swooping top tube ladies bike for my collection, to the dismay of my significant other (sorry babe).
I was able to date the bike using the serial number code. You can see the list below that I found courtesy of drumbent.com. Now I don't now if the series goes beyond 1960 in the same fashion, so if anybody out there knows, please fill us in and I will update this post.

Although built in 1950, the bike is a prime example of late Victorian era bicycle design built for ladies who wanted to go about in those nice big skirts. A lady would just not be seen wearing trousers in those days for any reason. The big swooping top tube made stepping through the frame very easy. Another feature that was found on those ear;y bikes was a net fixed to the rear frame and fender to prevent the skirt from ending up in the wheel spokes. A nice big whicker basket up front would complete the vintage ride.
The bicycle was a big part in the emancipation of women in the late 19th and early 20th century. No longer did a woman need a man to prepare a horse and buggy. The bike was ready to go any time and didn't need any feeding or cumbersome maintenance of the veterinarian or stinky kind. Took up a lot less room as well. All of a sudden, women could go anywhere in town and at a faster rate than walking.
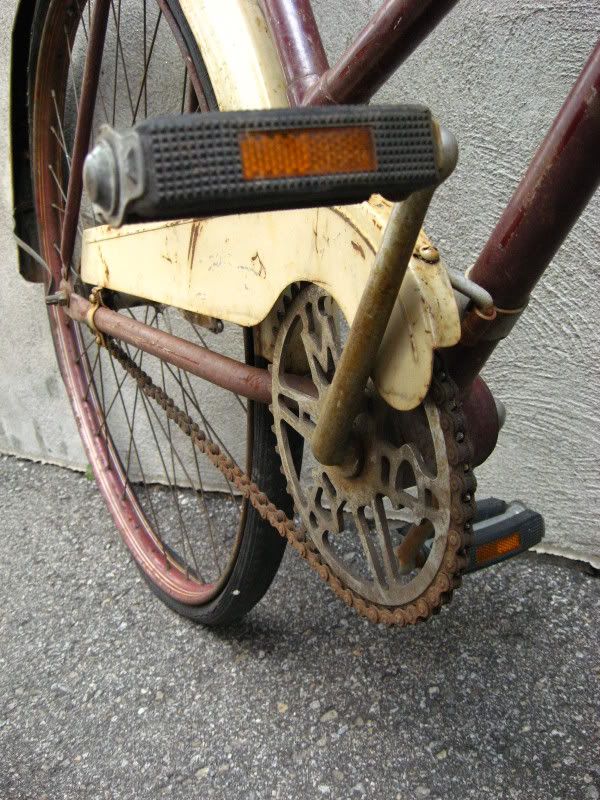
My plans for this bike are not set in stone yet. I really don't have any big ideas. However, I know for a fact that I will not touch the finish of the bike. This rusty used up look gives it character. The wheels are completely gone but the front and rear hub can be laced to another rim since they are of the 36 spoke variety. Hope this post helped to at least inspire someone and motivate them to bring back an "Old Girl" back to life, or any bike for that matter.
Til next time, ride safe and Godspeed.
Gerry :)
Sunday, September 02, 2007
HOW TO BUILD AN INEXPENSIVE SUSPENSION RECUMBENT BICYCLE AT HOME PART 1

WARNING! LONG POST BELOW.
Well it should be, how else can I explain all this. :) I have been building recumbent bikes myself for the last 12 years. I've built 7 or 8 of them, I stopped counting at some point. "Recumbent Bicycle" was the very first search I did when I got connected on the web and that's where that crazy quest started. My main goal was to build a reliable recumbent for not too much cash. It took me 7 (or 8) bikes to accomplish that and I had a blast in the process. Building your own bike provides even more pleasure in the "quest" itself of making your own ride work. Finding solutions for all the bugs and actually making it work is truly rewarding.
I loved building and riding these bikes until I built the last one that was actually a very reliable ride. Then many things came into play for me to lose interest, I had reached my goal, I moved to the city (Montreal streets are notoriously bad) and I started getting into cruisers. Until 2 weeks ago when something happened...
...I hurt my back! No way I could ride my cruiser in this condition. The timing was awful since I was planning to ride at critical mass and I was invited for a night cruise with the Hannan choppers afterward. So out came my pocket rocket recumbent from the mothballs and I rode for at least 8 hours and had a blast that evening. I was surprised that after at least 5 years of leaving that thing alone in storage, all I had to do was adjust the brakes, put some air in the tires and it ran solid the entire ride. Even did some pretty stupid stuff and came out of it with flying colors.
The other ingredient for that mechanical soup, that you are about to learn about, was a donation of a full suspension mountain bike from a friend. I started thinking"hmmm, I always wanted to build one with a rear suspension..." and the mad recumbent builder took over like Mr Hide.
So here we go, let's build a rear suspension recumbent bike from junk. :)

First thing I had to do was strip the old mountain goat to the bare frame. There was nothing left to use on this thing. It was one of those rare bikes that I find with no useful parts left and the damn thing made me sweat 2 hours to take it apart. I had to hacksaw my way to her guts! I will have to make sure that corrosion doesn't become an issue later on, it was bad.
I gathered the parts that I already have: 20 inch wheel and tire, matching fork( I can't keep the original fork because I want to lower the frame and be able to use brakes on the front wheel.), a spare rear shock(nothing fancy just a regular Chinese job) since the original one is dead and my faithful "Pocket Rocket" recumbent to donate the rest of the parts. I will have to make another seat since the suspension doesn't allow me to use the one from that bike, more R&D.
After stripping the mtb I installed the fork and 20 inch wheel to see how it will sit and give me some ideas for problems to come. One big issue in any recumbent build is chain management. This one won't be different. Expect a full post just for that. At this point it is time to decide how you will progress and think of solutions. Good exercise for your brain believe me.
The next ingredient that we will need for this build is a men's road bike frame for various parts, more on this in part 2. Now this post will have all the links to all the articles for this build. I will try to update the build at least once a week. This all depends on how things go and what kind of wall I hit.
Lastly, before you go out all crazy and build one of these, be warned! These bikes go real fast downhill and if you are not careful about how you build one, you can very simply kill yourself. I am not there to take you by the hand to build anything, so don't come crying to me if your are stupid enough to build a bike half assed and get hit by a truck. I have listed other recumbent sites in the sidebar and I have many recumbent sites in the Bicycle Search Engine, do your research. Finally, always respect the number one rule of all homebuilders: When in doubt, OVER BUILD.
Til next time, ride safe and Godspeed.
Gerry :)
Recumbent Build Part 2
Recumbent Build Part 3
Recumbent Build Part 4
Saturday, August 25, 2007
The Bicycle Search Engine

Have you ever went through endless pages on search engines like Google trying to find some information about bicycles and just having to waste time going through all those search engine optimized commercial websites before getting to the meat of what you are looking for? You, me and millions of people have bought that T-Shirt, well not anymore! I have made a custom search engine using a Google utility that permits searches only to those websites that I choose. So I chose from what I consider the best bike websites around and if you search in that little "Bicycle Search Engine" box at the top of this article or at the bottom of this blog, you should get immediate relevant information quickly. Of course this site is included, but I also included Sheldon Brown and some bike related forums as well.
So enjoy and if you notice an important bike related site missing, just email me at xddorox (at) gmail.com I will review the site and add it.
Til next time, ride safe and Godspeed.
Gerry :)
Sunday, August 12, 2007
How-to remove a bicycle cassette or freewheel
Derailleur equipped bikes have a cluster of gears installed on the rear wheel which permits to change the gear ration while you pedal. When you stop pedaling or coast you hear a click click click noise that is made by a ratchet mechanism that allows for the pedals to stop turning while the bike is coasting. Sometimes this mechanism fails. In the case of our reader Jay, the pedals on his bike keep turning while the wheels are in motion. This gear cluster cannot be serviced in my experience and must replaced.
However, you must determine which type you have since there are two different ways to accomplish this: The threaded freewheel or the cassette. The threaded freewheel is screwed on the threads that are on the rear hub. The mechanism is inside that freewheel. In the case of the cassette, the coasting mechanism is inside the hub itself. So if this fails, you must replace the rear hub. The cassette offers the advantages of being able to replace only the smallest gears when they are used up and offer a straight line of pull on the chain. If you observe a freewheel while the rear wheel is turning, you will notice a slight wobble caused by the fact that it isn't sitting perfectly flat on the threaded hub.
I've enclosed a video on how to remove and reinstall both. Take note that to avoid an industrial amount of takes for the making of that video, I removed those parts before taping. They take a bit more energy to remove. That explains that humongous open ended wrench that I have, it's not just for show. When reinstalling those parts, make sure that they are screwed in tight. Not a big issue with the freewheel since it tightens itself with each pedal stroke. But the cassette lock nut will not and if it becomes loose, the results will be ugly.
By the next video, I hope that my "studio" will be painted. At least now I don't have the noise of traffic and overhead 747's.
Til next time, ride safe and Godspeed!
Gerry :)
Monday, August 06, 2007
HOW TO ALIGN OR TRUE A BICYCLE WHEEL
Well it's been a long time coming, but here it is. I have attached a video to this article. It's not great, but it will have to do for now until I figure out a better studio set-up.
Truing a wheel is not that complicated. The rim is attached to the hub with the use of spokes. The spokes are divided equally on each side of the rim and are held there by brass nipples that can be screwed or unscrewed. A brass nipple is basically an upside down screw, so you have to go counter clockwise to tighten it and clockwise to untighten. Tightening a brass nipple will make a spoke "pull" the rim to the outside and the reverse will "push" it inside.
This means that if the rim is too much to the left from the center and this happens in front of a spoke located on the right side of the rim, you would have to go counter clockwise so that the spoke will "pull" the rim back to the right. If the same situation would occur in front of a spoke located on the left side of the rim, you would go clockwise to unscrew the nipple and that would "push" the rim to the right.
The main thing to remember is to go at it one spoke at a time. If you try to straighten the wheel by adjusting 6 spokes in one shot, you will have problems. Also, if you have to make more than one turn on a brass nipple, make half as many turns on the 2 nipples on each side of it to avoid creating a flat spot in the rim. When you are close to finishing the job and the adjustments are minute, you don't have to do this.
If you want to try this, get a truing stand, find some busted wheels and practice, practice, practice. Remember though, not every taco wheel can be saved. Sometimes it's better to start with a fresh rim.
Til next time, ride safe and Godspeed.
Gerry
Thursday, July 12, 2007
1 YEAR OF BLOGGING ABOUT BIKES

One year ago today I started a journey with no idea where it would take me. I just followed my guts and went ahead sharing my passion for bikes. Thousands of words, hundreds of pictures, 3 digital cameras, hundreds of contacts, over 230 000 hits and countless emails later, I am even more passionate about this endeavor.
A little over a year ago I had no clue what a blog was. A fortunate discussion with my cousin brought me into this fantastic cyber adventure. I started on the 13th of July thinking that it was a sign. My Grandfather's lucky number was 13 and he made it through 4 years overseas during World War 2 in one piece. Thanks Grandpa, it's going well. People told me I was crazy to give this information away freely but I figured that it could help out some people and I would be doing a good thing. Turns out I was right. A man in China being able to commute to work because he can maintain his bike, a single Mom in England who, to the eyes of her son, became a Hero because she was able to fix his rear wheel, a guy who decided to bike again because he figured out how to fix his ride or a kid that decided not to give up and followed his desire to repaint his bike are just a few examples of the positive feedback I have received.

These small events might seem like nothing, but they can have positive repercussions over a lifetime. Because of these small bites of information spread out there, somebody might be able to work and feed his family, have the admiration of a child for life, maybe avoid a heart attack or have the confidence to pursue whatever he/she wants. I am very aware of these possibilities. My day to day job has shown me that small events can have huge consequences in someones life. I feel privileged to be able to do this and I am very proud when ever I get an email telling me that this blog helped you out.
To those who are here for the first time, welcome. Read, learn, get your hands dirty and don't ever quit. To those of you who have enjoyed this blog for a while, a thousand thank yous. Keep posted for more stuff, I'm not about to run out of things to write about and if you have a passion in life, share it with the world. You might make it a little better.
Until next time, ride safe and Godspeed!
Gerry
Saturday, July 07, 2007
BIKE THEFT PREVENTION 2 OR HOW TO MAKE YOURSELF A GOOD BIKE LOCK
This post was motivated by 2 unrelated events that happened quite by fluke. First off I received an email from Jay Turnbull from CBC Radio concerning my previous post about bike theft prevention and ended up being invited on the Homerun show to talk about just that. I had to consider doing my homework on the subject even more to make sure I could answer any questions correctly right there on the spot. Less than 24 hours after, one of our readers made a comment in the above mentioned post about U-Locks being really easy to pick with a pen and to go out and buy a lock and chain instead. Iron Cross 87 even provided a Youtube link to such a video to prove his point, the message was received loud and clear man! I couldn't believe how easy it was and further research made me realize that the usual tubular lock associated with these U-Locks are pretty simple to pick with an available tool as well. I couldn't replicate the pen trick with my locks, but the fact that the tool to pick tubular locks was out there made me realize that I was easy prey.
I have never left a bike outside locked out of my site for more than a few minutes, most of my good rides sleep indoors, so should yours. But I was now in a jam since I would have to leave my bike locked outdoors for at least a few hours while I was going to be tied up in a building while doing a radio show. I always toyed with the idea of buying one of those super chain locks and I freaked out at the idea of paying $175 and more for that type of lock. But then I started thinking outside the box.

I went to my local big humongous hardware depot and bought 3 feet of 5/16inch, grade 70, 4700lbs test chain for $12. I then purchased a good quality padlock for $27. The whole thing for $39 plus tax and it is a lot better than any cheapo U-Lock that goes for about $20. The chain also gives you more flexibility on where or on what to lock your bike to. Now it depends on how good is the pole you lock it to. Remember, don't lock it to a tree! One big disadvantage to this set up is weight, the whole thing weighs in at 5lbs. It also doesn't have any cover to protect the finish of your bike, but you can always put together a chain caddy from any material easy. How hard can it be to make a cloth tube? I carry my contraption like a bandoleer, makes me look mean ;) Even if you decide to make yourself such a set-up, remember to still follow the other usual preventive tips from the previous post and lock your bike next to a better looking one with a lesser lock. It sounds bad but it's the truth, thieves always go for the easy prey.

So if you want to buy in on heavy duty protection, you can without forking a lot of cash. If you want to hear me on the radio and you have access to CBC radio, I'm on at 16H00 eastern time on the Homerun show Tuesday July 10th 2007.
Until then, ride safe and Godspeed.
Gerry :)
UPDATE:
I did the show and it went very well. Actually it went lightning fast. I had the chance to use my new lock set up while doing the show and later on during the ride home. The fact that it is very heavy is a mere inconvenience to the sense of added security and how flexible this is in it's use. I feel it was money very well spent. The bike was there when I returned, mission accomplished.
I have never left a bike outside locked out of my site for more than a few minutes, most of my good rides sleep indoors, so should yours. But I was now in a jam since I would have to leave my bike locked outdoors for at least a few hours while I was going to be tied up in a building while doing a radio show. I always toyed with the idea of buying one of those super chain locks and I freaked out at the idea of paying $175 and more for that type of lock. But then I started thinking outside the box.

I went to my local big humongous hardware depot and bought 3 feet of 5/16inch, grade 70, 4700lbs test chain for $12. I then purchased a good quality padlock for $27. The whole thing for $39 plus tax and it is a lot better than any cheapo U-Lock that goes for about $20. The chain also gives you more flexibility on where or on what to lock your bike to. Now it depends on how good is the pole you lock it to. Remember, don't lock it to a tree! One big disadvantage to this set up is weight, the whole thing weighs in at 5lbs. It also doesn't have any cover to protect the finish of your bike, but you can always put together a chain caddy from any material easy. How hard can it be to make a cloth tube? I carry my contraption like a bandoleer, makes me look mean ;) Even if you decide to make yourself such a set-up, remember to still follow the other usual preventive tips from the previous post and lock your bike next to a better looking one with a lesser lock. It sounds bad but it's the truth, thieves always go for the easy prey.

So if you want to buy in on heavy duty protection, you can without forking a lot of cash. If you want to hear me on the radio and you have access to CBC radio, I'm on at 16H00 eastern time on the Homerun show Tuesday July 10th 2007.
Until then, ride safe and Godspeed.
Gerry :)
UPDATE:

I did the show and it went very well. Actually it went lightning fast. I had the chance to use my new lock set up while doing the show and later on during the ride home. The fact that it is very heavy is a mere inconvenience to the sense of added security and how flexible this is in it's use. I feel it was money very well spent. The bike was there when I returned, mission accomplished.
Sunday, June 24, 2007
FIXING AND MAINTAINING YOUR BIKE FOR AN OPTIMUM RIDE!

I haven't posted in a while and I guess you can figure out why. Especially if you live in the snowbelt, it's summer and riding is a major part of my agenda. I can't write and ride at the same time now can I?
This year I decided to ride a single speed coaster brake cruiser. The decision was first based on looks (They do look cool!) and also on the fact that I was tired of hauling all the tools necessary to fix a busted derailleur or brake calipers everytime I go for a decent ride. A coaster brake cruiser requires very few tools and it lightens the tool bag big time. A cruiser also builds a good pair of legs!
A one speed cruiser bike is very demanding on hills and it's pretty heavy. So everything you can do to help yourself to move forward with less effort helps. These tips apply to any kind of bike. They are things that most people overlook or don't know about that robs them of a very enjoyable bicycle ride. Let's face it, the easier and more comfortable a bike is, the more you ride. So here it goes:
- TIRE PRESSURE: Buy a floor pump with a gauge and check your tire pressure on a regular basis. Rubber tubes are porous to a point and you do lose air over time. A low pressure tire will slow you down a lot. Pump it up to the prescribed pressure and you will see a huge difference.
- WHEEL AND PEDAL AXLE BEARINGS: The bearings in your bike are what makes everything turn smoothly. Make sure they are greased properly by doing a simple check, turn the front and back wheels to see if they turn freely. Get the chain off the front chainring and see if you can turn the pedals without feeling any resistance.
- LUBE THAT CHAIN: It sounds crazy, but a badly lubed chain will rob you of some power. I noticed this when I ran a recumbent with a chain 2 and a half times longer than a regular bike. The thing ran a lot better when the chain was properly lubricated.
- IS ANYTHING RUBBING?: If you are riding with a brake pad rubbing on the rim all the time, this will take away a lot of your pedaling power for nothing. Again, spin the wheels to see if they turn freely. Check also if the wheels are sitting properly in the frame and that the tires or not rubbing on it.
- SEAT POSITION: If your seat is too low, you will have a hard time pedaling and you might even hurt your knees. I have seen people riding their bikes with their knees sticking out sideways countless times and somehow they don't seem to enjoy themselves.
- GEARS, USE 'EM IF YOU HAVE 'EM: Give yourself a chance and leave from a dead stop on a lower gear. I often see people leaving a traffic light on the biggest chainring in the front, pedaling hard, looking in pain and hurting their knees. Use the middle or small chainring and learn to shift that bike or get a one speed cruiser!
- PUT YOUR BIKE ON A DIET: Do you have any kind of junk on your bike that you don't use or that is there for no purpose? If so, remove it. A heavy bike will show it's bad side when climbing hills or going against a hard head wind. You are the only thing powering that beast, so every ounce counts.
'Til next time, ride safe and Godspeed.
Gerry :)
Monday, May 28, 2007
DIAGNOSIS: SEIZED BACK BRAKE ON LADY'S BIKE
This ever happen to you? You squeeze the rear brake lever on your nice woman's frame bike to find out that absolutely nothing moves! You check everything, the cable routing, the lever, the pads. Everything is OK, where and how it should be. Yet you are perplexed at the fact that nothing wants to move so that the rear wheel can come to a stop. The culprit hides it's ugly face deep inside the cable housing, corrupting that seemingly perfect and healthy looking rear brake cable. Yes, rust has decided to dwell inside and has fused the cable and housing together. No amount of oil will solve this problem permanently. When rust decides to elect domicile inside a cable housing, it becomes as difficult to get rid off as a colony of cockroaches. You will have to trash the cable and that part of the housing to regain full enjoyment and use of your rear brakes.

The cause of this problem is very simple. The step through frame usually has a lower cable routing that goes underneath the brake caliper. This exposes an opening to the elements and water can seep in. May it be a casual ride in the rain or the bike being stored outdoors, the water will sit there and create rust that will weld the cable and housing in one single piece of rust. To prevent this, insert a few drops of oil down the housing at the same place the water gets in or cap it off with a dab of grease or do both. Do this once a season or more if the bike is exposed to rain on a regular basis.
Some of you have asked me why does a woman's bike have a lower top tube. It would seem more logical that this would be more practical for men! We have to go back in history to find out why. Back in the late 19th century when the safety bicycle (that's the name for the current rear chain driven wheel bike design) was invented, women rode their bikes with big skirts and dresses. This was not an option for the ladies of the time, it was the everyday dress code. It was very unladylike to throw a leg over the back wheel to mount and a dress over a top bar would have been just as bad. So bike designers of the time solved this problem by making the step through frame. To this day, for some odd reason, most bikes for women are still made that way. But a real woman's frame is one built to accommodate their shorter torso and longer legs compared to the men's frame. Ask your local bike shop about a real woman's bike. If they are any good, they should know what you're talking about.
Til next time ride safe and Godspeed.
Gerry
Wednesday, May 16, 2007
PIMP MY BIKE VIDEO!
Ok, this is a bit on the lighter side of things. A group of guys and gals from the UK put these videos together and manage to make some pretty cool bikes. I'm in grease up to my ears these days and more how to's are soon to follow. Enjoy the vids.
Gerry
Gerry
Saturday, April 28, 2007
BEST RIDE EVER! MONTREAL CRITICAL MASS
I always wondered what it was like to ride in a critical mass. Critical mass was created 15 years ago in San Francisco when a bunch of cyclist decided to reclaim the streets on their own by just getting on the streets once a month and taking as much space as possible. Now there are critical masses all over the world, including Montreal. I was contacted this winter to check out there site and this Friday I decided to join in.
Now these rides are notorious for being very unorganised affairs in some places. The one in New York City is, from what I hear, a monthly clash between cyclist and the very well manned NYPD. The Montreal ride as also it's extremist elements, but being Montreal it's in a civilized manner. The morning before the ride I was watching the weather on a regular basis and I was hoping for the rain to vanish so I would be able to take part. Mother nature decided otherwise!

I was about to call it at around 3 O'clock and it made me realise that I was getting soft. I used to ride to work 12 months a year in way worst weather and here I was being held back by a little rain. Damn the torpedoes and full speed ahead. Out came the high-vis raincoat and I headed downtown with the 45 lbs cruiser. The ride down to Phillips Square was a blast and when I got there I was surprised to find at least 50 people who had gathered in spite of the rain. I even met a reader of this blog who put together a trailer from one of my articles. Riley used the trailer to carry the music for the ride, sweet!
With no Police escort, we took to the street and rode for at least 30 minutes without any trouble. The rain was on and off but that didn't affect our spirits. Pedestrians on the sidewalks cheered us on and motorists were cursing the very fact that we were alive! Then somewhere on Park Avenue, we crossed a Police car that was waiting in the oncoming lane and by the look on the officers face, I knew we had just ruined what must have been a very quiet shift.

We had three Police cars join us after that in no time. We were intercepted at the corner of St-Laurent and Mont-Royal were they tried to escort us. One car was preparing to open the ride up front, but the mass decided to turn on the street before on Drolet to start a game of cat and mouse. The cruisers caught on pretty fast and the mass was boxed in within 2 minutes. The officers from station 38 were pretty ticked off. You could see it in their face, body language and deployed straight batons! They really didn't won't to mess around. But station 37 came behind us and the sargeant on duty from that station managed to calm things down on both sides. Great work on his part prevented things to go ugly. The ride was over, this was confirmed once we were advised that it was an illegal demonstration. The Police took down the names of 4 people without advising them of why I was told. The group broke up and we ended up at the Mont-Royal metro station for chat and snacks. I rode back home at around 8H30 pm and that ride was a blast.
What made this ride enjoyable for me was not the mere fact of riding in the streets in a spate of what might be interpreted as civil disobedience. The people I met there, the ride-in in traffic, the ride-out in the darkness were even more fun. Meeting a reader of this blog that actually put together one of my crazy ideas was also a great kick I must admit. Almost as exciting as a brush with the law.
So if your bike riding or your life is getting too boring, get to Union and Ste-Catherine at 5H30pm every last Friday of the month and go for it. For the readers of this blog that are out there in the world, just google critical mass to see if there is one in your town. If not, start one.
Til next time, ride safe and Godspeed.
Gerry
Monday, April 23, 2007
THE CRANK OR PEDAL ARM KEEPS FALLING OFF! A DIAGNOSIS

One thing that I've seen often in bike repair and experienced myself was to have a crank arm just falling off the bike. Now if that doesn't ruin your day, imagine a few days later riding along all proud of having fixed the problem, riding with joy, birds singing in the trees, life is good....and the darn thing falls off again! Of course this happens in the middle of nowhere with no handy tools at hand. Option A: Pedal with one leg Option B: walk and push the bike home.
To prevent this from happening in the first place, take the time to tightened the nut attaching the crank arms to the axle at least once a year. This can be done with a 14mm socket ratchet wrench. If your crank arm just keeps on falling off, even after you've asked your muscle building neighbour to tighten that nut as if his life depended on it, there is one simple reason. When the crank arm is loose and you pedal with it, you damage the four corners of it's socket that rest in the axle. Somehow this damage causes the crank arm to wiggle enough to unscrew the nut little by little until it just falls off again. You will have no choice but to replace it. You can try locktite, but I've had no success with that either. Bring the old crank arm with you to make sure you buy the same size, that's unless you have a leg shorter than the other!
Til next time, ride safe and Godspeed.
Gerry
Wednesday, April 04, 2007
READER'S BIKE NORBERTO'S REYNOSO


Norberto is one of our readers from Buenos Aires in Argentina. He didn't know much about fixing bikes when he found this blog, but now I think that this is not the case anymore. Norberto also went and registered on the Rat Rod Bike forum and got bit by that bug. He found this wreck, a cruiser made by an Argentinian Company called the Reynoso, took his newly found skills and decided to enter the Rat Rod Bike Build-Off.
What you see in the pictures is the result of some very well done work. The bike was totally stripped down to the bare frame and fork, litteraly! He simply coated the entire bike with a few clear coats to protect the metal finish, added some nice fenders and a set of brand new wheels. I love what he did with the chainring, a simple piece of black tin sandwiched behind it makes for a very cool effect. Check out the entire build thread.
Norberto didn't win the build-off, but he made us proud and now has a pretty cool bike to cruise around in the sun of Argentina.
Great job Bro !
Gerry
Monday, March 26, 2007
THE CHIEF BEACH CRUISER BY FIRMSTRONG: A BIKE REVIEW

click on the images for a full view
I got this beach cruiser from justbicycles.com with not much expectations. I was more interested in the frame itself which is a forward bottom bracket design. Man, was I ever surprised! I've been into cruisers lately and I enjoy the laid back riding position a lot. I had looked into the Electra Townie, but the one I could afford didn't look that great and the nice looking cruisers they have were out of reach for my budget. Then I saw this thing in the justbicycles.com online catalog. It was advertised as a cruiser for tall people with an ordinary picture, but the frame design looked interesting. If you want the lowdown on how I put it together, check out this post.So I got this out of the box and I flipped. The frame is of solid construction with that nice big hump of a top tube. This cruiser is a one speed coaster brake job with 26X2.125 white wall Kenda Flame tread tires mounted on aluminium rims. It weighs in at 34.5 lbs and as a wheel base of 47.5 inches from axle to axle. The pedal axle is 5.5 inches forward in relation with the seat tube.
It has some nice parts to it like the handle grips made of simili-leather, nice big looking seat, killer design solid chainring and those huge handlebars. I wasn't expecting that much, but the whole bike comes together and looks like it's worth a lot more. The ride is very comfortable and quite special with those handlebars and front tire way ahead of you. It almost feels like riding one of those old motorcycles.
After riding it a little (ok a lot!) it was time to take some things apart and see what it was really made of. I had recently bought a Huffy cruiser and to my surprise found no grease at all inside all of the bearings, so I was curious with this one. I knew almost immediately that this thing was greased properly just by feeling the way the fork was turning in my hand. Sure enough, after taking the fork and bottom bracket apart I found both to be well greased.
I have no big issue with this bike. The only small thing that bugs me is the seat that makes noise when I hit a bump. But it's not surprising with those springs underneath, it is to be expected. I found a few scratches on the finish when I unpacked it. After taking some pictures of the damage that was caused prior to it being packed, I sent them to justbicycles.com by email and i got a prompt reply. I will be receiving replacement parts from what I have been told. I'll keep you posted. There is one thing about buying a bicycle online compared to your local bike shop and that is you have to wait for shipping. It's not perfect, but I am satisfied with the quick response of their customer support.

All and all, this bicycle doesn't have a cheap feel to it. It is of solid construction and the ride is amazing. I have to say that I have fallen in love and it's a good thing that my other bikes are not jealous! I'll be making some modifications to this bike in the coming future and I will keep you posted on the progress. The first thing I want to do is go for a Shimano 3 speed Nexus coaster hub...and a suicide shifter. ;)
Til next time, ride safe and Godspeed.
Gerry
BUYING A BICYCLE ONLINE
A while back, Sue from justbicycles.com contacted me to add some of my articles to their website. I went over to check things out and found a no frills website and blog about selling bicycles online. Being a cruiser bike maniac myself, I was happy to see that they had a nice selection of cruisers, even a tandem, among the other regular bikes. The prices were also very decent. So you might have noticed the banner for them at the bottom of this blog for a while. I figured that it would be more to the point than some Linux banner.
Anyways, I was going through their online bicycle catalog and I found this bike, The Chief. It was on sale at $140, shipping to Canada was $65, with duties and exchange rate, the total is a bit over $CDN300. Not bad considering that we don't have too many cruisers around these parts and the price for something like this would be a lot more.

To be fair and find out if it was easy to assemble, I enlisted my daughter to take on the job. Now Sarah is not unfamiliar with bike maintenance, I have taught her well. But she never had the chance to assemble a brand new bike together. Don't think for a minute that I gave her the job just because she's a girl. Sarah can tune a bike, flip a boy bigger than her over her head and she sword fights with the toughest of them in Live Role Playing.
The first thing to do is to get that bike out of the wrapper and get your tools ready. You'll need a set of Allen keys, a 15mm socket wrench for the wheel, a 15mm open ended wrench and/or an adjustable open ended wrench. Cut the tie wraps holding every thing together and remove the wrapping paper over the frame by hand. The only thing to watch for while unpacking the bike is the front wheel. It is slipped into the left crank arm and you must slide it out carefully. Install the front wheel and pull out the kickstand so you can work easily for the rest of the assembly.

Align the front wheel properly and make sure that the washers are between the nut and fork. Tighten the nuts with a 15mm socket wrench. Now pump both tires to the indicated tire pressure, in this case 40 psi. Moving to the handlebars, remove the protective plastic cap on the stem and adjust the bars temporarily by unscrewing the 2 top Allen bolts. The bar is shipped that way to save on space. Insert the stem inside the fork tube until you can't see the safety line on the stem. Align it with the front wheel and screw it in hard. Now you can adjust the angle of the handlebars to your preferred position permanently.

Now insert the seat tube inside the frame and lock it in by screwing in the Allen bolt. Install the seat, adjust it to be level with the ground and tighten the nut with an open ended wrench. To adjust the height of the seat, you will have to install the pedals first with a 15mm open ended wrench. Make sure you don't mix them up! On the pedals, you will find a stamped "R" or "L". Left and Right, with right being on the side of the chain drive. The reason this is important, is that the left side pedal is reversed thread. This means you have to go counterclockwise to screw it in. After installing the pedals, you can now adjust the height of the seat by making sure that with your heel on one pedal, your leg is straight while sitting down on the seat. Check out this article for a complete explanation.

That's it, your done. Make sure that everything is tight and aligned. You also have an owners manual that comes with the bike. It is not specific to your particular bike, but it includes all kinds of valuable information on bicycle maintenance. Don't throw it away, keep it for your future needs. This bike being a one speed coaster brake, it was pretty easy to put together, but if I had gotten a multi speed bike it would have involved adjusting brakes and gear shifting. All that information is contained in that booklet. Kind of a hard copy of howtofixbikes ;)
For a review of this bike, check out this post.

Til next time, ride safe and Godspeed.
Gerry
Anyways, I was going through their online bicycle catalog and I found this bike, The Chief. It was on sale at $140, shipping to Canada was $65, with duties and exchange rate, the total is a bit over $CDN300. Not bad considering that we don't have too many cruisers around these parts and the price for something like this would be a lot more.

click on the images for a full view
The bike was shipped with Fedex and I received it within 7 days. The bike was very well packed and the only loose thing the box was the seat, but it was very well protected for the trip. I have pulled hundreds of bikes fresh out of the box while working for stores and bicycle shops and this one was very much up to standard.To be fair and find out if it was easy to assemble, I enlisted my daughter to take on the job. Now Sarah is not unfamiliar with bike maintenance, I have taught her well. But she never had the chance to assemble a brand new bike together. Don't think for a minute that I gave her the job just because she's a girl. Sarah can tune a bike, flip a boy bigger than her over her head and she sword fights with the toughest of them in Live Role Playing.
The first thing to do is to get that bike out of the wrapper and get your tools ready. You'll need a set of Allen keys, a 15mm socket wrench for the wheel, a 15mm open ended wrench and/or an adjustable open ended wrench. Cut the tie wraps holding every thing together and remove the wrapping paper over the frame by hand. The only thing to watch for while unpacking the bike is the front wheel. It is slipped into the left crank arm and you must slide it out carefully. Install the front wheel and pull out the kickstand so you can work easily for the rest of the assembly.

Align the front wheel properly and make sure that the washers are between the nut and fork. Tighten the nuts with a 15mm socket wrench. Now pump both tires to the indicated tire pressure, in this case 40 psi. Moving to the handlebars, remove the protective plastic cap on the stem and adjust the bars temporarily by unscrewing the 2 top Allen bolts. The bar is shipped that way to save on space. Insert the stem inside the fork tube until you can't see the safety line on the stem. Align it with the front wheel and screw it in hard. Now you can adjust the angle of the handlebars to your preferred position permanently.

Now insert the seat tube inside the frame and lock it in by screwing in the Allen bolt. Install the seat, adjust it to be level with the ground and tighten the nut with an open ended wrench. To adjust the height of the seat, you will have to install the pedals first with a 15mm open ended wrench. Make sure you don't mix them up! On the pedals, you will find a stamped "R" or "L". Left and Right, with right being on the side of the chain drive. The reason this is important, is that the left side pedal is reversed thread. This means you have to go counterclockwise to screw it in. After installing the pedals, you can now adjust the height of the seat by making sure that with your heel on one pedal, your leg is straight while sitting down on the seat. Check out this article for a complete explanation.

That's it, your done. Make sure that everything is tight and aligned. You also have an owners manual that comes with the bike. It is not specific to your particular bike, but it includes all kinds of valuable information on bicycle maintenance. Don't throw it away, keep it for your future needs. This bike being a one speed coaster brake, it was pretty easy to put together, but if I had gotten a multi speed bike it would have involved adjusting brakes and gear shifting. All that information is contained in that booklet. Kind of a hard copy of howtofixbikes ;)
For a review of this bike, check out this post.

Til next time, ride safe and Godspeed.
Gerry
Monday, March 19, 2007
SPRINGTIME BICYCLE CHECKLIST

Well with spring around the corner, many of you are aching to get that favorite ride of yours out of the shed or basement and on to the pavement. Before you do so, there are a few things you should check out on your bike before you head out into cycling bliss. Here's a checklist to guide you in that task:
- CHECK TIRE PRESSURE AND INFLATE ACCORDINGLY Those rubber tubes are actually porous and you do lose some air during that storage period. Don't be alarmed about that, it's normal.
- CHECK FOR TIRE WEAR Look if you have any bald spots or balloons in the sidewalls. If you don't need to replace the tires and you have a matched set, rotate them from front to back. They will wear evenly and last a lot longer.
- CHECK BRAKE LEVER AND CALIPER ACTION Nothing sucks more than ruining your first ride with your brakes deciding not to show up for work at the first corner. Don't end up has a hood ornament on a Mack truck and make sure these work properly.
- CHECK BRAKE PAD WEAR Pads do wear out after a while. If they look decent, do a rotation and they will last longer. In general the rear pads wear out faster than the front ones. It may be the other way around according to the way you ride.
- CHECK ALL CABLES Derailleurs, brakes, check everything. If you see rust or a cable starting to fray, don't wait and replace immediatly. Especially the brake cables, remember that hood ornament thing?
- CHECK YOUR CHAIN AND LUBE IT Back pedal and watch for any links that are jammed. Oil the chain with anything but regular engine oil or WD40(I use transmission fluid myself). If your chain has many thousands of miles and looks slack, replace it.
- CHECK FOR ANYTHING LOOSE I mean everything. If it's screwed or bolted, it will come loose at some point. Check them all!
- CLEAN YOUR BIKE Yes that's right, clean it. Dirt and filth actually helps a bike to deteriorate. Take some lemon furniture polish and clean it nice. Your bike will thank you for it and you'll be looking good. It smells nice too!
Til next time, ride safe and Godspeed.
Gerry
Monday, March 12, 2007
ONE SERIOUSLY EXTREME BICYCLE

Ok, this has nothing to do with bike repair. But I find this so amazing that I have to share it with you. If you click on the image, you will see the most amazing bike ever. This thing is actually a bonafide rideable bike. It's 8 feet long, the weight is 90 lbs, it has a custom made aluminium frame, disc brakes and 8 speeds. It can actually climb hills. Nothing sucks more than having an awesome ride and having to push it up hills, not going to happen with this ride.
Anybody can build a cool looking bike, but can they actually ride it. This is where this thing is just amazing. You can ride this bike all day like any other bike, just don't mind everybody looking at you. I recently went myself inside the shop where Eric Hannan builds these bikes and I just couldn't believe it. The construction is amazing and they are very comfortable. They can even be taken apart in a few minutes and will fit inside a Honda Civic. Eric is just coming back from bike week in Daytona and he told me that his Choppers were a hit. This only shows that you can be cool and good to the environment at the same time. It demonstrates that anything is possible when you put your mind to it.
Now I'm sure you're wondering how much something like that cost. Well, it's in the neighbourhood of 5 grand. But some people shell out that kind of cash for a road racer that just looks like any other racer out there. You won't go unnoticed on this thing ever!
We are living in great times and I sense that the Custom Bicycle is about to come into it's own.
Check out the site at Hannan's Customs.
Til next time, ride safe and Godspeed
Gerry
Saturday, March 03, 2007
EMERGENCY WHEEL FIX

Pop quiz, you're riding down the road minding your own business when all of a sudden you crash and seriously bend a wheel on your faithful ride to the point that it looks like a taco. What do you do? Let's say that you have no tools, you're miles away from home, there is not a bike shop anywhere in site and no way to get a lift home. Supposing that you have survived the incident intact and you don't require ambulance transport, you're on foot and you need to get back home.
At this point, you have nothing to lose and everything to gain. Your wheel is busted and you'll have to replace it anyway. You can work the wheel roughly back into shape by putting it on a hard surface, place your feet on the raised side of the "taco" and with both feet, jump firmly on the wheel to press it down. It should come back into a rideable shape. Do some more spot presses if you have to. The idea of this maneuver is not to have a perfect wheel, you'll have to replace it anyways, but to bring it back to a decent shape so you can ride back home slowly. At this point, the wheel will do it's job, but it won't be balanced and safe. So avoid any serious speed, especially downhill.
Let's face it, the worst ride beats the best walk! In the images, I used a wheel without a tire. Wheels with a tire usually come back in pretty good shape if I refer to the few times that I actually had to do this. Don't kid yourselves after this, the rim and spokes are shot, so go to your local bike shop and get another wheel once you get home safely.
Til next time, ride safe and Godspeed.
Gerry
HOW TO REMOVE A BICYCLE WHEEL

This blog has covered a lot of fancy things like taking apart a bottom bracket, adjusting various components and building trailers. But I just recently realised that one of the basic things was never covered, like how to remove a bicycle wheel. For people like me who fix bikes it's pretty darn obvious, but I realise that for some of you it's not.
So let's get cracking! Removing a wheel is easy once you know a few things. The front wheel is the easiest to remove. Simply unbolt the nuts, pull the washers and you are done. The only thing to remember is to remove a brake pad to clear wide tires. Just one should suffice, it will avoid you the trouble of disconnecting the caliper and having to reajust it afterwards. Ajusting just one pad is much simpler. When you put the wheel back on, it is much better to have the bike and wheel sitting on the ground. This way you will be certain that the axle is sitting even in the fork and the wheel won't be crooked. Another way to find out if your wheel is on straight is to look and see if the center thread of the tire is aligned with the caliper hole in the fork.
The rear wheel is another story. Depending on what type of bike you have, there are some things you have to know before removing the wheel. Let's check it out one type at a time.
- One speed coaster brake First thing to do is to remove the bolt that holds the brake arm to the bracket on the frame. Then untighten the wheel nuts, wiggle the wheel to slacken the chain and remove the wheel. When putting the wheel back on, make sure the brake arm is aligned with the bracket and put the chain back on the gear before.
- 3 speed or more internal gears Disconnect the cable to the hub mechanism before you do anything. Do the same thing as the coaster hub wheel to remove and reinstall it.
- Multi speed derailleur Make sure that the chain sits on the last gear closest to the frame. Unbolt the wheel and push it forward while pulling on the derailleur cage. The wheel should slide right off. When reinstalling it, put the chain on the last gear again, pull the derailleur cage and slide the wheel back in place.
That's it, you're done.
Til next time, ride safe and Godspeed.
Gerry
Saturday, February 10, 2007
HOW TO CONVERT A VINTAGE BICYCLE HEADLIGHT TO A WHITE LED TAKE 2!


I recently did a post about converting a vintage bike headlight with a white LED. My feeble attempt at electrical work was just that, feeble. I guess I should never talk again about wiring stuff together since my knowlege of anything electrical is not that great. You are reading a guy who once long ago put a Swiss Army knife to a live electrical panel to unscrew some wires...POW! The fact that I'm writing these lines proves that I am alive and well in spite of this incident and that there is a God for idiots.
Fast forward to a couple of days ago. I am browsing inside my favorite Dollar store and came across some LED reading lamps. I figure, as we all do, man for a buck what do I have to lose. So I bought one to see if this set up would be easier to incorporate inside a vintage headlight. It was even easier than I tought. The diameter of the lamp is almost the same as the socket inside the headlight. Here's how I did it:
1- Get all the stuff you need together:
Vintage Headlight
LED reading lamp
Tape (In this case hockey tape, I'm from Canada what do you expect?)
a pair of cutters
2- Remove the light and holder from the headlight socket, remove the clip and cut the holding arm off the LED
3- If necessary, put some tape around the LED to have a perfect fit in the socket.
4- Insert the LED lamp in the socket
5- Secure the LED lamp by taping it to the prongs of the headlight.
6- Push away or remove any brackets inside the headlight to make space for the LED. Click the LED on and close the assembly and your done.
The only disadvantage about this set up is that you have to open and close the light assembly to get access to the switch, but the price is right. These LED lamps could probably be used on there own or for position lights. If any of you make something special with these, don't hesitate to let me know.
Til then, ride safe and Godspeed.
Gerry
Wednesday, February 07, 2007
AUTOPSY OF A CHEAP HUFFY BEACH CRUISER BICYCLE


I've always loved the beach cruiser cantilever frame. I've built 2 such bikes in my lifetime so far and my recent interest in rat rod bikes has brought me full circle and I am totally hooked. Last week in the dead of winter I stumbled upon this red Huffy cruiser in our local kijiji site and couldn't believe my luck. The price was right($85) and the mere fact of finding one around here was amazing.
So I brought my new baby home and decided to start the transformation right away by removing stuff that I didn't want like the fenders. The removal of the fenders required that I take off the wheels to get to the fender bolts. While I took off the front wheel I heard the distinct sound of dry bearings in the headset assembly. Now this bike is very recent and to my knowledge has never been serviced and it should have some factory grease left in it...NOT! Those headset bearings were bone dry. I just couldn't believe it. I figured that the bottom bracket bearings might be in the same shape and I wasn't wrong, bone dry as well. It's not a matter of the bearings running out of grease, the grease was never present in the first place at all.
Now I know most of you are thinking, "what do you expect, this is a cheap bike" and I agree. But, I've worked on cheap bikes before from Canadian to Hungarian communist era made bikes and this as just never happened. There was always some grease left!
Low end mega store bikes don't have the best components and that is a given to most of us, but the basics must be there. Would you ever buy a car without oil in it? I don't think so. Grease is a fundamental element in your bike. Apart from protecting those bearings from wear, it also provides you with a better ride by reducing resistance on all those moving parts. A well greased bike will always be easier to pedal than one who isn't.
This is a prime example of why you should spend the extra bucks at a local bike shop. The quality of the bikes is better and I would be very surprised that such a situation would occur. Now this thing is just a cruiser and is used for riding around the neighbourhood, but they also sell mountain bikes. I'll let your mind paint THAT picture!
So for my taste, this bike is just a blank canvas for a custom ride. I've already changed the no bearing cheap plastic pedals for real ones and I will also change the front wheel hub in the near future. I will also push the "no grease" investigation to the rear wheel coaster hub. I have to be careful since these things tend to commit suicide on me when I open them up. Yes, I will post about it even if I fail so you can all learn either how to or how not to do it.
If you haven't gone tru this entire blog yet and want to know how to take apart a one piece crank bottom bracket, check here for the fork headset, check here
Simply pack everything with green axle grease and reassemble.
Til next time, ride safe and Godspeed.
Gerry
Tuesday, January 30, 2007
WHITE LED VINTAGE BICYCLE HEADLIGHT HOW-TO


Last summer I recycled a Sylvania LED light puck and a vintage headlight for my cruiser by taken it apart and jamming it in there. It works great and battery life is truly not an issue. I didn't document it because I figured that the puck at $10 was too expensive and the job was just too complicated. That's apart from the fact that it was a real crappy job and by some miracle it is still working to this day.
Then I came across those white LED keychains for $1. Now that's very affordable and they work off of 2 small 3V batteries cells. Now I'm no electrical engineer and what I'm about to present may not be a good set up, proof of the matter is I almost set this thing on fire while building it! So if any of you have additionnal info regarding resistors and such, please feel free to illuminate our lantern and post a comment about it. The pun was totally intended. :)
So here's how I did it. First, take that keychain light apart and retain the white LED. everything else you can toss away. You can keep those 3V cells for another project.
Second, get yourself a 4 AAA battery holder to get the 6 volts required to run that LED, a small switch and some wires. Don't forget the 4 AAA batteries. Wire it all up and make sure it works.
Third, take the bulbs and side connector of the headlight out. The switch screws right into the empty hole left by the connector on the headlight, no need to drill. Lose whatever wiring is left in there. Keep the brass clamps to hold your battery pack in place later.
Fourth, you'll need to plug the upper bulb hole with something shiny like chromed tape so you don't lose any reflective surface. Make a plug out of cardboard or anything else that will press fit the LED in it and the plug into the main bulb hole. If you need to use glue here, do not use superglue, it will fog up your lens and LED for ever. Use white glue, it has a strong bond when dry and it becomes clear when dry. Test everything again, close it up and install on your bike.
Those batteries should last a very long time. Now all you need is an LED red flashing light in the back and you can go night cruising without worrying about losing power to those vital lights. Remember, your main obejective is to be seen. Those white LED's do not go unnoticed, trust me.
Till next time, ride safe and Godspeed.
Gerry
Sunday, January 21, 2007
HOMEBUILT BICYCLE CHOPPER PART 3, REDOING THE BANANA SEAT AND MAKING A SUICIDE SHIFTER


I always wanted a bike with a suicide shifter. It was pretty easy to make. I took a seat tube from a women's frame and cut it. I gave it a slight bend at the bottom. I flattened the end that would bolt to the bracket. I didn't flatten it all the way, you need a little space left so you can slide in the cable and have it move freely to operate. I drilled a hole for the cable and then I made two cuts on the arm to be able to install the cable and then for it to work. I made another hole for the nut and bolt assembly. A nylon washer was installed between the shifter arm and the bracket to allow some movement. I finished it off with a knife handle from a toy knife bought at the dollar store for a buck. That's how much money I have put into this project so far, one dollar!
My attention was then brought to the seat. I did a crappy job of redoing it some years ago and I was more than willing to screw it up again. I don't really mind since all I want is for it to be comfy and not look half bad. The fabric used was an old black t-shirt. I separated the two seat pans, cut a piece of high density foam to size, sprayed adhesive on the pan, installed the foam on the pan. I then sprayed everything that was going to touch the fabric with that stuff and stretched it on. I then cut away the excess fabric and rejoined both pans together. A word of caution, those tabs are not made to be flexed back and forth too many times. Be careful or they will snap off and you won't be able to reconnect the pans. Well, I'm not about to put leather on a Boyd Coddington car anytime soon, but it's clean and it didn't cost me anything.
So go get your hands dirty and have some fun.
Til next time, ride safe and Godspeed.
Gerry
Subscribe to:
Posts (Atom)


